PTI CRM

PTI CRM Documentation

Comprehensive User Guide • Field Sales, Multi-Warehouse Inventory, Orders, Customers & System Settings

Watch Video Tutorial Switch to Apartment MS Launch PTI CRM
System Walkthrough

Watch Video Tutorial

Comprehensive visual walkthrough demonstration covering system authentication, warehouse configuration, company linking, user creation, catalog taxonomy, purchase order workflows, draft product publishing, order lifecycles, and HRM field operations.

Recorded Demo • ptic-crm.webm
Authentication

Login & Portal Access

Sign in to the centralized PTI CRM web portal. The system provides secure role-aware authentication for Super Administrators, Branch Managers, Accounts Auditors, and Field Sales Representatives.
Portal Access Details
Open Portal
Portal URL
https://pticrm.com/
Login Identifier
Registered Email or Mobile Number
Security
Password + OTP Two-Factor Verification
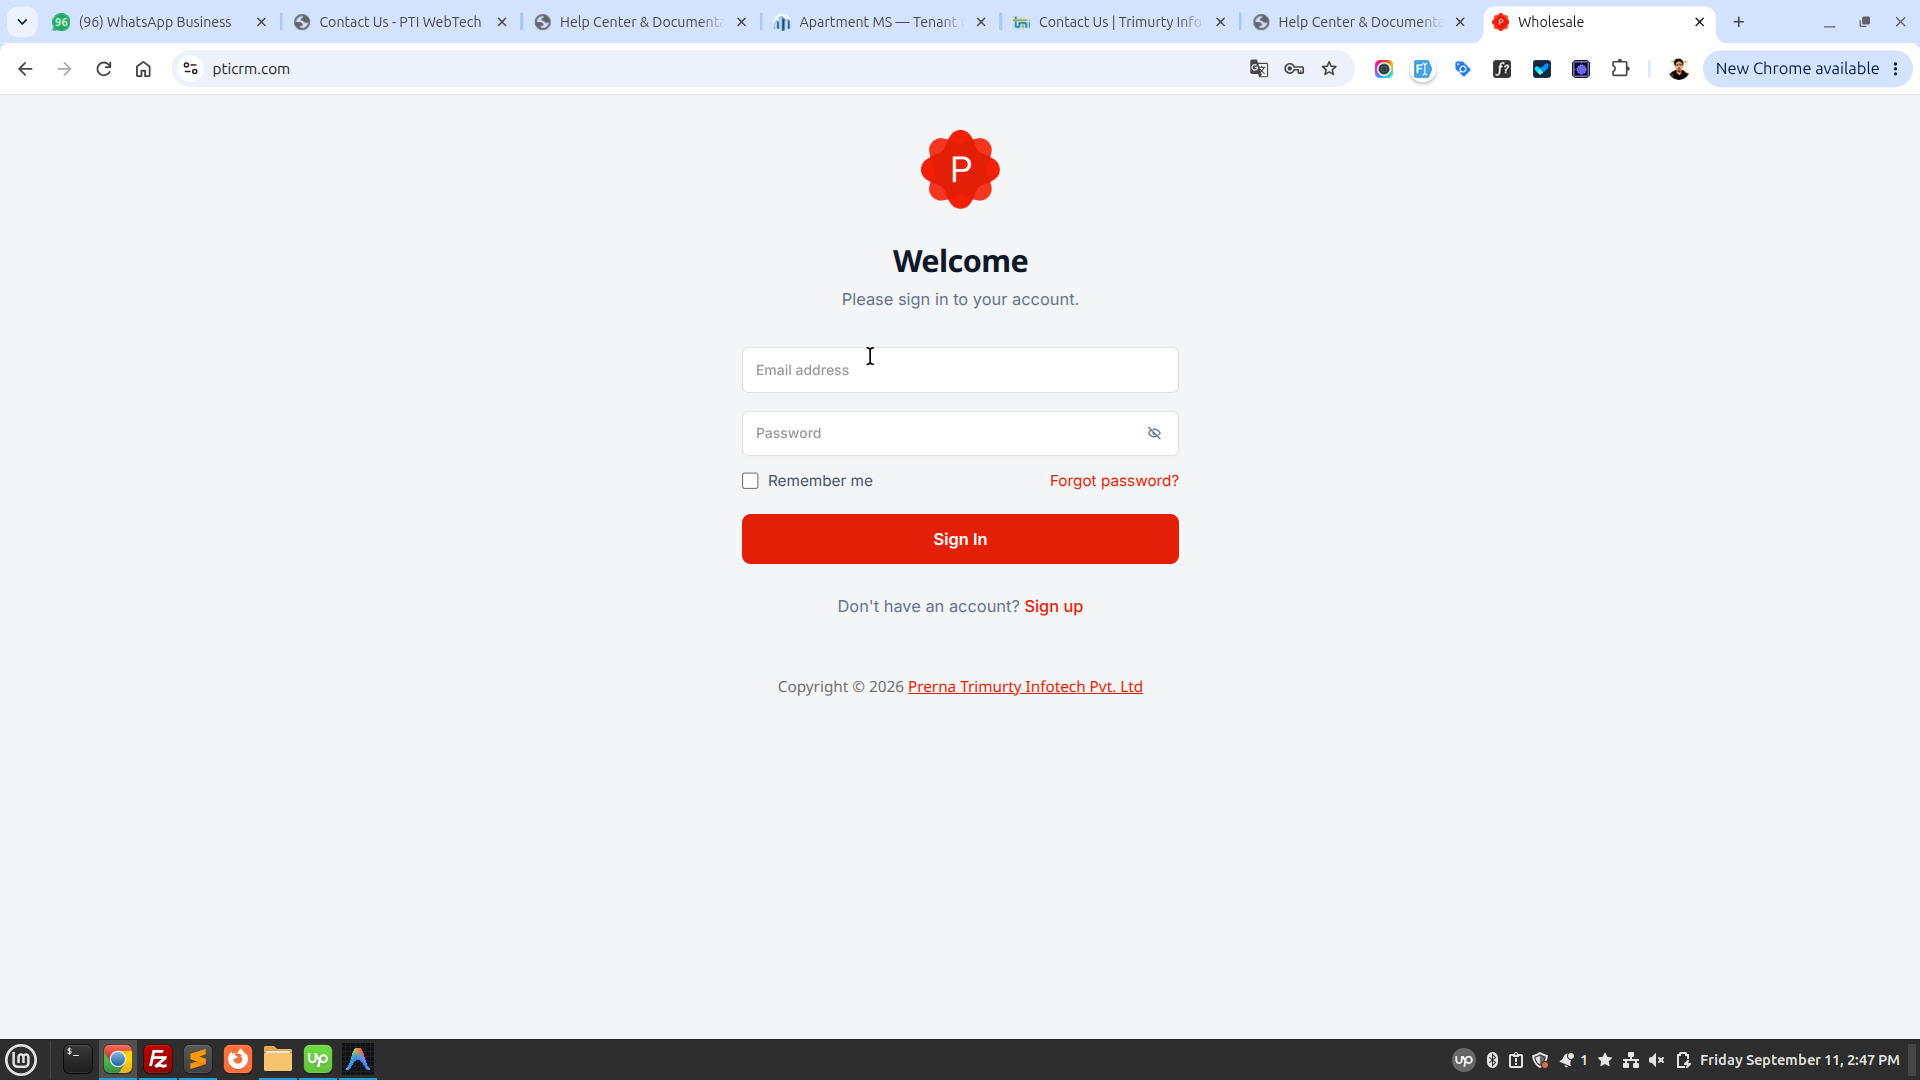
PTI CRM — Sign In Interface
https://pticrm.com/login
PTI CRM Login Interface
Figure 0.1: Sign In screen with secure email/phone input, password visibility toggle, and credentials recovery. Live Interface

Login Steps

  1. Enter Registered Credentials

    Open the PTI CRM portal and provide your registered email address or official mobile number, followed by your confidential account password.

  2. Remember Device & Sign In

    Optionally check "Remember Me" on trusted personal workstations for expedited future logins. Click the primary Sign In button.

  3. Password Recovery

    If you forgot your password, click the "Forgot Password?" prompt to receive a secure password reset link via your registered email.

Two-Factor Security

Verify Email and Phone by OTP

To ensure zero unauthorized access to sensitive company data, field sales records, and financial ledgers, PTI CRM enforces dual-channel OTP verification during authentication and initial account activation.
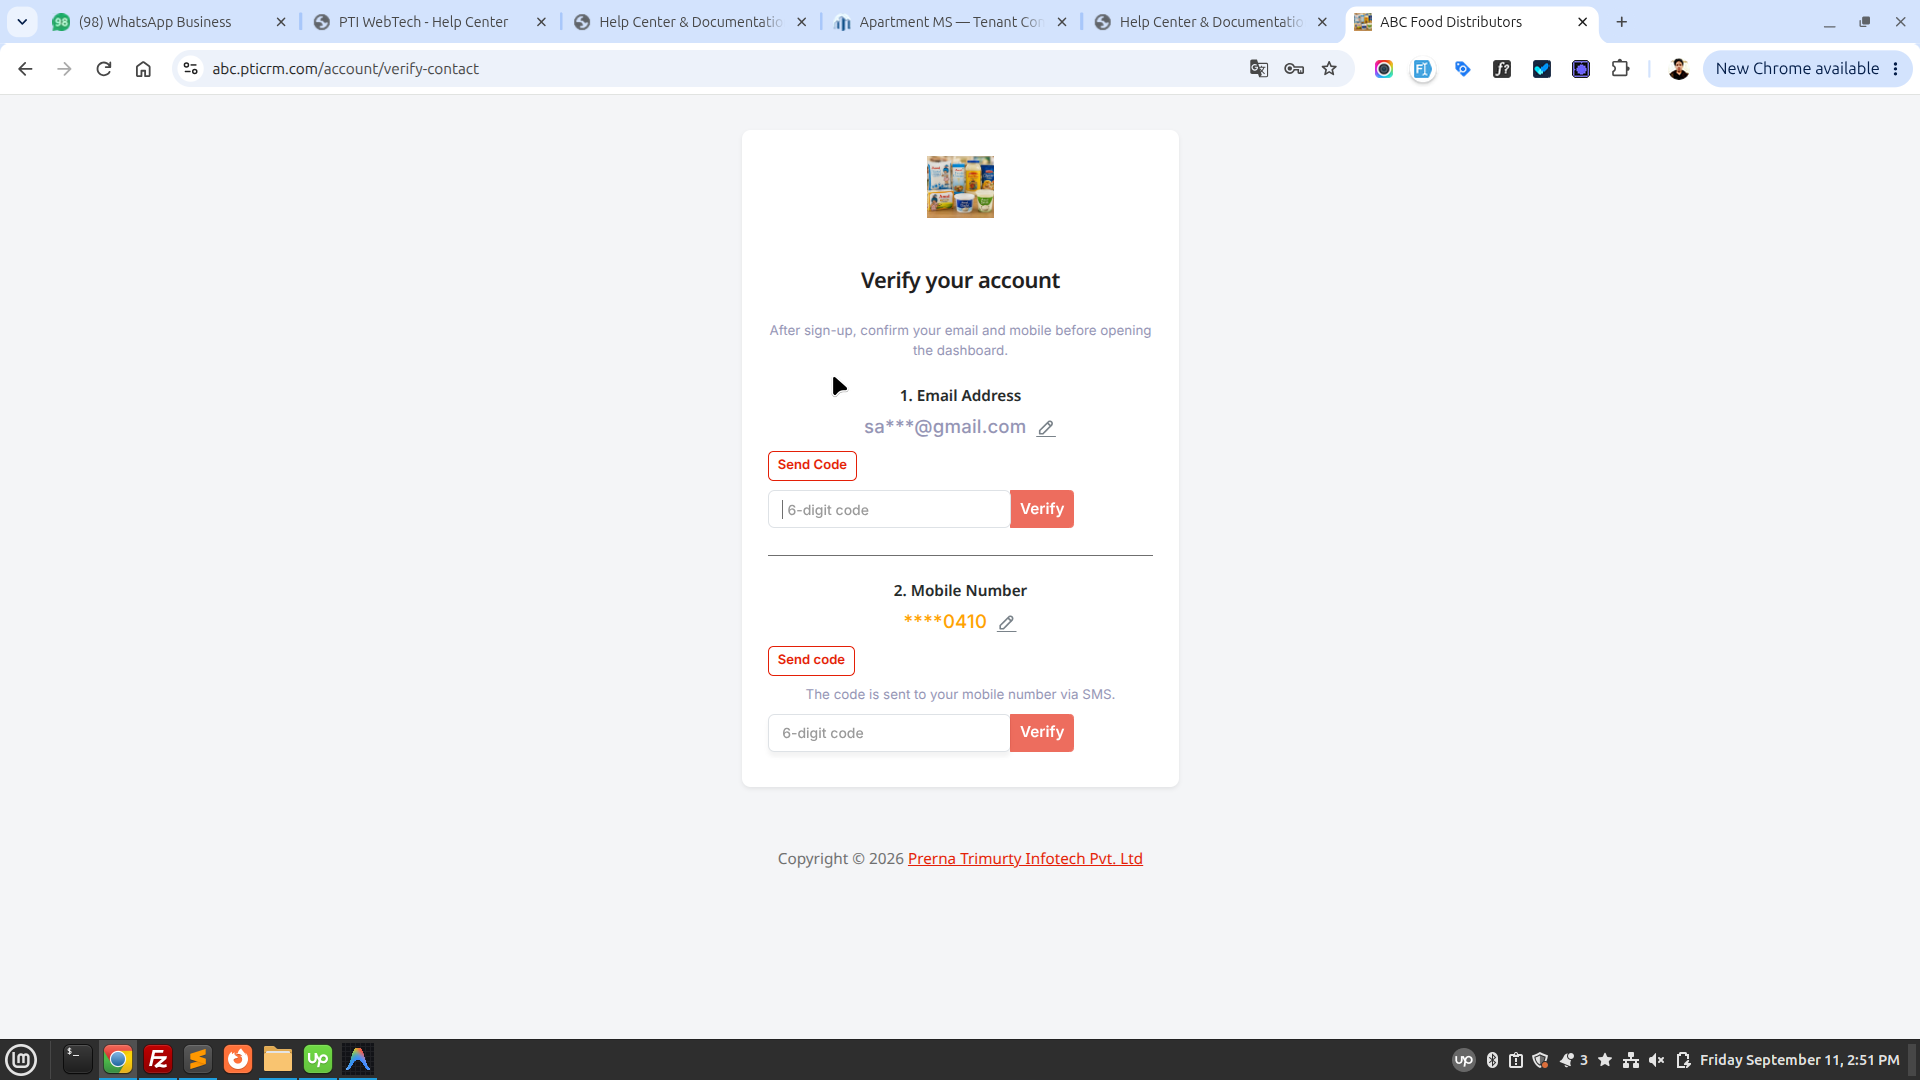
PTI CRM — Email & Phone OTP Verification
https://pticrm.com/verify-otp
PTI CRM Email and Phone OTP Verification Screen
Figure 0.2: Multi-channel OTP verification portal for mobile phone SMS and email confirmation. Live Interface

OTP Verification Workflow

  1. Receive 6-Digit One-Time Passcodes

    Upon successful initial credential validation, the system dispatches time-sensitive 6-digit OTP codes to both your registered mobile number (via SMS gateway) and email inbox.

  2. Enter Verification Codes

    Type the received digit code into the respective verification fields on the screen. The interface automatically shifts focus between input boxes for effortless entry.

  3. Resend Timer & Fallback

    If you do not receive the SMS or email within 60 seconds, click the active "Resend OTP" link to trigger a fresh delivery attempt via alternate gateway channels.

  4. Successful Session Authorization

    Once verified, your browser session is granted secure authenticated access and redirected immediately to your role-designated dashboard.

Inventory Infrastructure

1. Warehouses — Create New Warehouses

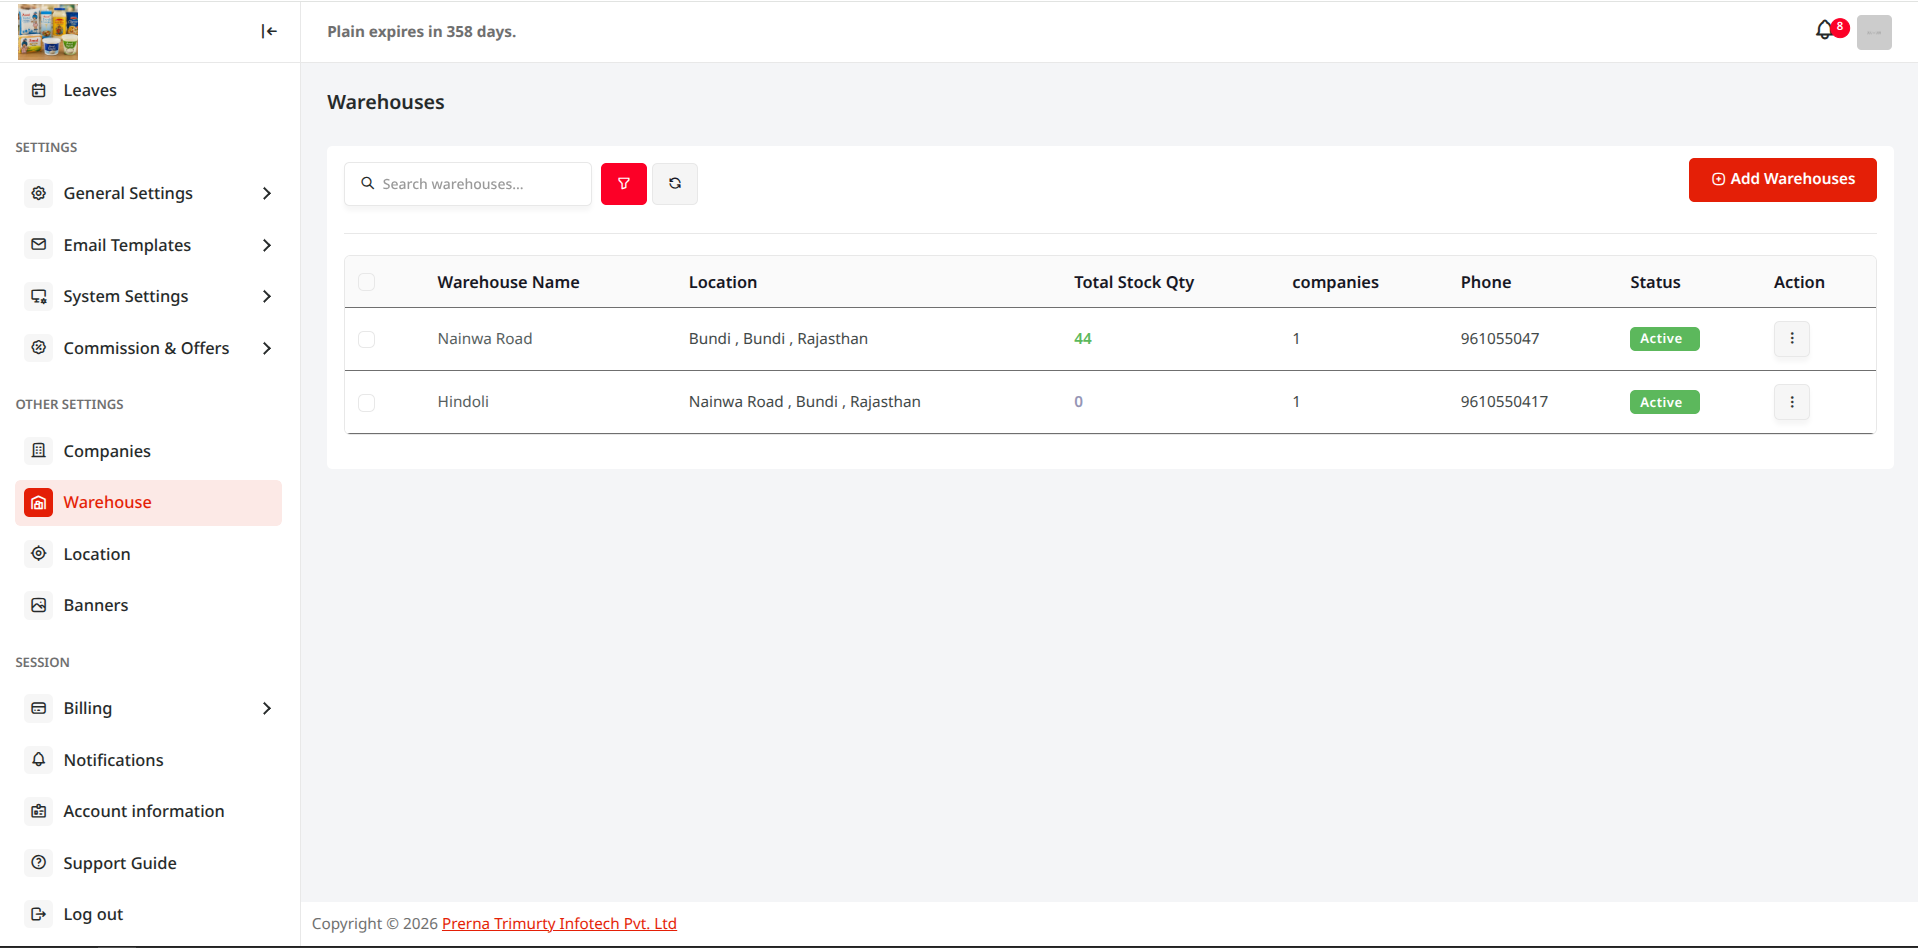
Warehouses represent your physical stock holding locations, central fulfillment hubs, regional transit depots, and distribution centers. Set up distinct warehouses to isolate inventory ledgers, track transfers, and assign fulfillment routing.
PTI CRM — Warehouses Management Directory
https://pticrm.com/warehouses
PTI CRM Warehouses Directory
Figure 1.1: Central Warehouses directory showing active warehouse locations, contact details, status toggles, and search filters. Live Interface
PTI CRM — Add New Warehouse Modal
https://pticrm.com/warehouses/create
PTI CRM Add New Warehouse Screen
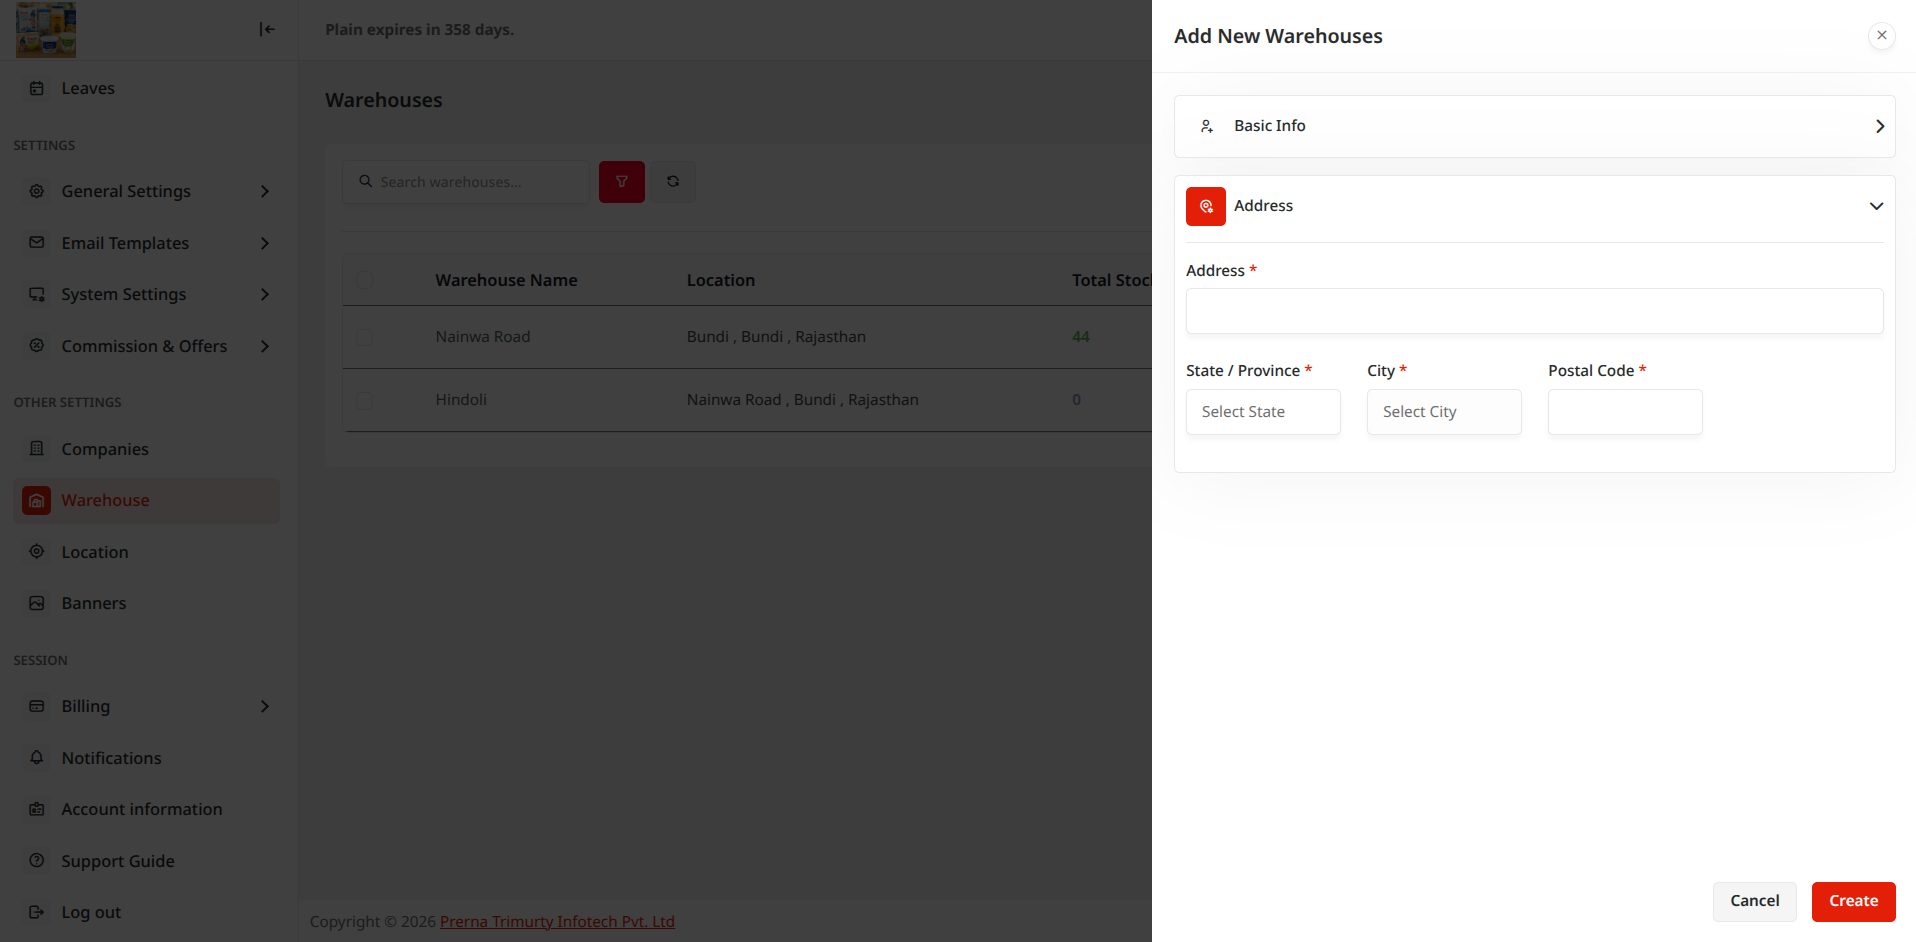
Figure 1.2: Add New Warehouse form with name, email, contact phone, full street address, city, state, pincode, and operational status. Live Interface

Step-by-Step: Creating a New Warehouse

  1. Step 1: Navigate to Warehouses

    From the left navigation sidebar under Settings / Other Settings or the main navigation menu, click on Warehouses (`/warehouses`).

  2. Step 2: Click the "Add Warehouse" Button

    On the top right of the Warehouses table, click the primary Add Warehouse or Add New Warehouse button to launch the creation modal.

  3. Step 3: Enter Warehouse Information

    Fill in the required warehouse parameters:

    • Warehouse Name *: Enter the full identifier name (e.g., Central Distribution Depot - Hub 1).
    • Email Address: Official dispatch or depot manager email for inventory alert notifications.
    • Phone Number: Contact number for warehouse supervisor.
    • Street Address & Location: Physical street address of the storage facility.
    • City, State & Pincode: Geographic classification for automated freight calculations and zone mapping.
    • Status: Toggle status as Active.
  4. Step 4: Save & Activate Warehouse

    Click Save Warehouse. The new facility will immediately appear in the master warehouse list and become selectable across company assignments, purchase orders, and stock transfers.

Multi-Entity Architecture

2. Companies — Assign Warehouses to Company

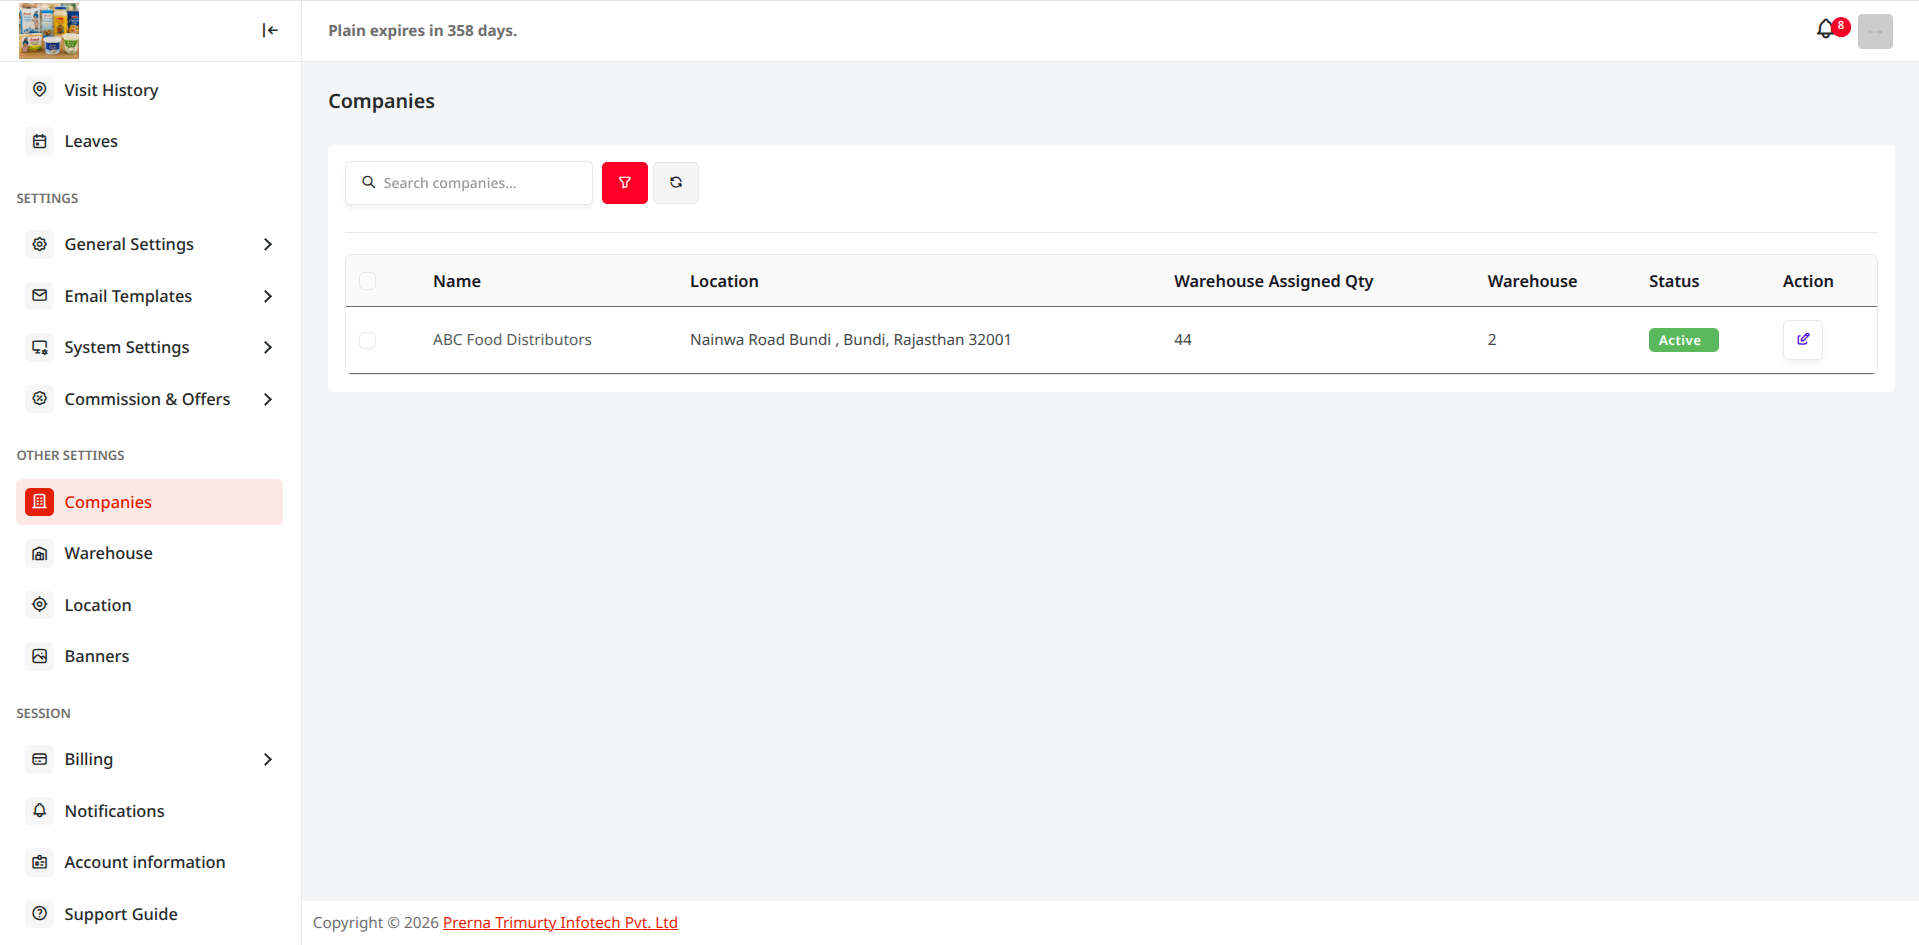
PTI CRM supports multi-company and subsidiary architectures. Once warehouses are created in the master pool, they must be linked to specific Companies so sales agents and operations staff can fulfill orders and manage inventory under that corporate entity.
PTI CRM — Companies Master Directory
https://pticrm.com/companies
PTI CRM Companies Directory
Figure 2.1: Master Companies directory displaying active corporate entities, registration identifiers, and warehouse counts. Live Interface
PTI CRM — Search Warehouses & Add To Company
https://pticrm.com/companies/manage-warehouses
PTI CRM Search Warehouses and Add to Company
Figure 2.2: Company Warehouse association: Type in the 'Search Warehouses' box, select the suggested warehouse from autocomplete, and click 'Add To Company'. Live Interface
PTI CRM — Company Details & Assigned Warehouses View
https://pticrm.com/companies/view/abc-food-distributors
PTI CRM Company Details & Assigned Warehouses View
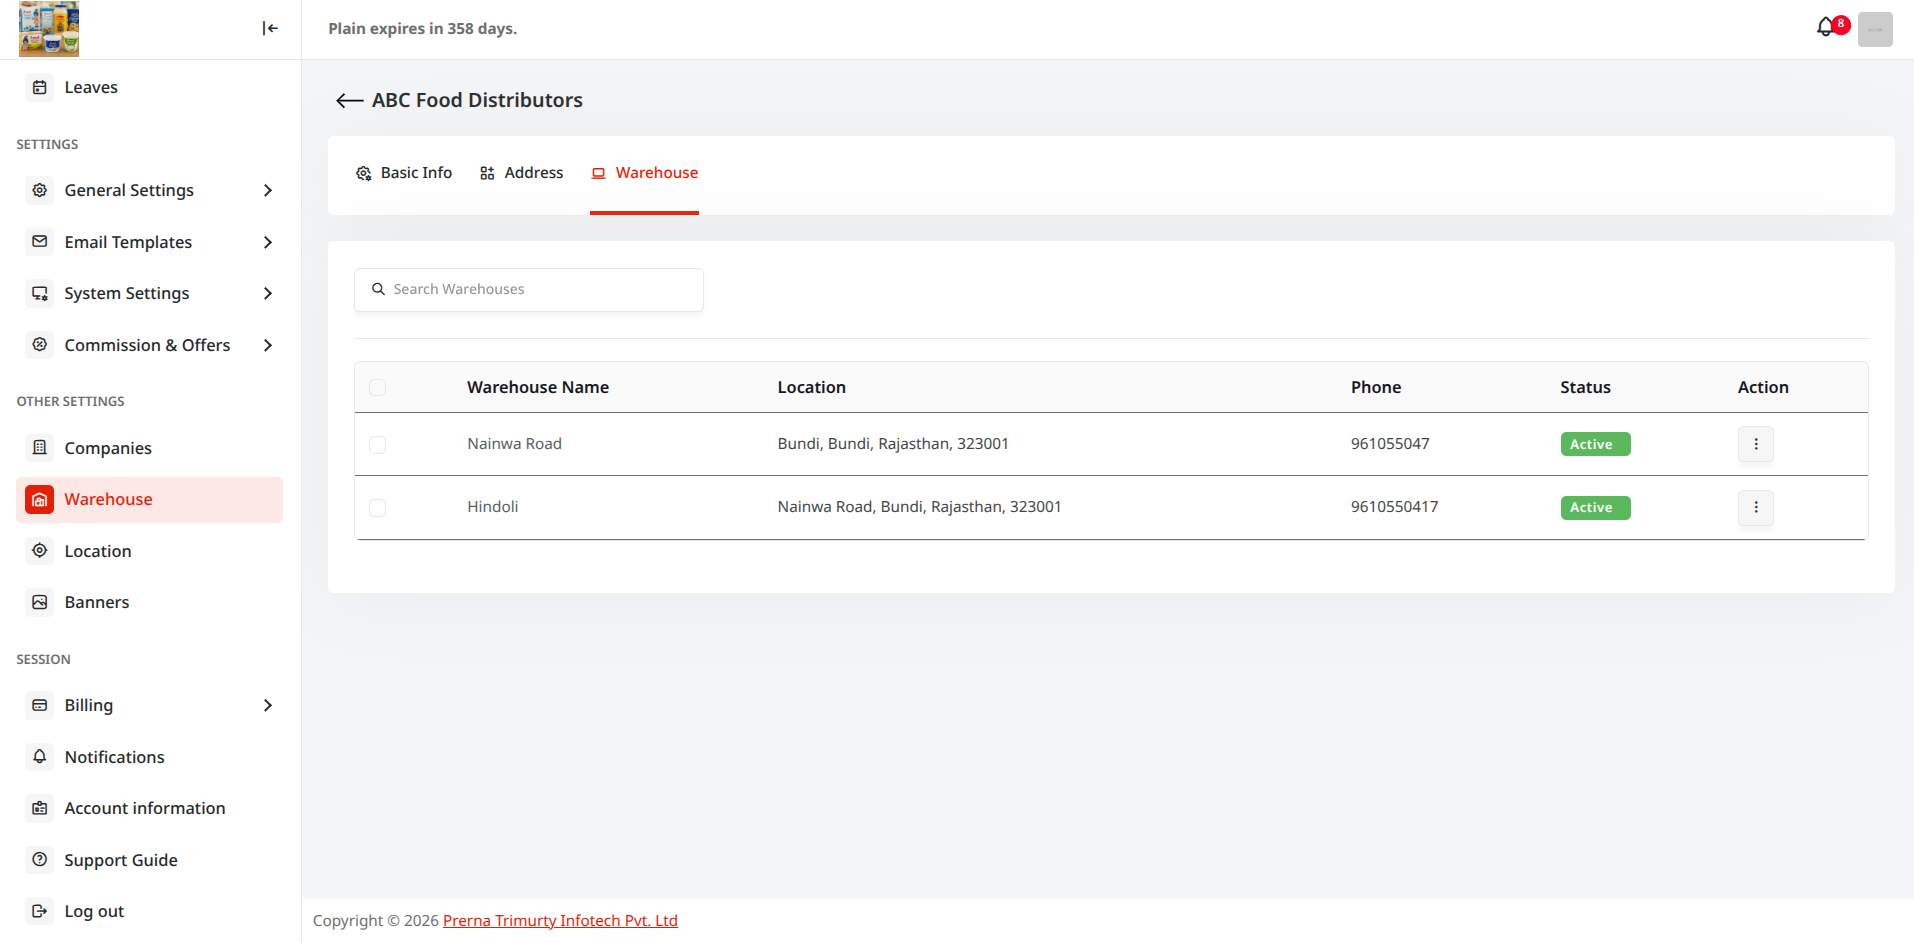
Figure 2.3: Detailed view of company entity (e.g. ABC Food Distributors) showing assigned warehouses, staff allocations, and operational zones. Live Interface

Step-by-Step: Linking Warehouses to a Company

  1. Step 1: Open Companies Directory

    Navigate to Companies (`/companies`) from the sidebar menu to view your registered business entities.

  2. Step 2: Select the Target Company

    Locate the desired company (e.g., ABC Food Distributors) and click on Manage Warehouses or open the company profile edit view.

  3. Step 3: Click the "Search Warehouses" Box

    In the Warehouse association panel, click inside the Search Warehouses input field.

  4. Step 4: Type Warehouse Name & Select Suggestion

    Type the name of the warehouse you created in Step 1. The intelligent autocomplete dropdown will immediately display matching warehouse depots. Click to select the appropriate suggestion.

  5. Step 5: Click "Add To Company"

    Click the primary Add To Company button. The selected warehouse is linked to this company, enabling catalog inventory pooling and sales fulfillment under this company profile.

User & Field Workforce

3. Sales Person — Manage Users & Create New User

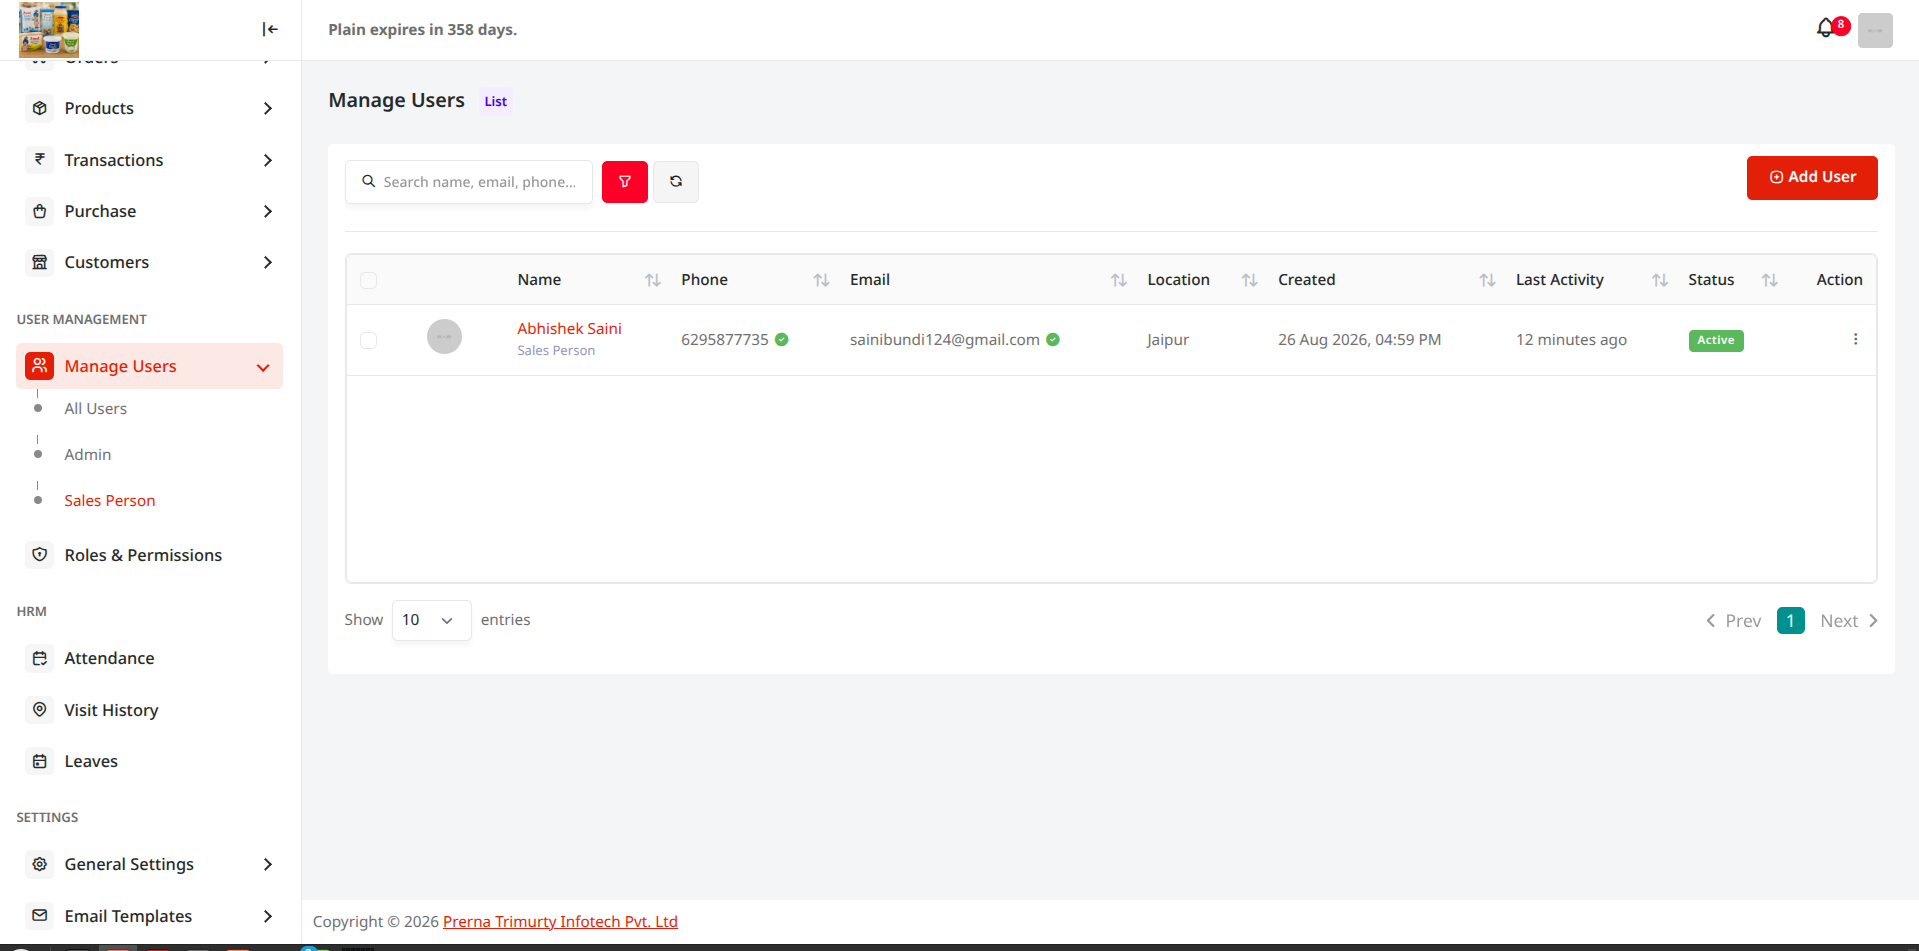
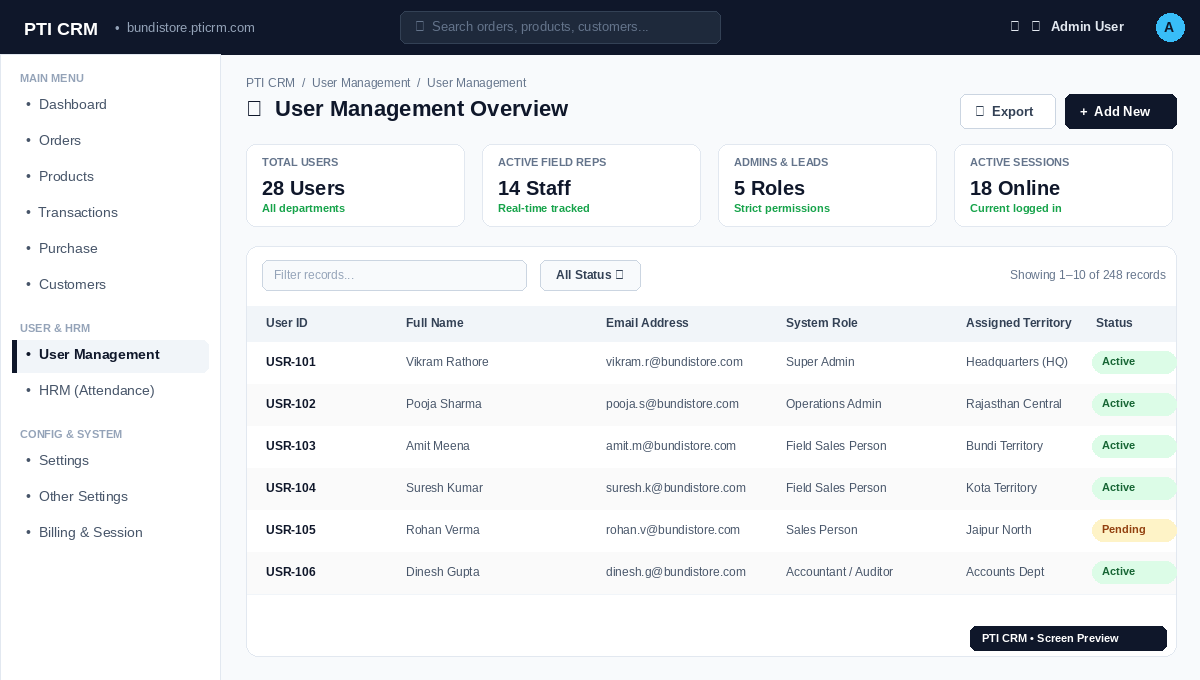
Manage your internal staff profiles, sales workforce, and administrators. Creating a dedicated Sales Person account enables field sales executives to record customer visits, punch GPS attendance, submit draft orders, and access assigned catalog price lists.
PTI CRM — Manage Users Directory
https://pticrm.com/users
PTI CRM Manage Users Directory
Figure 3.1: Manage Users dashboard with quick search, role filters, active status badges, and 'Add New User' action. Live Interface
PTI CRM — Add New User & Role Assignment
https://pticrm.com/users/create
PTI CRM Add New User and Role Assignment
Figure 3.2: User registration form: Enter profile credentials, assign company & branch, and select system role as Sales Person. Live Interface

Step-by-Step: Creating a Sales Person Account

  1. Step 1: Open Manage Users

    From the left sidebar under User Management, click on Manage Users (`/users`).

  2. Step 2: Click "Add New User"

    Click the primary Add New User button located at the top-right of the user directory.

  3. Step 3: Enter User Details

    Complete the user setup form with the representative's official information:

    • Full Name *: First and last name of the sales representative.
    • Email Address *: Official email address used for login and notifications.
    • Mobile Number *: Contact phone number used for SMS OTP verification and WhatsApp dispatches.
    • Associated Company *: Select the company entity created in Step 2.
    • Role Selection *: Choose Sales Person from the Role dropdown menu.
    • Password & Confirm Password: Assign a strong temporary password (user will be prompted to reset upon first login).
    • Territory / Zone: Optionally assign geographic sales beats or customer territories.
    • Status: Ensure status is set to Active.
  4. Step 4: Save & Dispatch Login Credentials

    Click Save User. The system provisions the account immediately, granting the representative secure access to the PTI CRM mobile app and web portal.

Catalog Management

4. Products — Taxonomy, Units & Add Product

Before creating products, organize your product taxonomy hierarchy. Set up Categories, Sub Categories, Brands, dynamic Attributes, and Unit Settings, followed by complete product creation with warehouse stock assignments.

Product Master Hierarchy & Master Setup

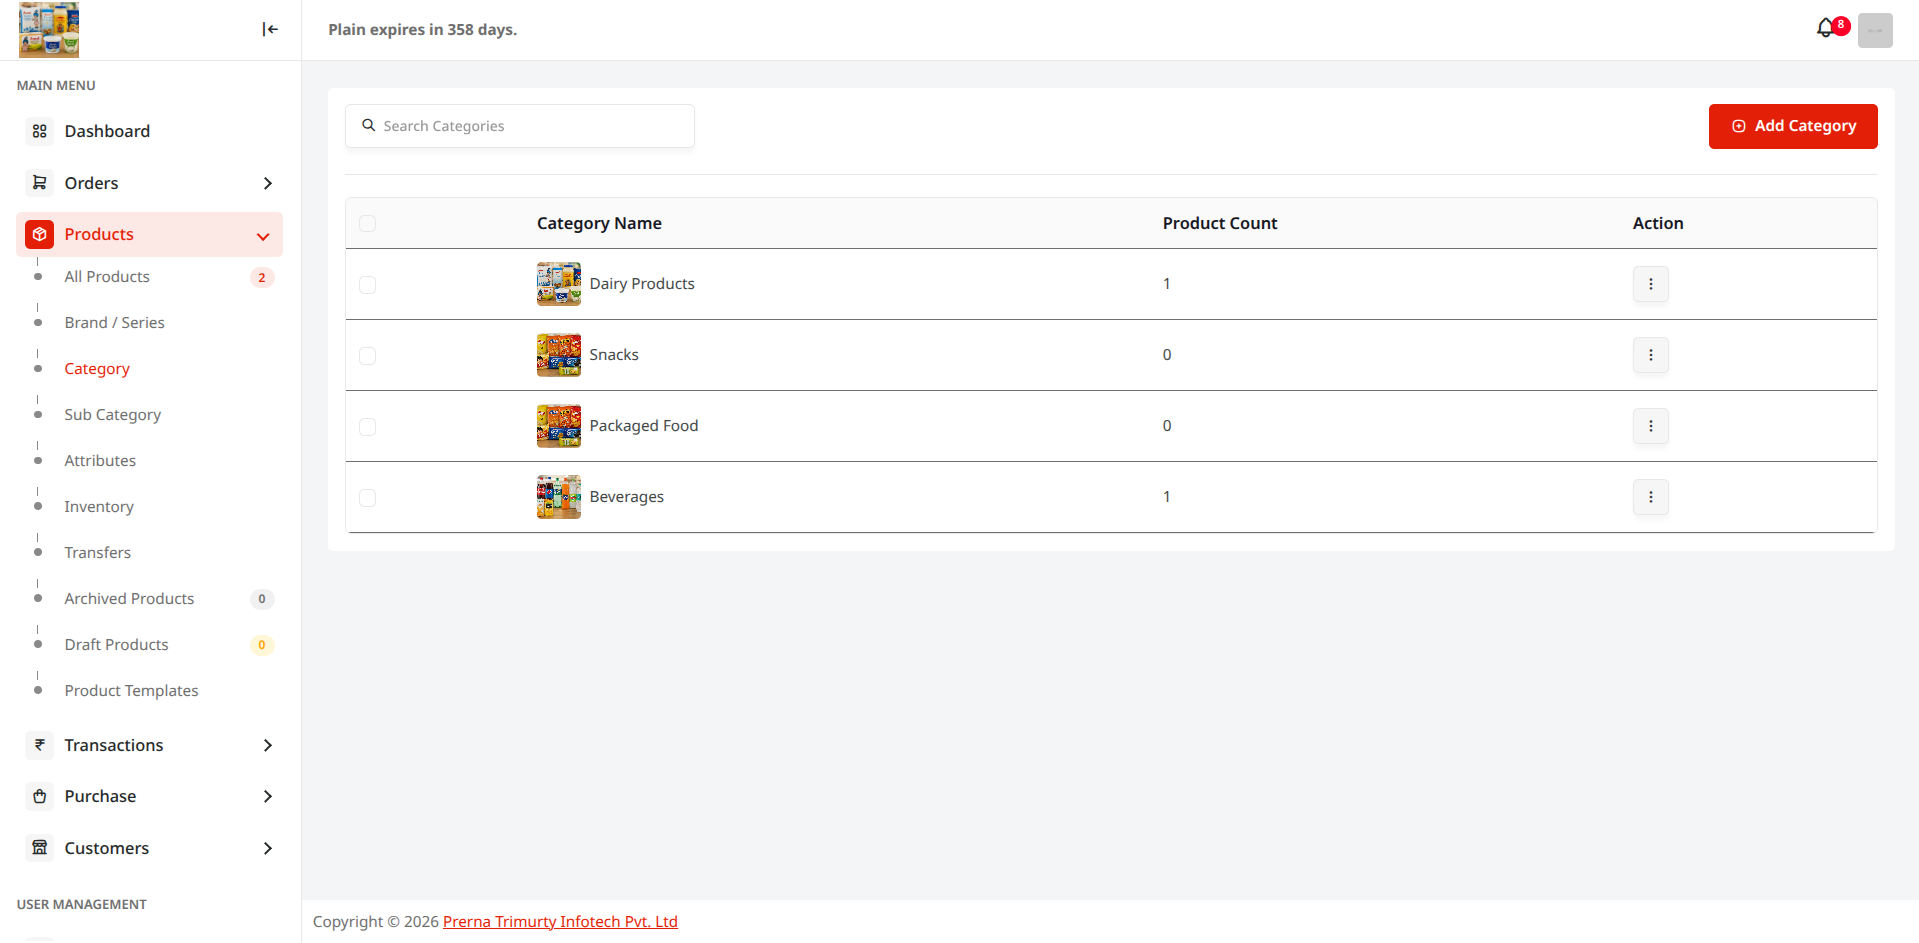
A. Category (/categories)

Top-level classification for catalog browsing (e.g., Groceries, Spices, Dairy, Packaging).
PTI CRM Categories
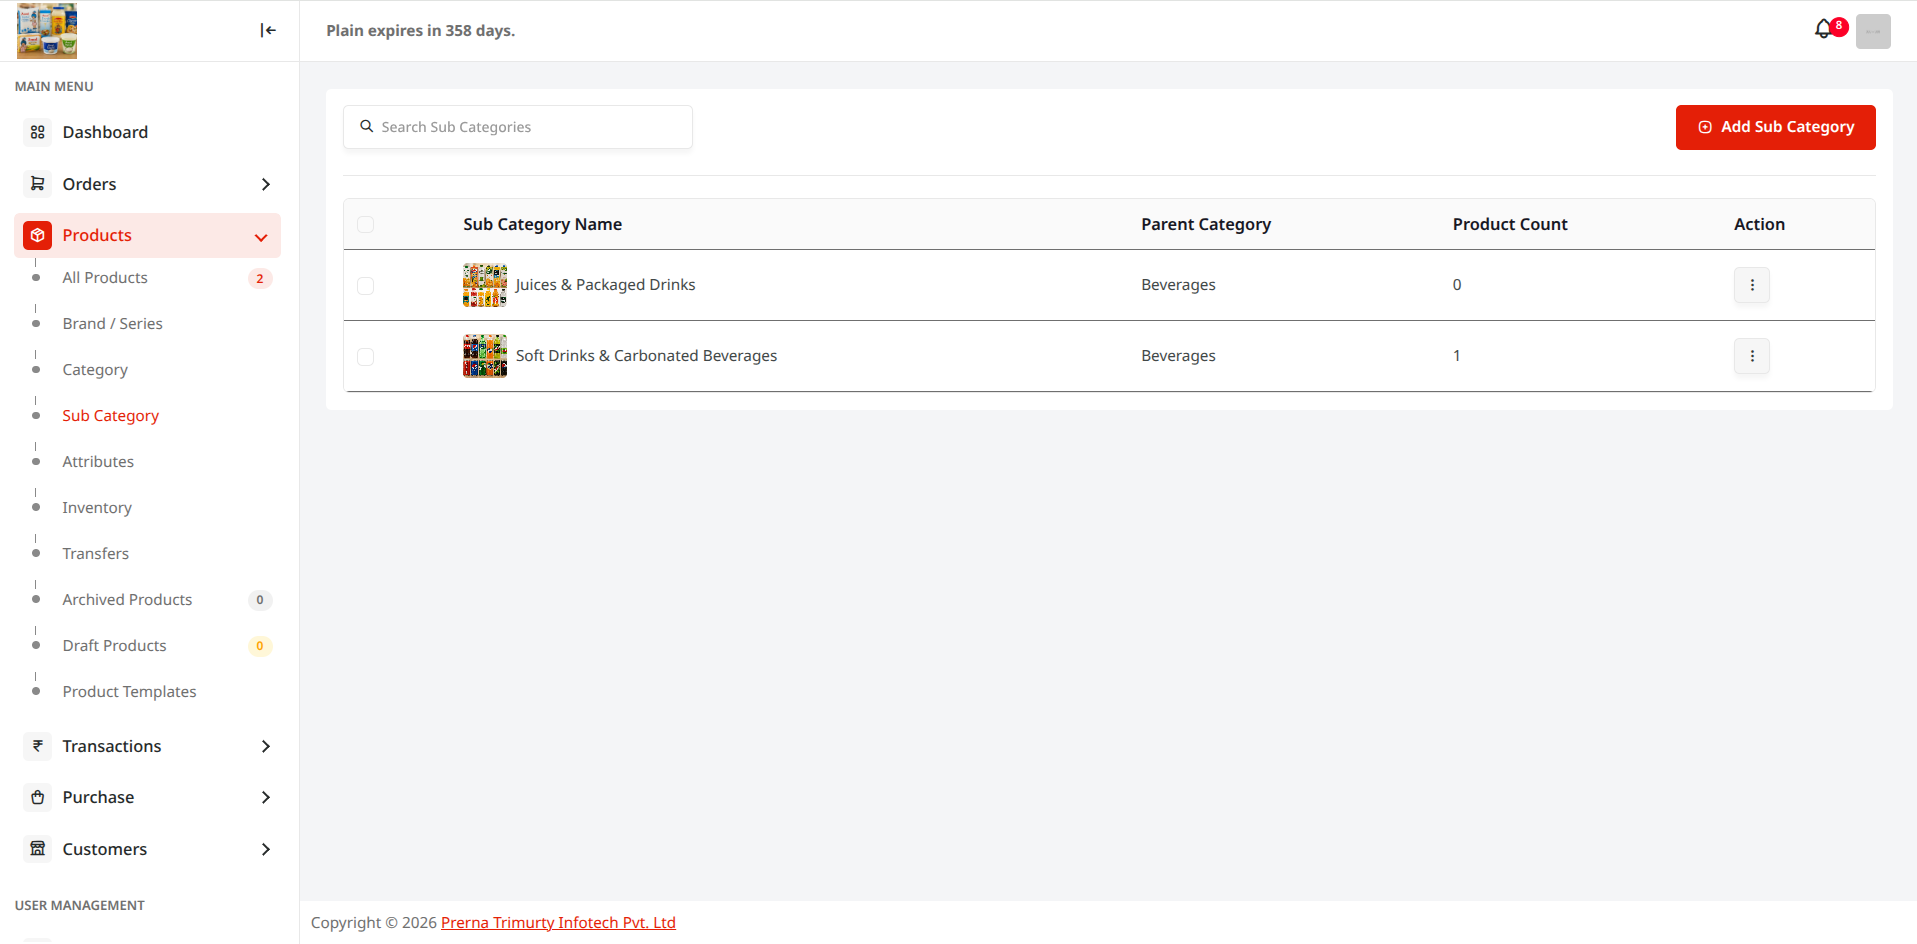
B. Sub Category (/sub-categories)

Second-tier classification mapped directly to a parent category (e.g., Whole Spices, Ground Powders).
PTI CRM Sub Categories
C. Brand (/brand)

Brand manufacturer and OEM trade names with brand logos and origin details.
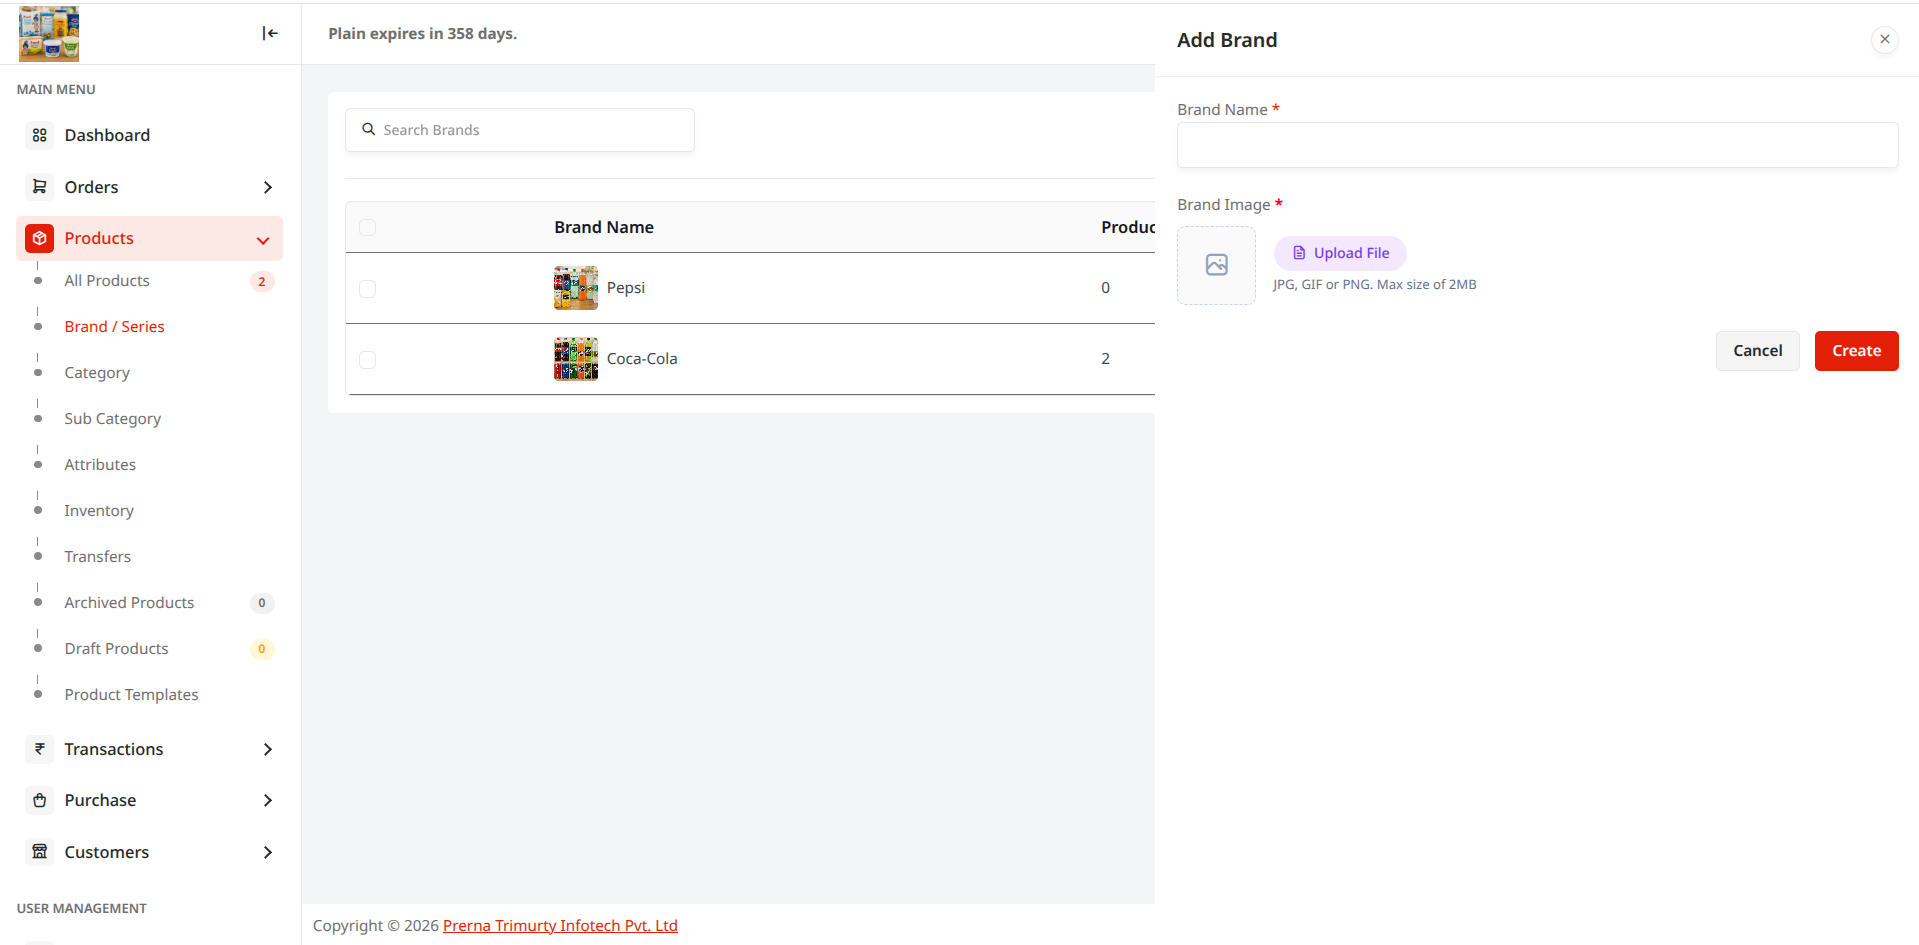
PTI CRM Brands
D. Attribute (/attributes)

Custom variant dimensions (e.g. Pack Size, Weight, Color, Volume) for variable multi-SKU products.
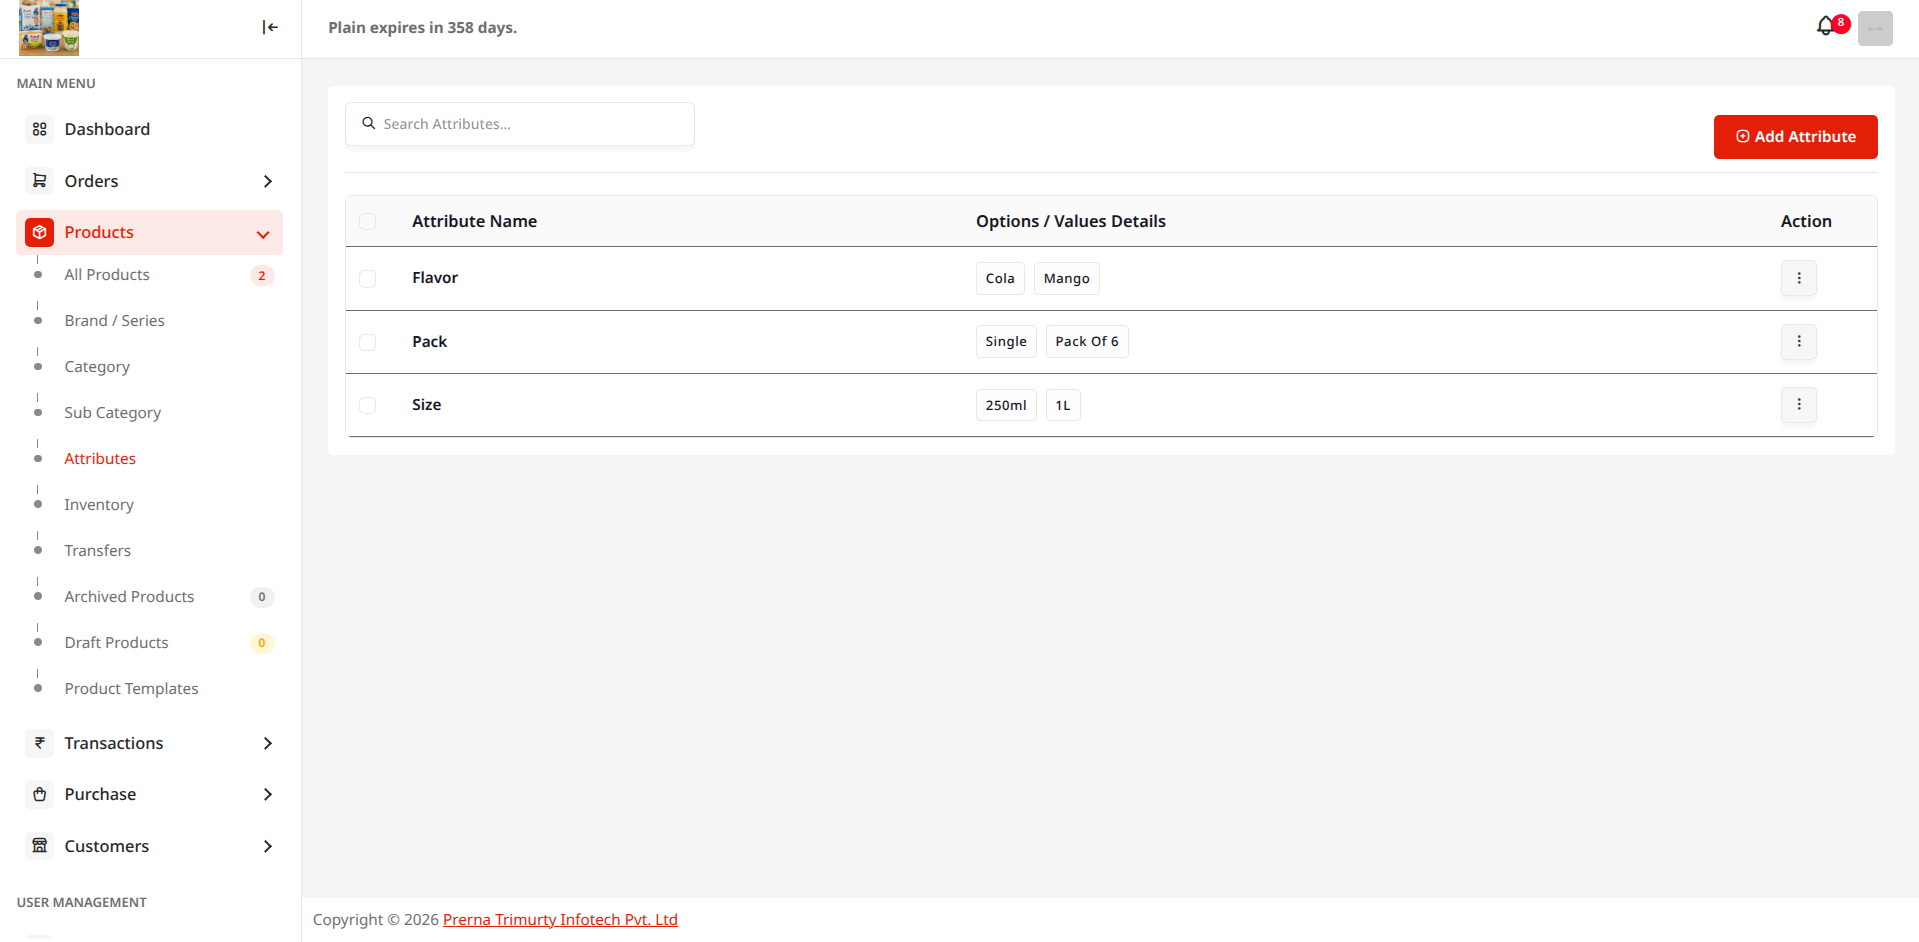
PTI CRM Attributes
E. Unit Settings (/unit-settings)

Standard measurement units (Pcs, Kg, Box, Liter, Bag, Carton) and conversion ratios.
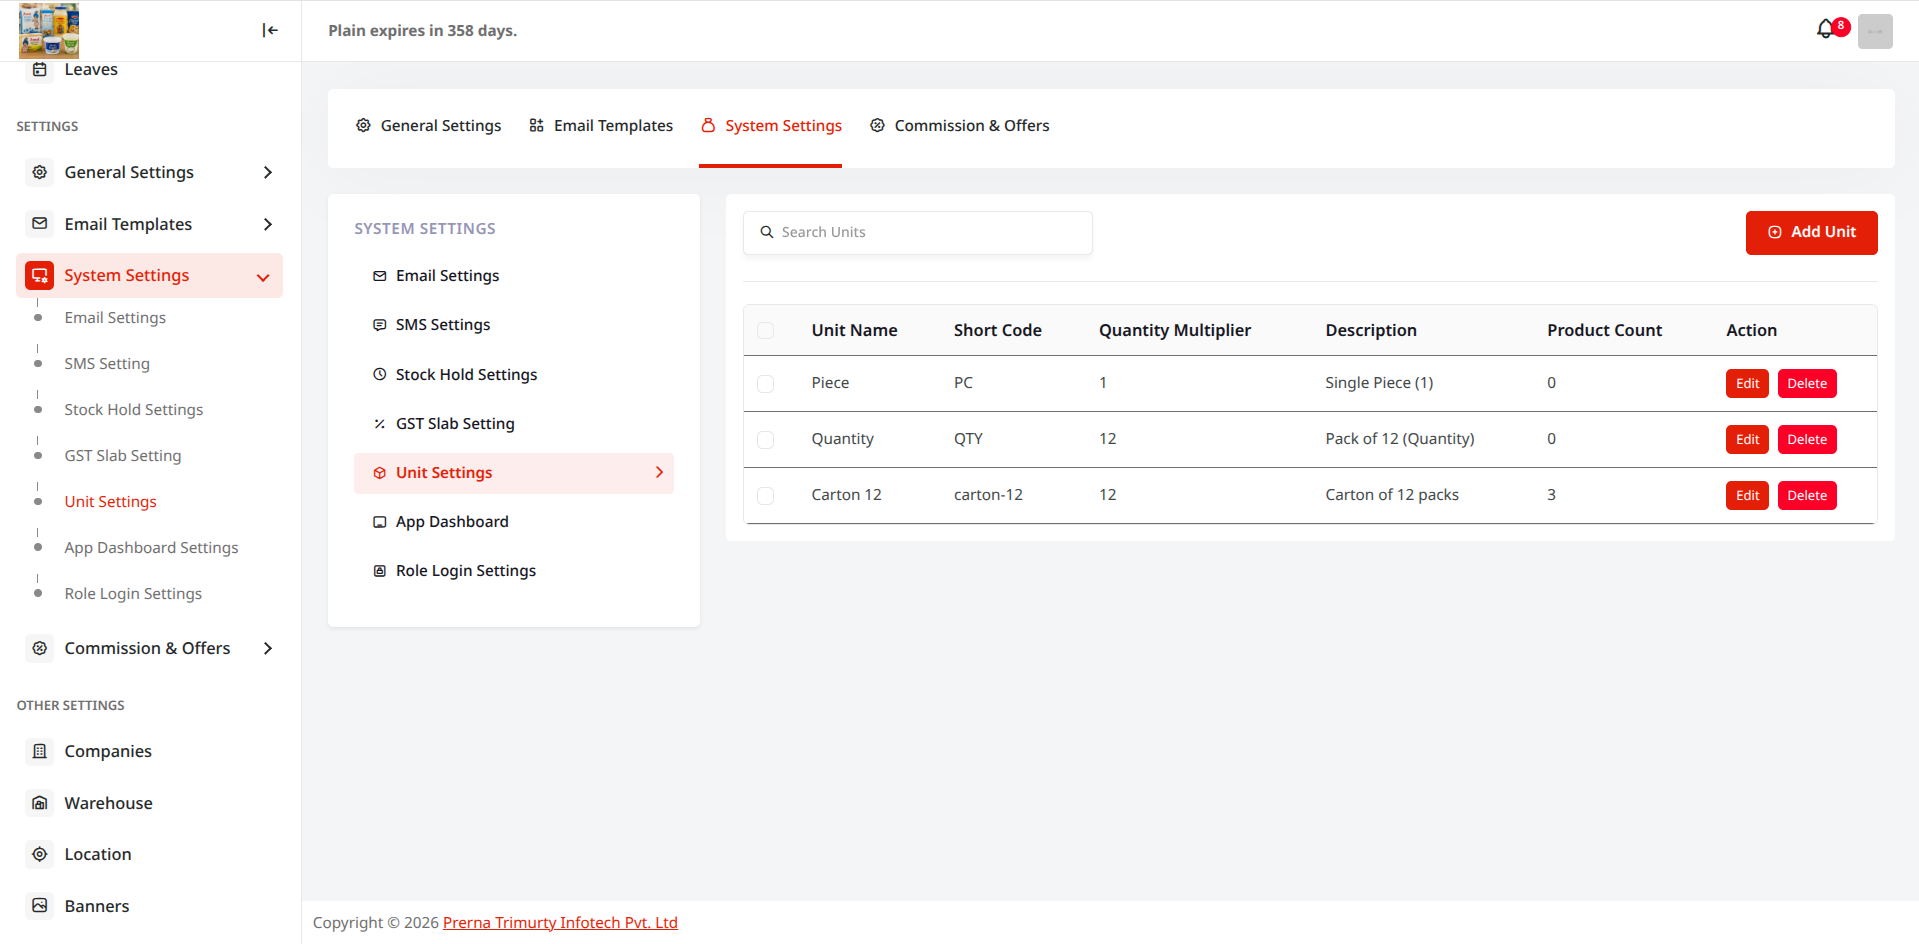
PTI CRM Unit Settings

Step-by-Step: Adding a New Product

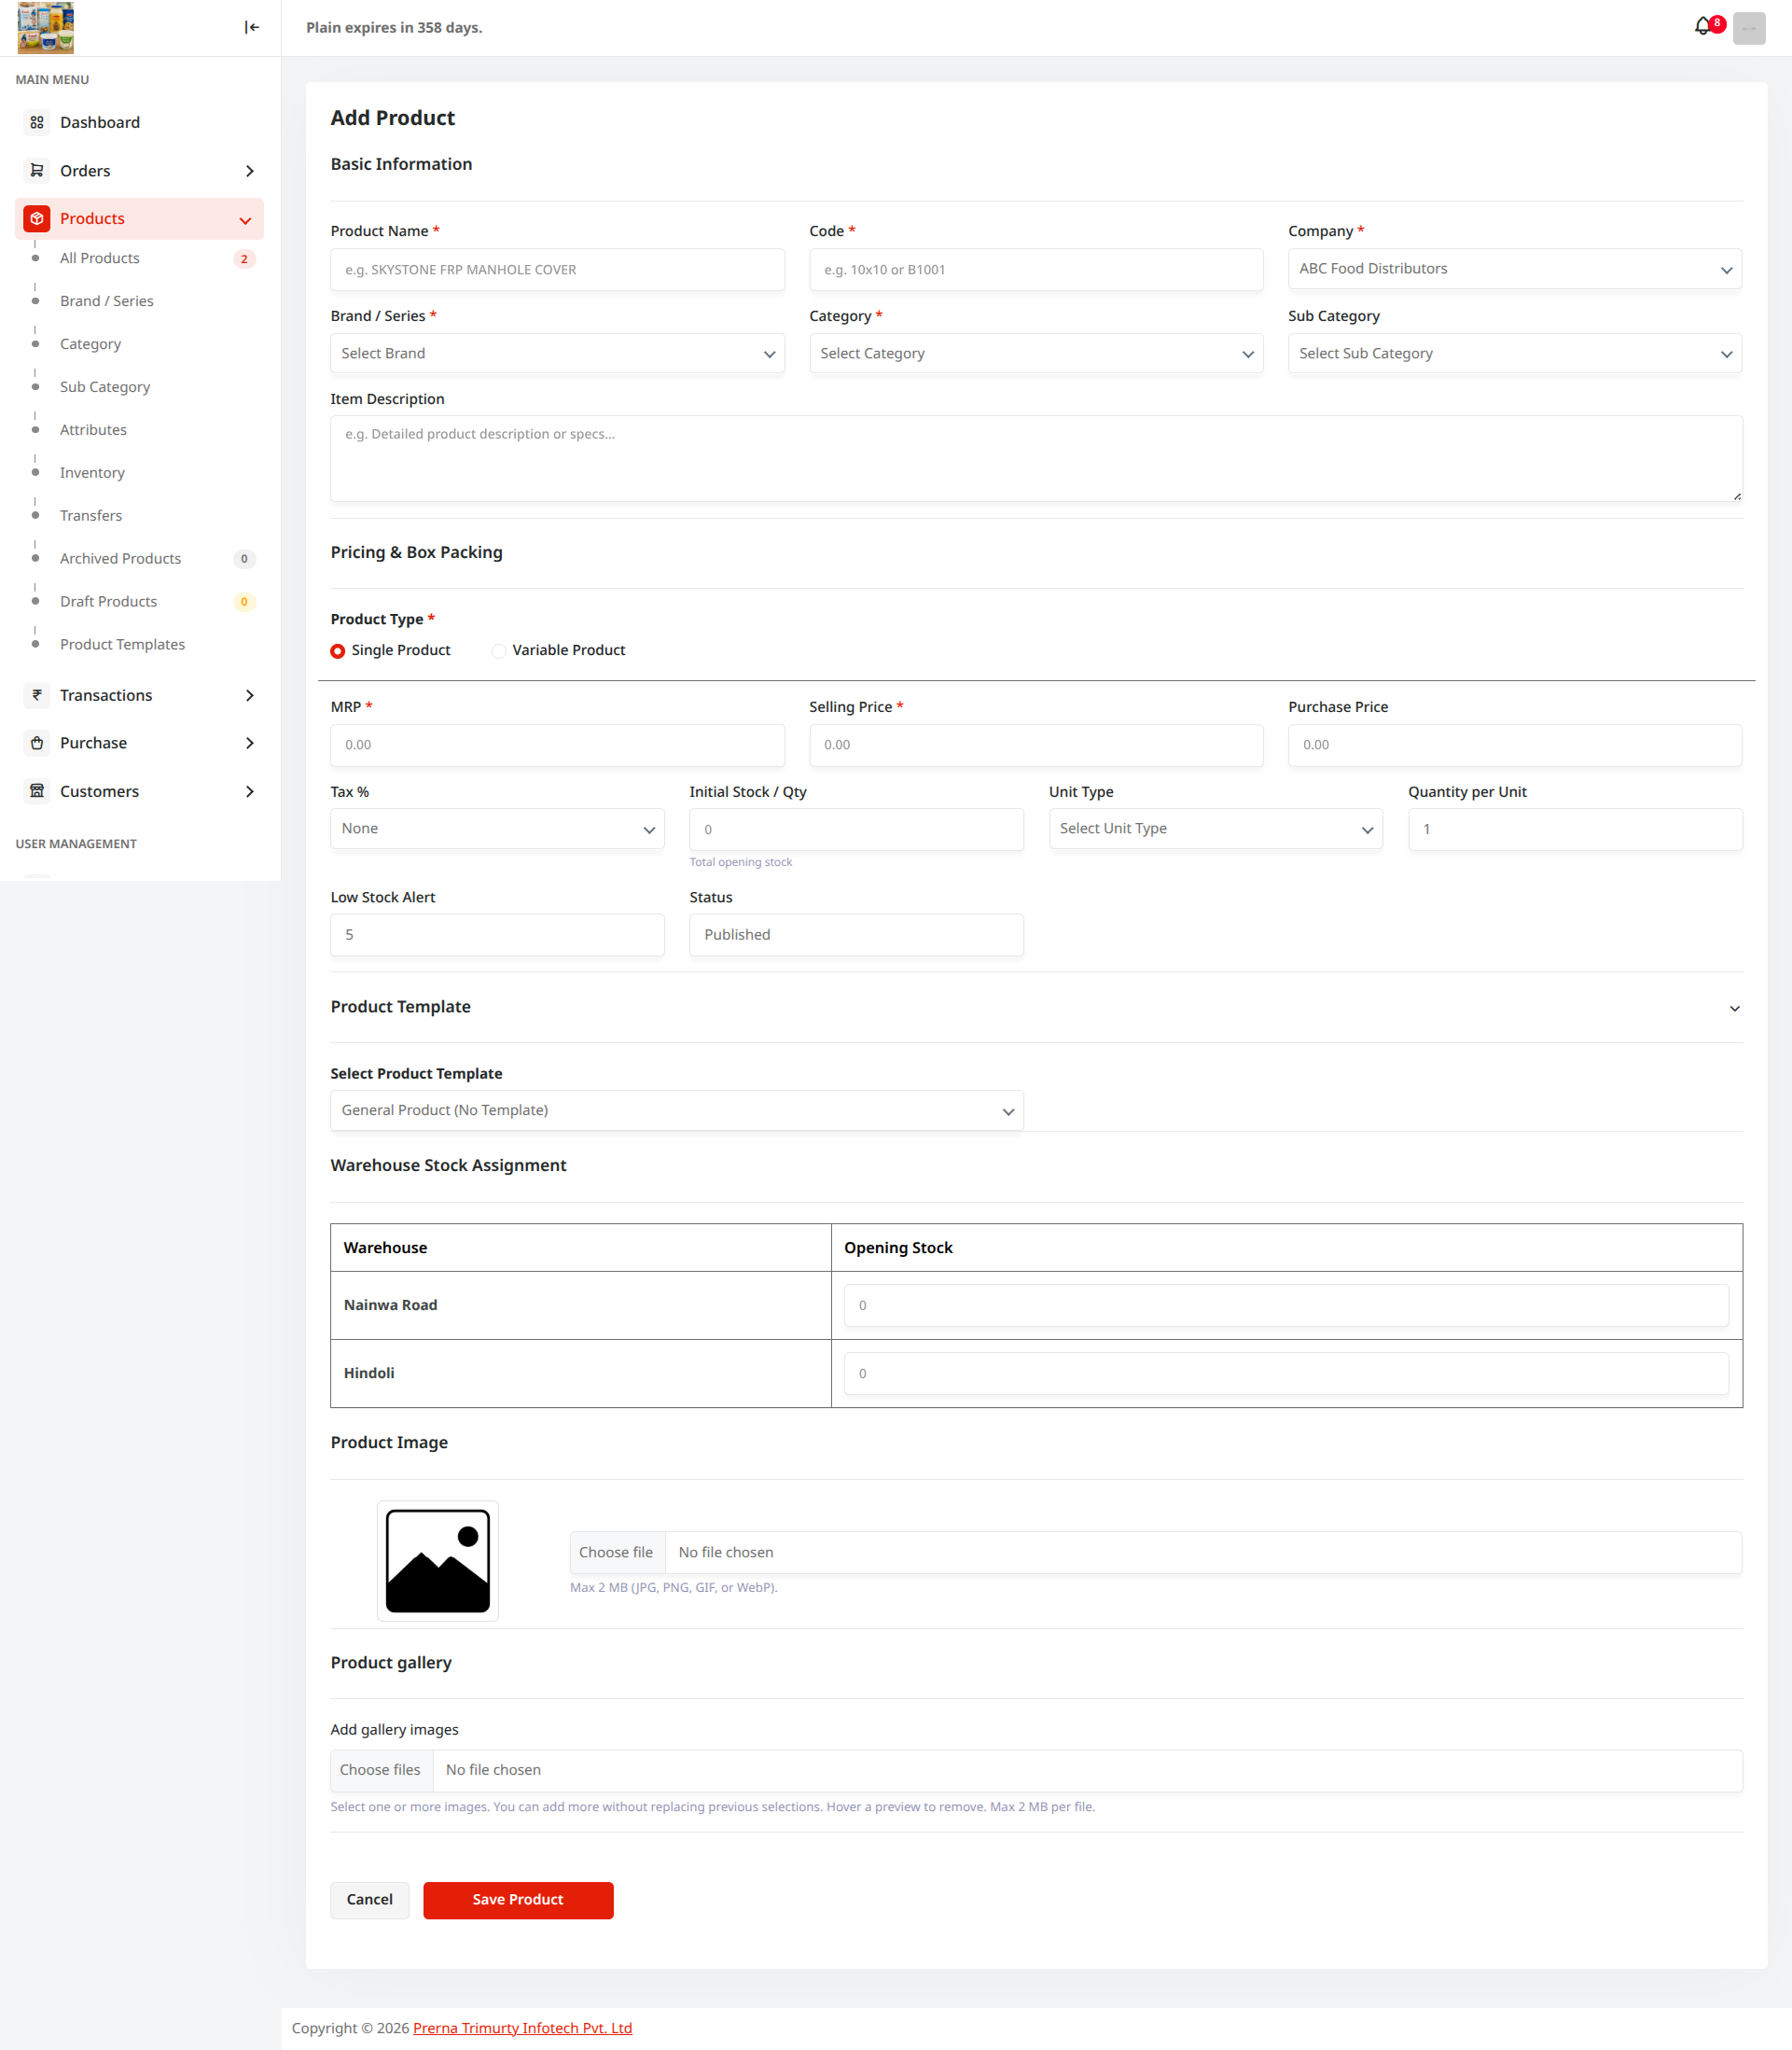
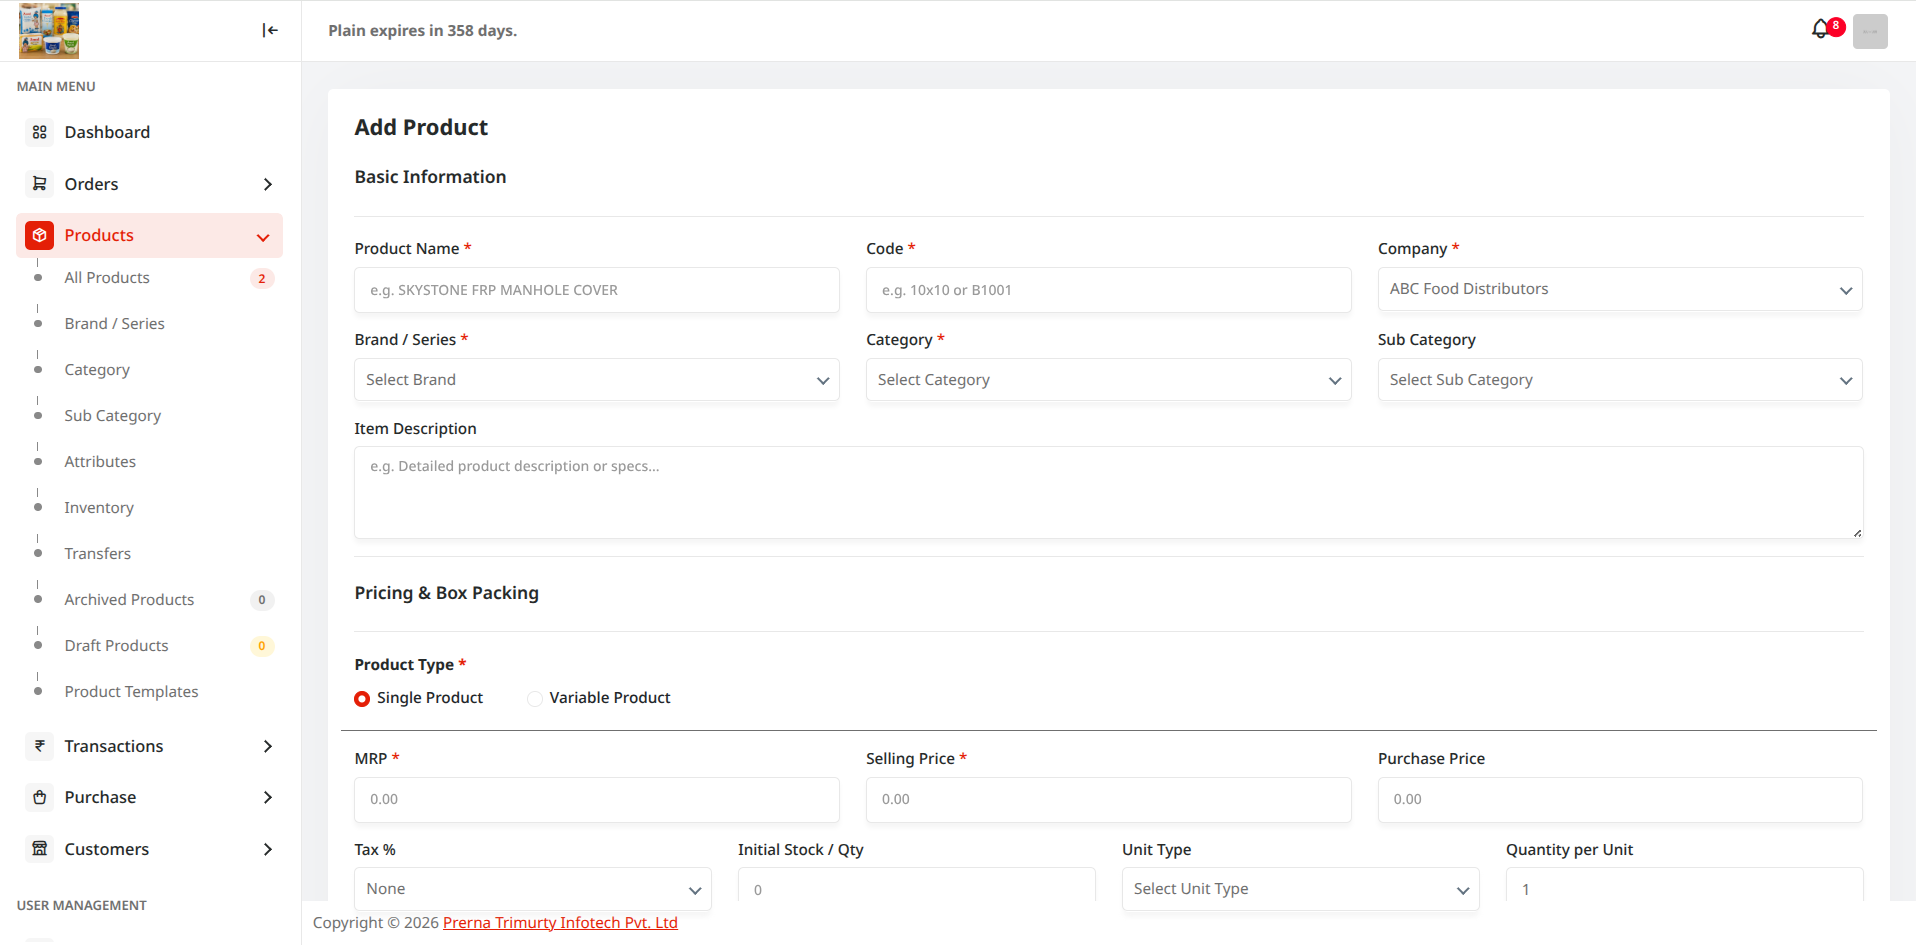
PTI CRM — Add Product Form (Basic Info, Product Type & Stock Assignment)
https://pticrm.com/products/create
PTI CRM Add Product Form
Figure 4.1: Comprehensive Add Product interface detailing Basic Information, Product Type selection, Tax slabs, and Warehouse Stock Assignment. Live Interface
  1. Step 1: Click "Add Product"

    From the left sidebar under Products, navigate to All Products (`/products`) and click the primary Add Product button.

  2. Step 2: Enter Basic Information

    Fulfill the essential item specifications:

    • Product Name / Title *: Official product title for invoices and catalogs.
    • Product Code / SKU *: Unique Stock Keeping Unit code or barcode identifier.
    • Category & Sub Category *: Select from the pre-configured taxonomy dropdowns.
    • Brand *: Select the manufacturer brand.
    • Unit of Measurement: Select standard unit (e.g., Pcs, Box, Kg, Liter, Carton) configured in Unit Settings.
    • GST Tax Slab (%): Select applicable GST rate (0%, 5%, 12%, 18%, 28%).
    • Product Description: Marketing features, ingredients, and storage specifications.
  3. Step 3: Select Product Type *

    Choose between two product architecture types:

    • Simple Product: Single standalone SKU with unified pricing, MRP, wholesale rate, and standard barcode.
    • Variable Product: Multi-variant product based on configured attributes (e.g., 250g, 500g, 1Kg packs). The system generates a variant matrix allowing distinct SKUs, prices, barcodes, and images per variant.
  4. Step 4: Warehouse Stock Assignment

    Allocate initial stock quantities and thresholds across active warehouses:

    • Opening Stock Quantity: Initial physical inventory present at each assigned warehouse depot.
    • Minimum Alert Level (Reorder Threshold): Automated threshold count triggering low-stock notifications on the dashboard.
    • Safety Stock Level: Buffer inventory reserved to prevent stockouts during transit replenishment.
  5. Step 5: Save & Verify in Products Master

    Click Save Product. The product is activated in your live catalog and ready for purchase orders, quotation creation, and mobile app field bookings.
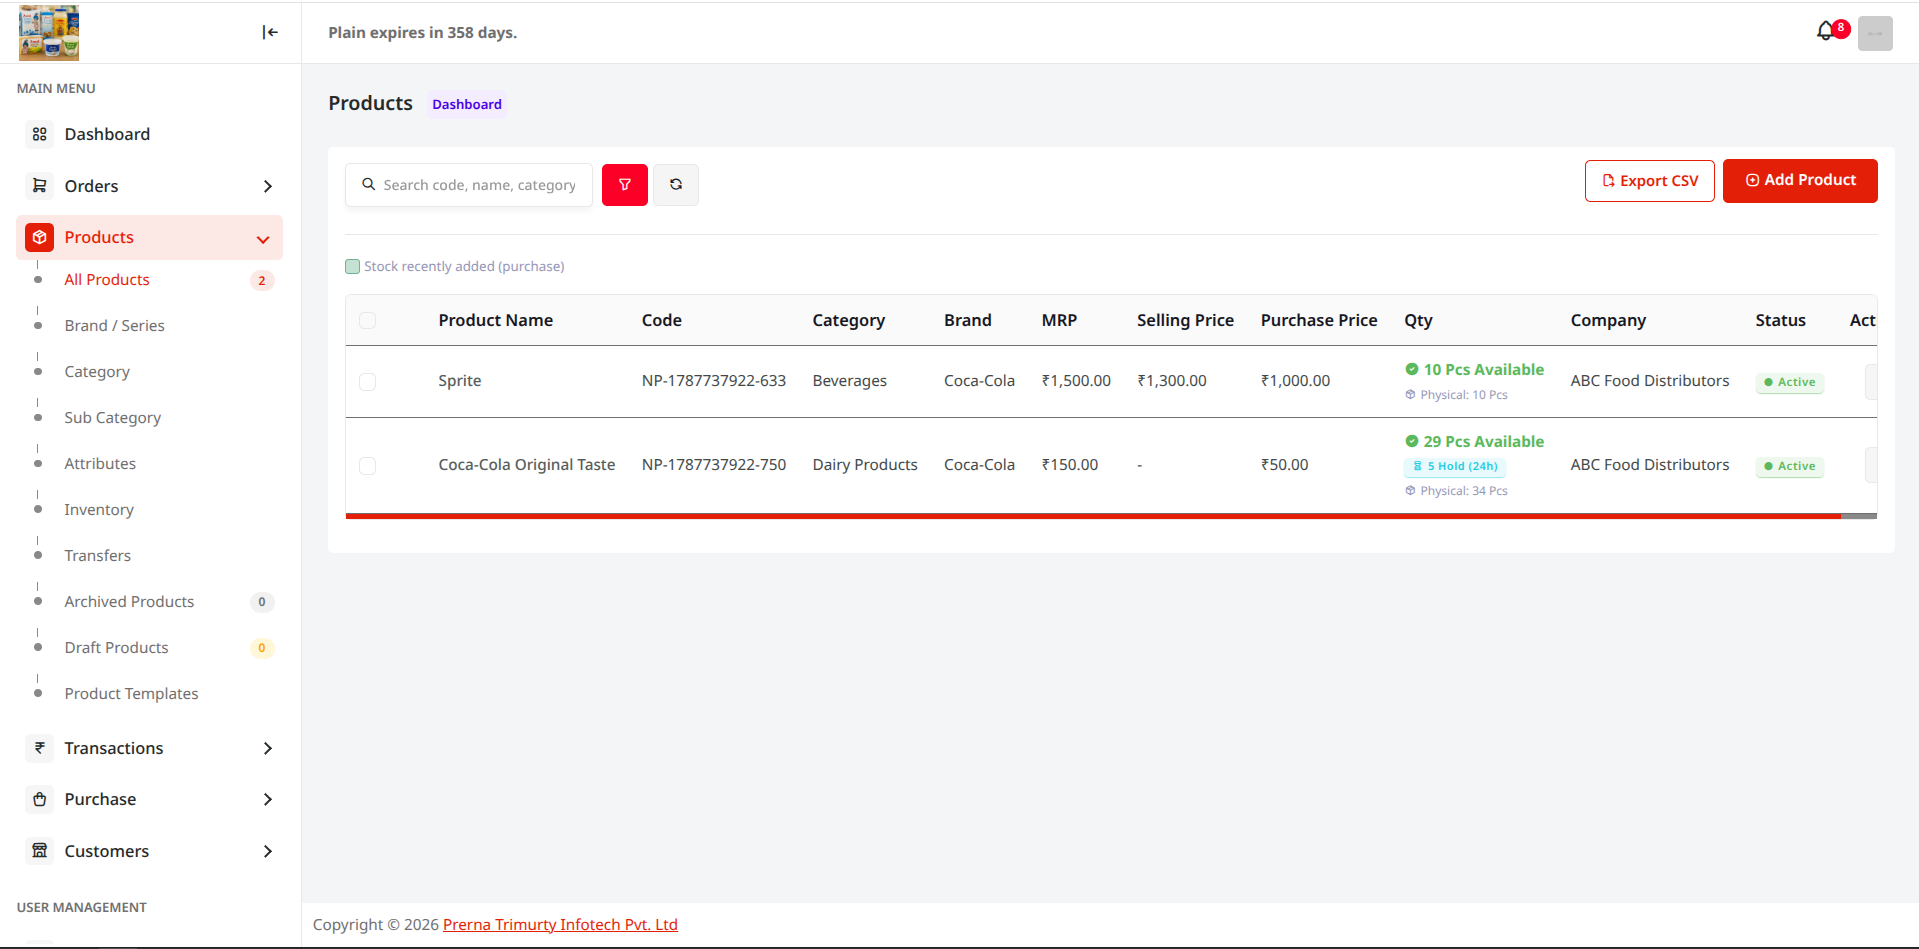
PTI CRM — Active Products Catalog Table
https://pticrm.com/products
PTI CRM Products List
Figure 4.2: Master product catalog table displaying SKU codes, category hierarchy, current stock across warehouses, wholesale pricing, and action controls. Live Interface
Procurement & Inward Supply

5. Purchase — Suppliers, Create Purchase & Draft Products

Record inward inventory procurement from external vendors. Manage supplier compliance profiles, log formal Purchase Invoices, and execute the essential Draft Products to Published catalog publishing workflow.

5.1 Suppliers (Vendors) Setup

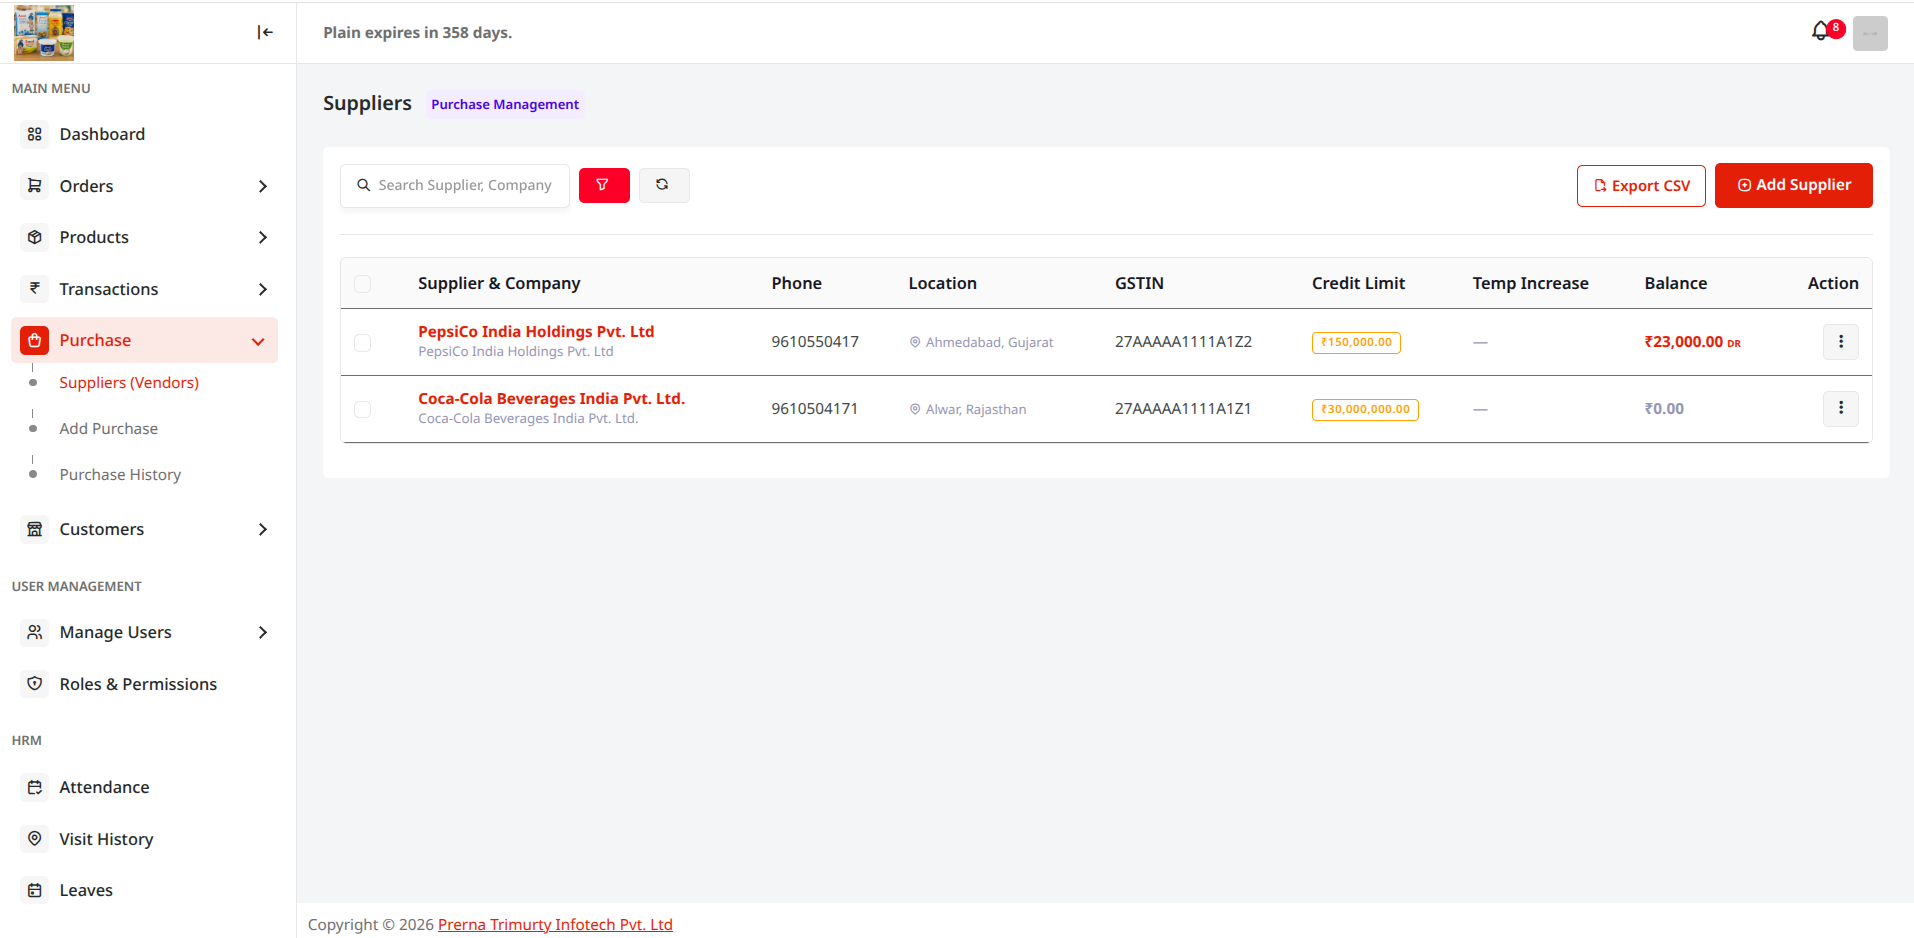
Maintain complete compliance profiles for OEM manufacturers and distributors under Suppliers (`/suppliers`).
PTI CRM — Suppliers Directory
https://pticrm.com/suppliers
PTI CRM Suppliers Directory
Figure 5.1: Suppliers directory listing registered vendors, contact phone, GSTIN details, and outstanding balances. Live Interface
PTI CRM — Add New Supplier Modal
https://pticrm.com/suppliers/create
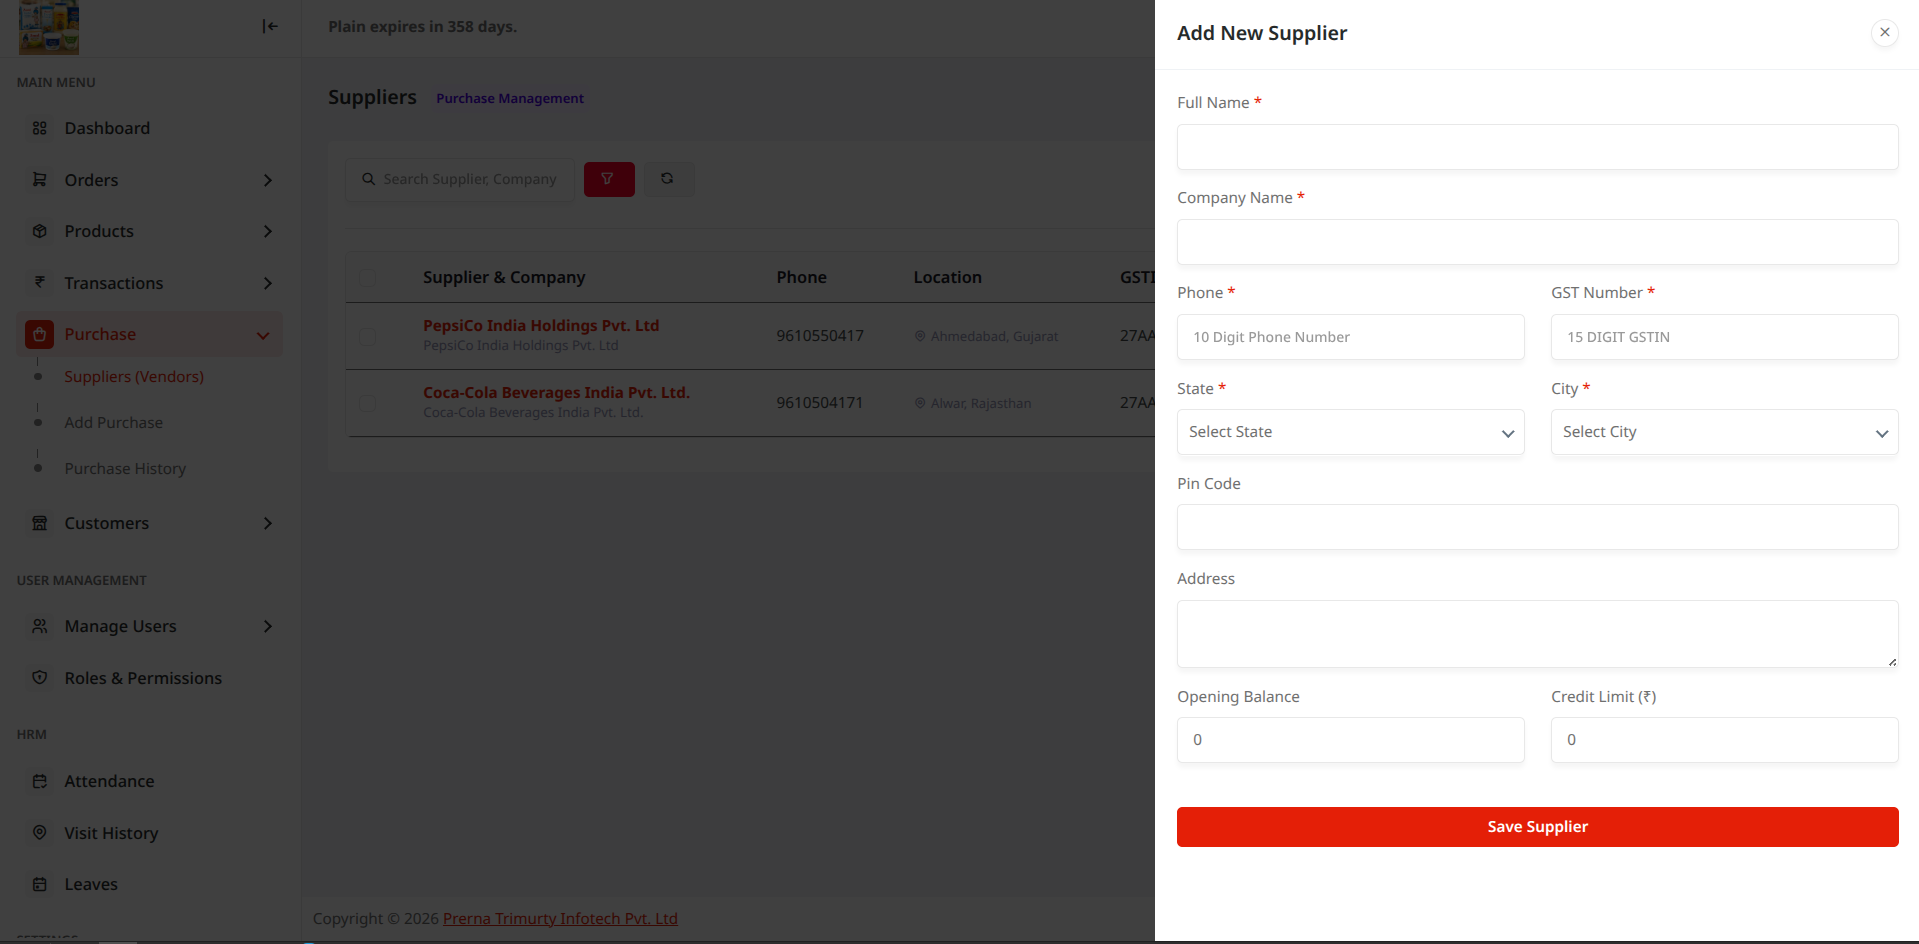
PTI CRM Add New Supplier Modal
Figure 5.2: Add New Supplier form: Vendor Name, Contact Person, GSTIN, Phone, Address, Payment Credit Terms, and Bank Details. Live Interface
  1. Click "Add New Supplier"

    Open Suppliers from the sidebar and click Add New Supplier.

  2. Enter Supplier Compliance Details

    Fill in Supplier Trade Name, Contact Representative, Official Mobile, GSTIN, Billing Address, Credit Days limit, and Bank Account IFSC details. Click Save Supplier.
5.2 Create New Purchase

PTI CRM — Create New Purchase Bill
https://pticrm.com/purchases/create
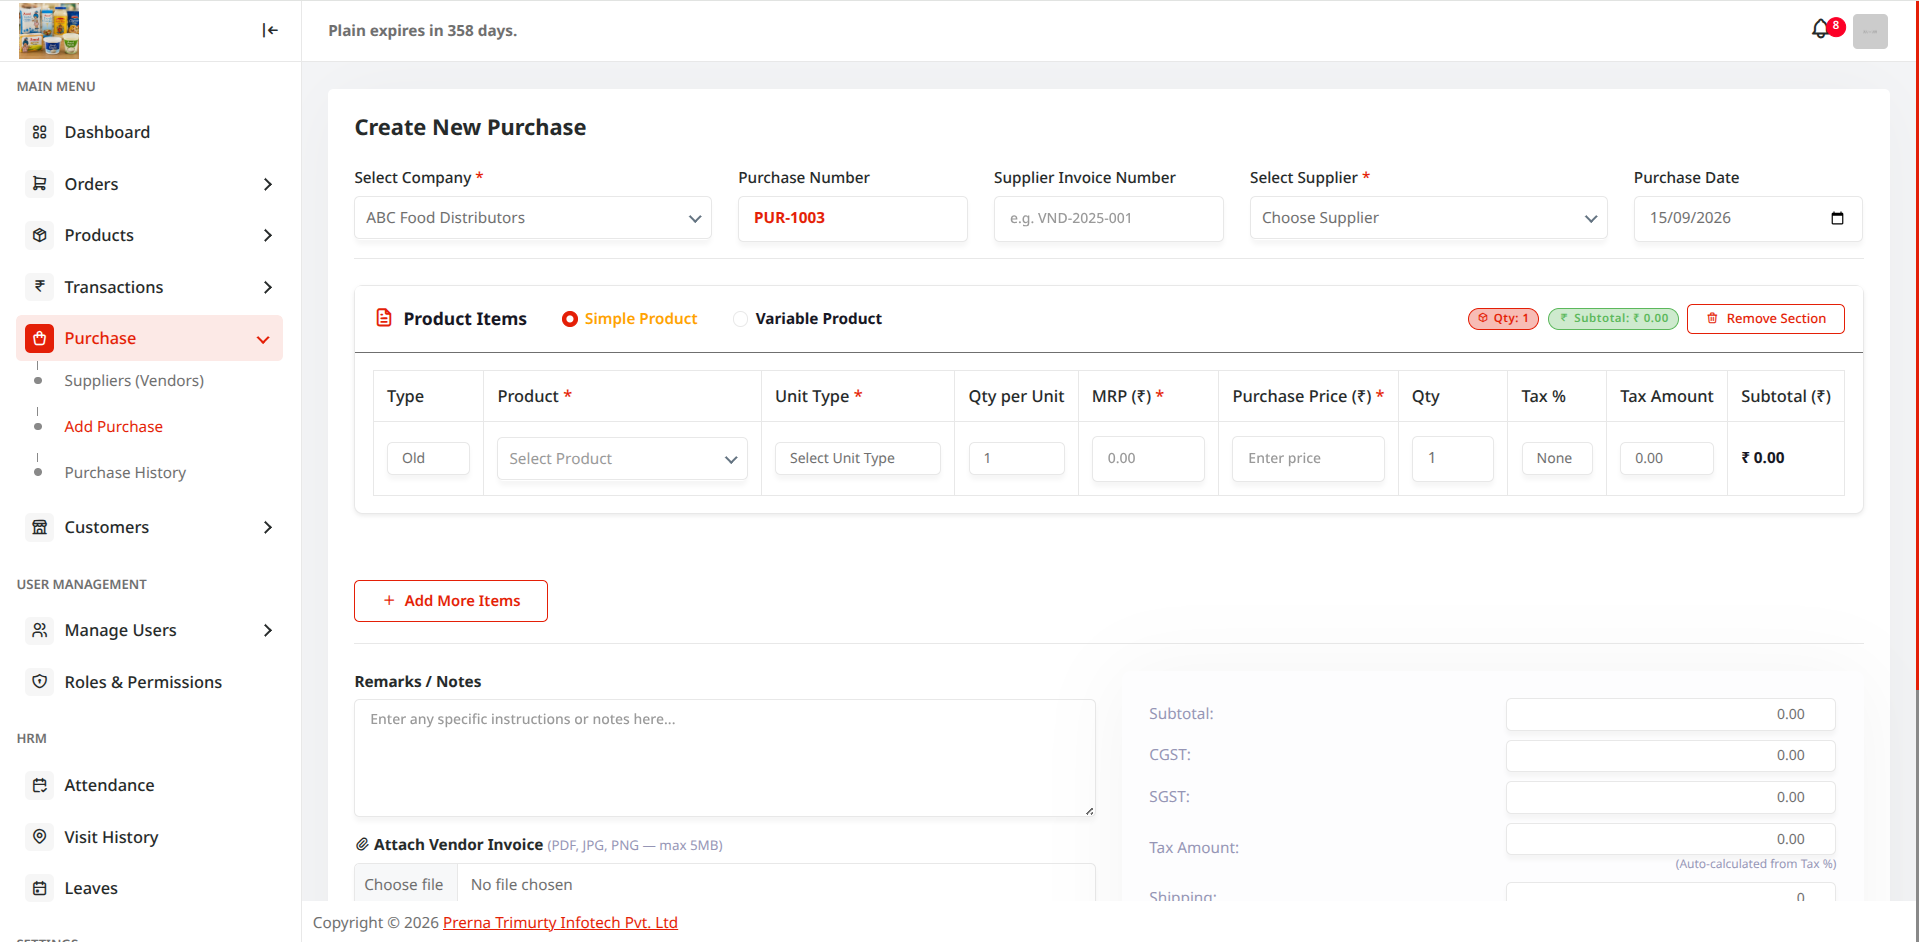
PTI CRM Create New Purchase Screen
Figure 5.3: Purchase creation screen: Select supplier, receiving warehouse depot, invoice number, items, purchase rates, taxes, and payment status. Live Interface
  1. Step 1: Open Create New Purchase

    Navigate to Purchase > Create New Purchase (`/purchases/create`).

  2. Step 2: Select Supplier & Destination Warehouse

    Choose the vendor from the Supplier dropdown and select the destination Warehouse where the physical shipment will be received.

  3. Step 3: Add Purchased Items & Costing

    Search and select items, enter received batch quantities, unit purchase price, vendor discounts, and applicable GST rate. The system automatically computes subtotal and grand total.

  4. Step 4: Enter Vendor Invoice & Submit

    Provide the vendor's physical Bill/Invoice Number, purchase date, attach scanned PDF invoice, and click Submit Purchase. Inward stock is added to the inventory ledger.

5.3 Critical Workflow: Draft Products to Published Catalog

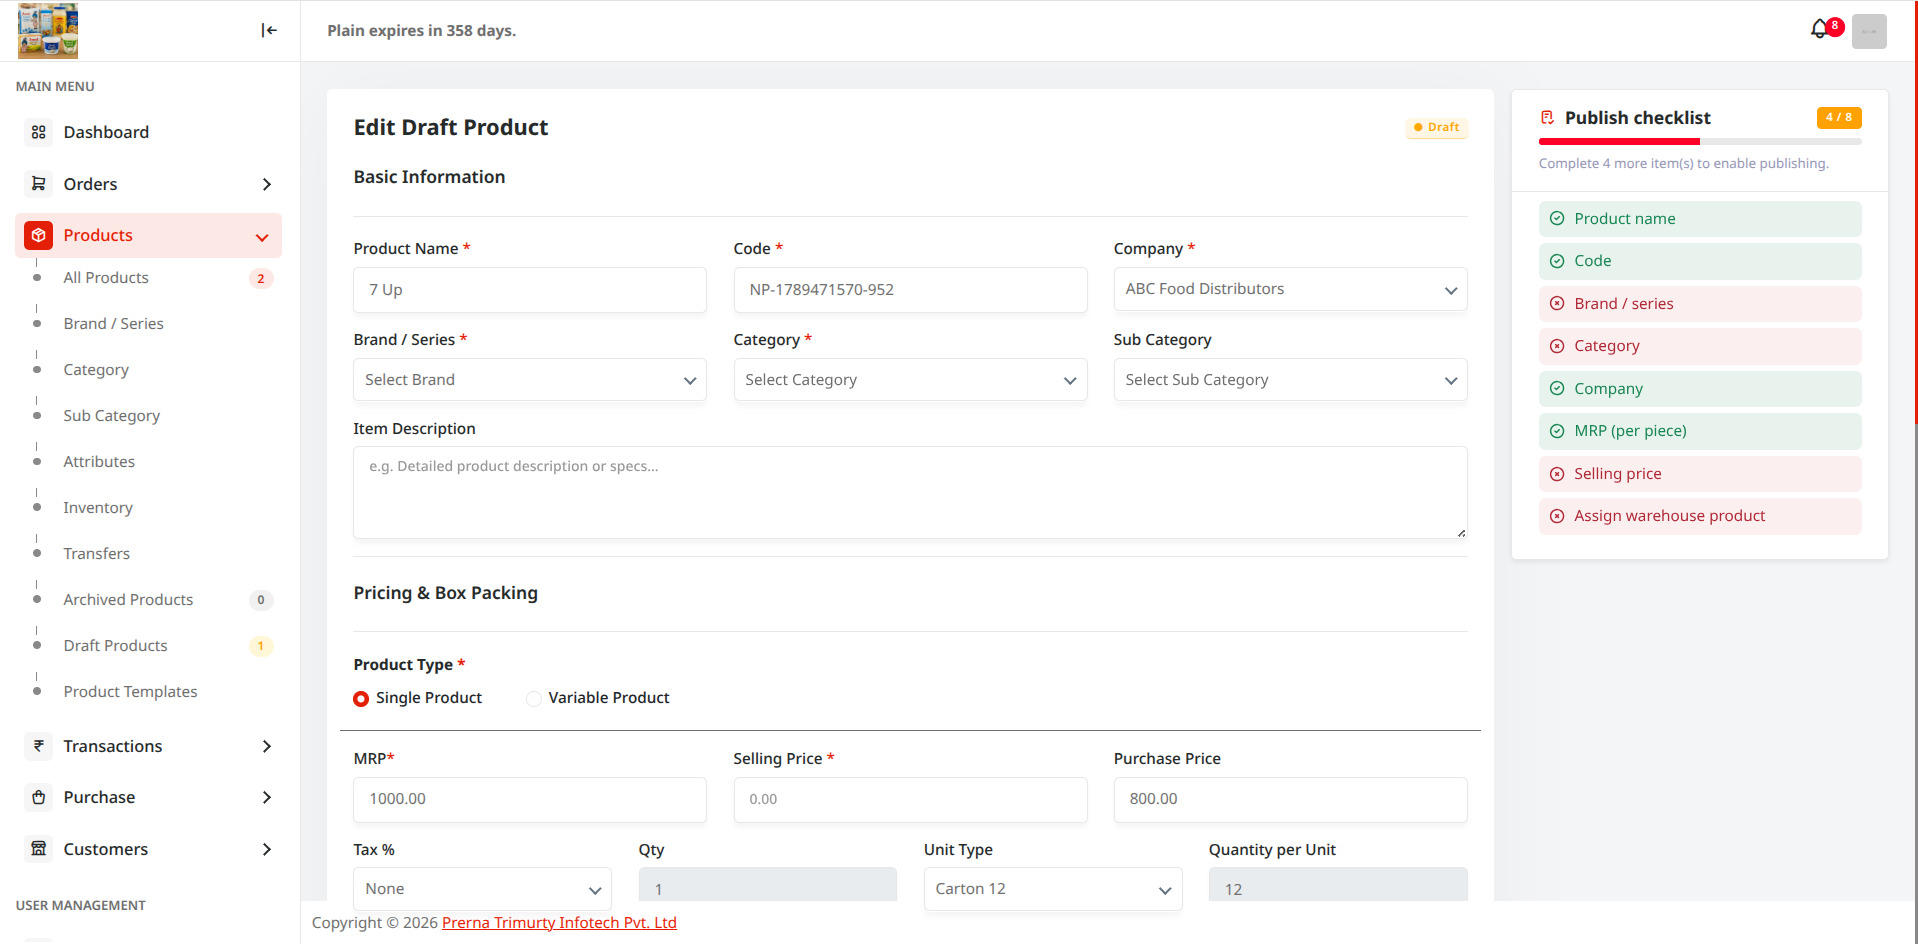
Important Operational Rule: When items are procured through purchases or newly synced from external bulk feeds, they are initially held in Draft Products state. To enable sales executives to book orders against this inventory, you must complete the product information and click Publish Product.
PTI CRM — Draft Products Management & Publish Interface
https://pticrm.com/products/draft
PTI CRM Draft Products Management
Figure 5.4: Draft Products listing: Review pending items, fulfill required retail MRP, wholesale prices, category mappings, and click 'Publish Product'. Live Interface
  1. Step 1: Click "Draft Products" under Products Menu

    From the left sidebar menu under Products, click on Draft Products (`/products/draft`).

  2. Step 2: Select the Draft Product

    Click on the draft record generated from your recent purchase invoice or bulk upload.

  3. Step 3: Fulfill Required Product Information

    Complete the required catalog fields:

    • Upload high-resolution product showcase images and gallery thumbnails.
    • Set customer Selling Price (MRP) and dealer Wholesale / Tiered price tiers.
    • Verify assigned Category, Sub Category, and Brand associations.
    • Add barcode values and detailed sales descriptions.
  4. Step 4: Click "Publish Product"

    Click the primary Publish Product button. The item transitions from draft status to Live / Published, instantly making it visible on the sales reps' mobile order app and web catalog!

Dynamic Catalog Engine

6. Product Templates — Dynamic Sections & Fields

Manage custom product templates, dynamic sections, and field configurations to support diverse industry catalog specifications (e.g. food nutrition tables, technical specs, pharmaceutical batch details, industrial dimensions).

Template Configuration Capabilities

Dynamic Custom Fields

Add text fields, numeric inputs, date pickers, dropdown selects, and toggle switches mapped to specific product categories.

Modular Specification Sections

Group fields into organized accordion sections such as "Technical Specifications", "Storage Guidelines", or "Regulatory Certifications".

Category Template Binding

Automatically apply targeted template layouts when a user selects a designated category during product creation.

Inter-Warehouse Logistics

7. Stock Transfers

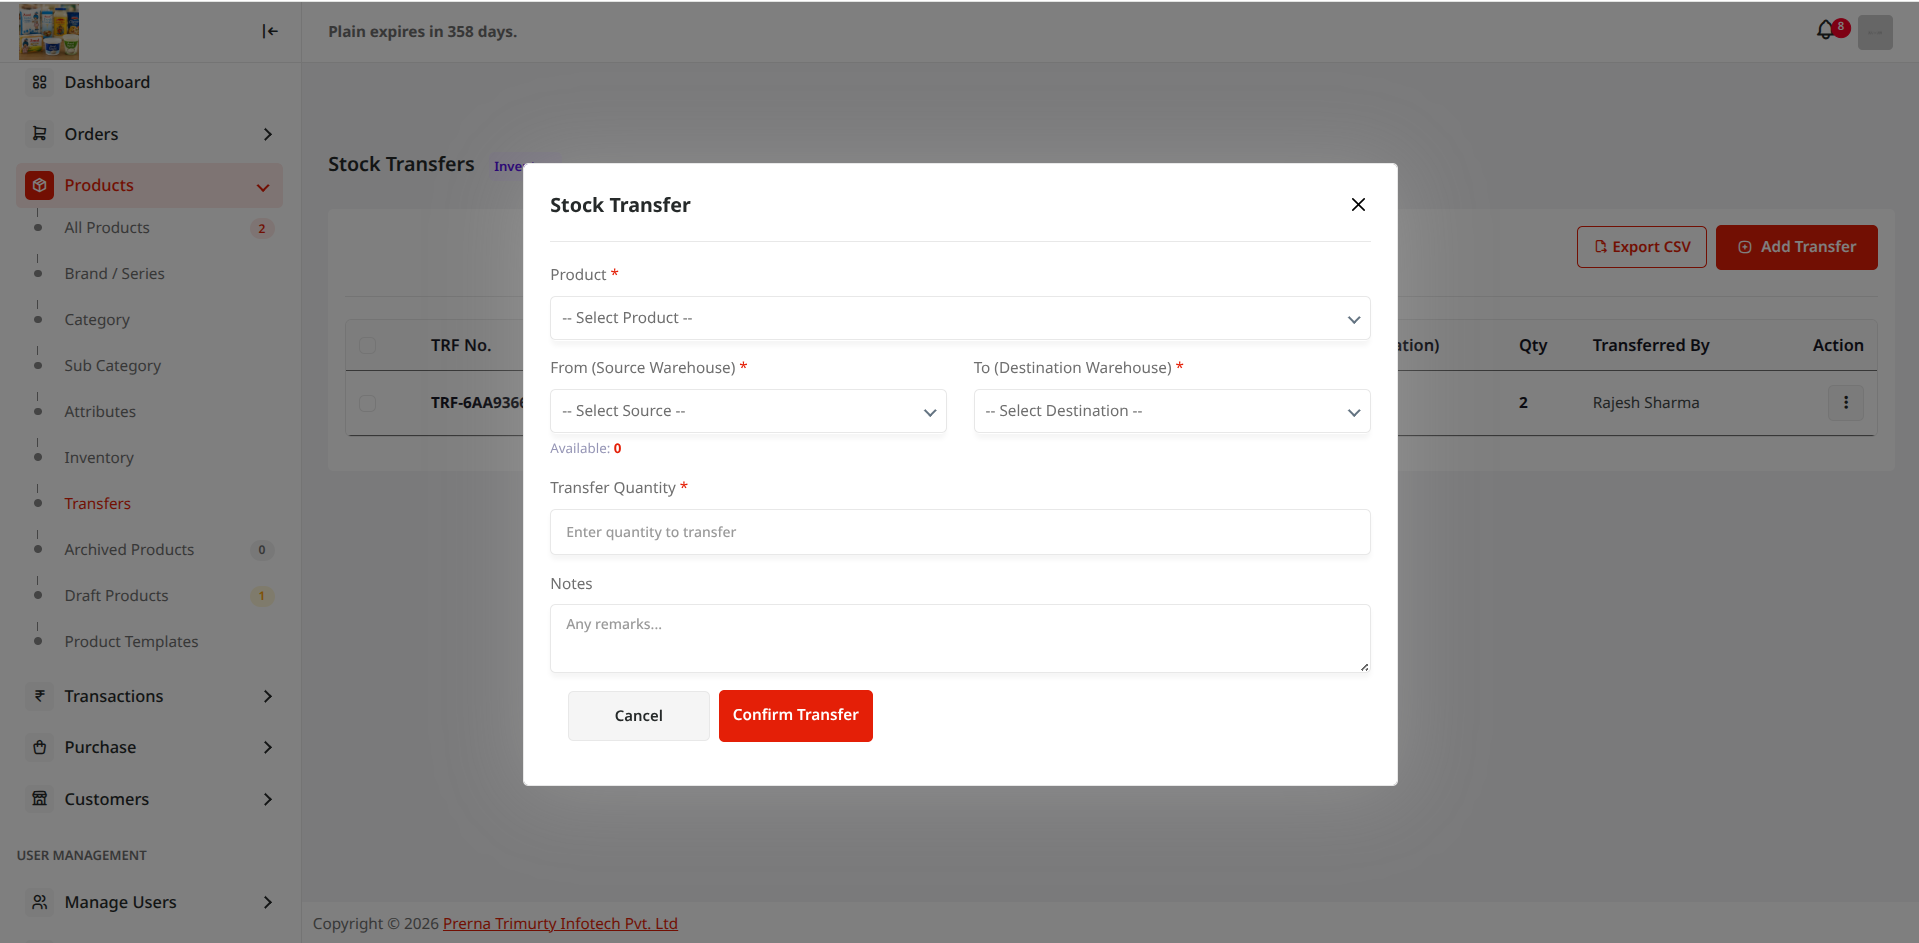
Move inventory smoothly between central storage hubs and regional delivery depots with real-time transit tracking, Goods Transfer Notes (GTN), and receiving depot verification.
PTI CRM — Stock Transfers Management & Dispatch History
https://pticrm.com/stock-transfers
PTI CRM Stock Transfers Directory
Figure 7.1: Inter-warehouse stock transfers table displaying Transfer ID, Source Depot, Destination Depot, Total Quantities, Status, and Date. Live Interface

Stock Transfer Workflow

  1. Step 1: Initiate Stock Transfer

    Navigate to Products > Stock Transfers (`/stock-transfers`) and click Create Stock Transfer.

  2. Step 2: Select Source & Destination Warehouses

    Select the originating Source Warehouse (where stock is deducted) and the target Destination Warehouse (where stock will be received).

  3. Step 3: Add Items & Transfer Quantities

    Select products, batch numbers, and transfer quantities. The system validates available stock at the source location to prevent overselling.

  4. Step 4: Dispatch & Inward Verification

    Generate the official Goods Transfer Note (GTN). Once the transit carrier arrives, the destination depot manager conducts inward physical count verification and clicks Accept Stock to update local inventory.

Stock Audit & Reconciliation

8. Inventory Ledger

The Inventory Ledger maintains an immutable, real-time audit record of every stock movement across your entire supply chain — including purchases inward, sales deductions, inter-depot transfers, returns, and damage adjustments.

Ledger Capabilities & Tracking

Movement Type Trigger Source Ledger Impact Audit Trail
Purchase Inward Vendor Purchase Bill Entry + Stock Quantity Added Linked to PO # & Vendor Invoice
Sales Outward Confirmed Sales Order Dispatch - Stock Quantity Deducted Linked to Order # & Tax Invoice
Inter-Depot Transfer Stock Transfer Acceptance Balance Shifted between Depots Linked to GTN Manifest
Order Return Customer RMA Restocking + Restocked to Usable Inventory Linked to RMA # & Credit Note
Stock Adjustment Damage, Expiry, or Audit Count +/- Reconciled Balance Auditor ID & Approval Note
Sales Engine

9. Orders — Create New Order & Complete Order Statuses

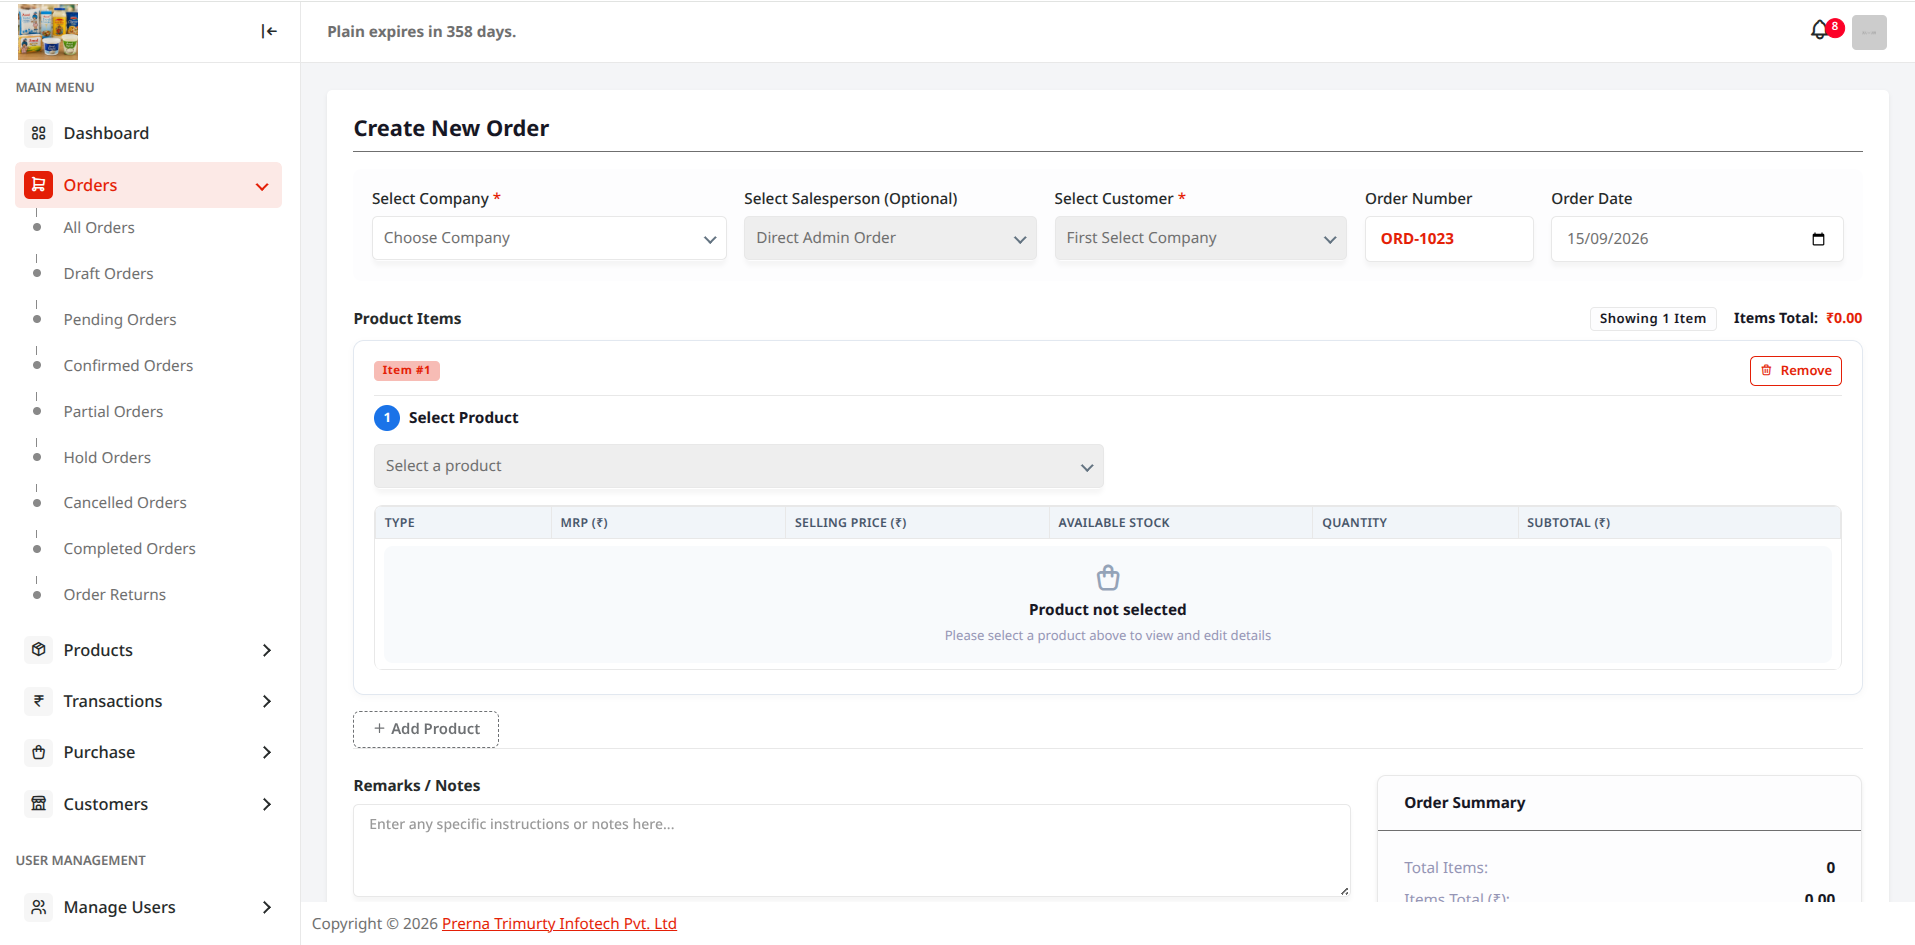
Manage the entire sales order lifecycle from initial quote drafting and credit limit evaluation to warehouse picking, dispatch, tracking, and returns authorization.
9.1 Create New Order

PTI CRM — Create New Sales Order
https://pticrm.com/orders/create
PTI CRM Create New Order
Figure 9.1: Sales order creation form with customer selector, fulfillment warehouse depot, item search, variant picker, discounts, and payment mode. Live Interface
  1. Step 1: Open Create New Order

    From the left sidebar under Orders, click Create New Order (`/orders/create`).

  2. Step 2: Select Customer & Warehouse

    Select the customer account (or onboard a new client) and select the fulfillment Warehouse Depot to check real-time stock availability.

  3. Step 3: Add Items & Configure Pricing

    Search products, choose item variants, enter order quantities, apply authorized promotional discounts, and specify billing/shipping addresses.

  4. Step 4: Select Payment Mode & Submit

    Select payment terms (Credit, Cash, UPI, Cheque), review GST breakdown, and click Place Order.
9.2 Complete Order Status Lifecycle

PTI CRM — Orders Master Directory & Status Tabs
https://pticrm.com/orders
PTI CRM Orders List and Statuses
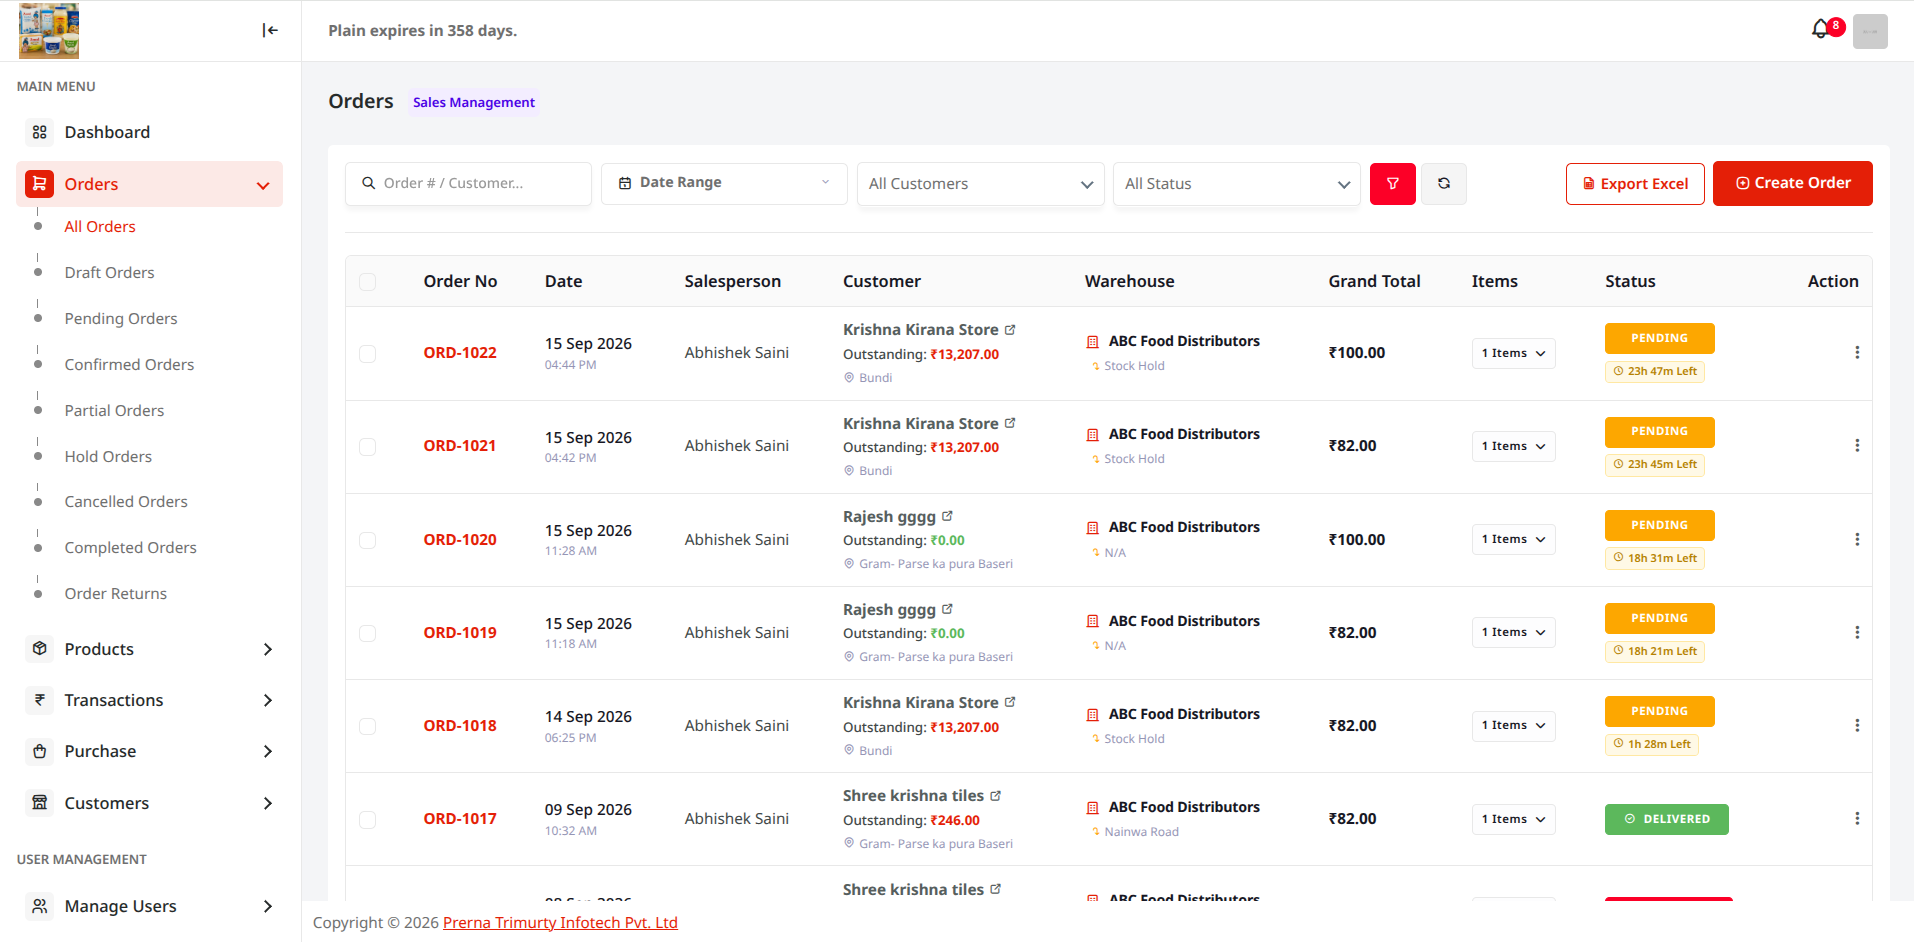
Figure 9.2: Orders directory showcasing categorized status tabs: All, Draft, Pending, Confirmed, Partial, Hold, Cancelled, Completed, and Returns. Live Interface
Order Submenu / Status Description & Purpose Action / Next Step
All Orders Unified master directory displaying all current and historical orders across companies with date, status, and sales rep filters. View / Export
Draft Orders Incomplete or estimated quotes initiated by sales reps before customer final confirmation. Stock is not yet deducted. Edit / Finalize
Pending Orders Submitted orders awaiting credit limit approval, payment confirmation, or manager sign-off. Approve / Hold
Confirmed Orders Approved orders queued for warehouse packing, picking list generation, and tax invoice creation. Generate Invoice
Partial Orders Orders split into multiple shipments when partial stock is available, dispatching in-stock items first. Ship Remaining
Hold Orders Temporarily frozen orders (e.g. pending customer payment clearance) with automated stock hold reservation timers. Release / Resume
Cancelled Orders Terminated orders where reserved stock is automatically returned to the active warehouse inventory ledger. Stock Released
Completed Orders Fully delivered orders with signed Proof of Delivery (POD) and settled accounts receivable. Archived / Closed
Order Returns Return Goods Authorization (RMA), defect inspection, restocking, and credit note issuance. Credit Ledger
Customer 360° Master

10. Customers Directory

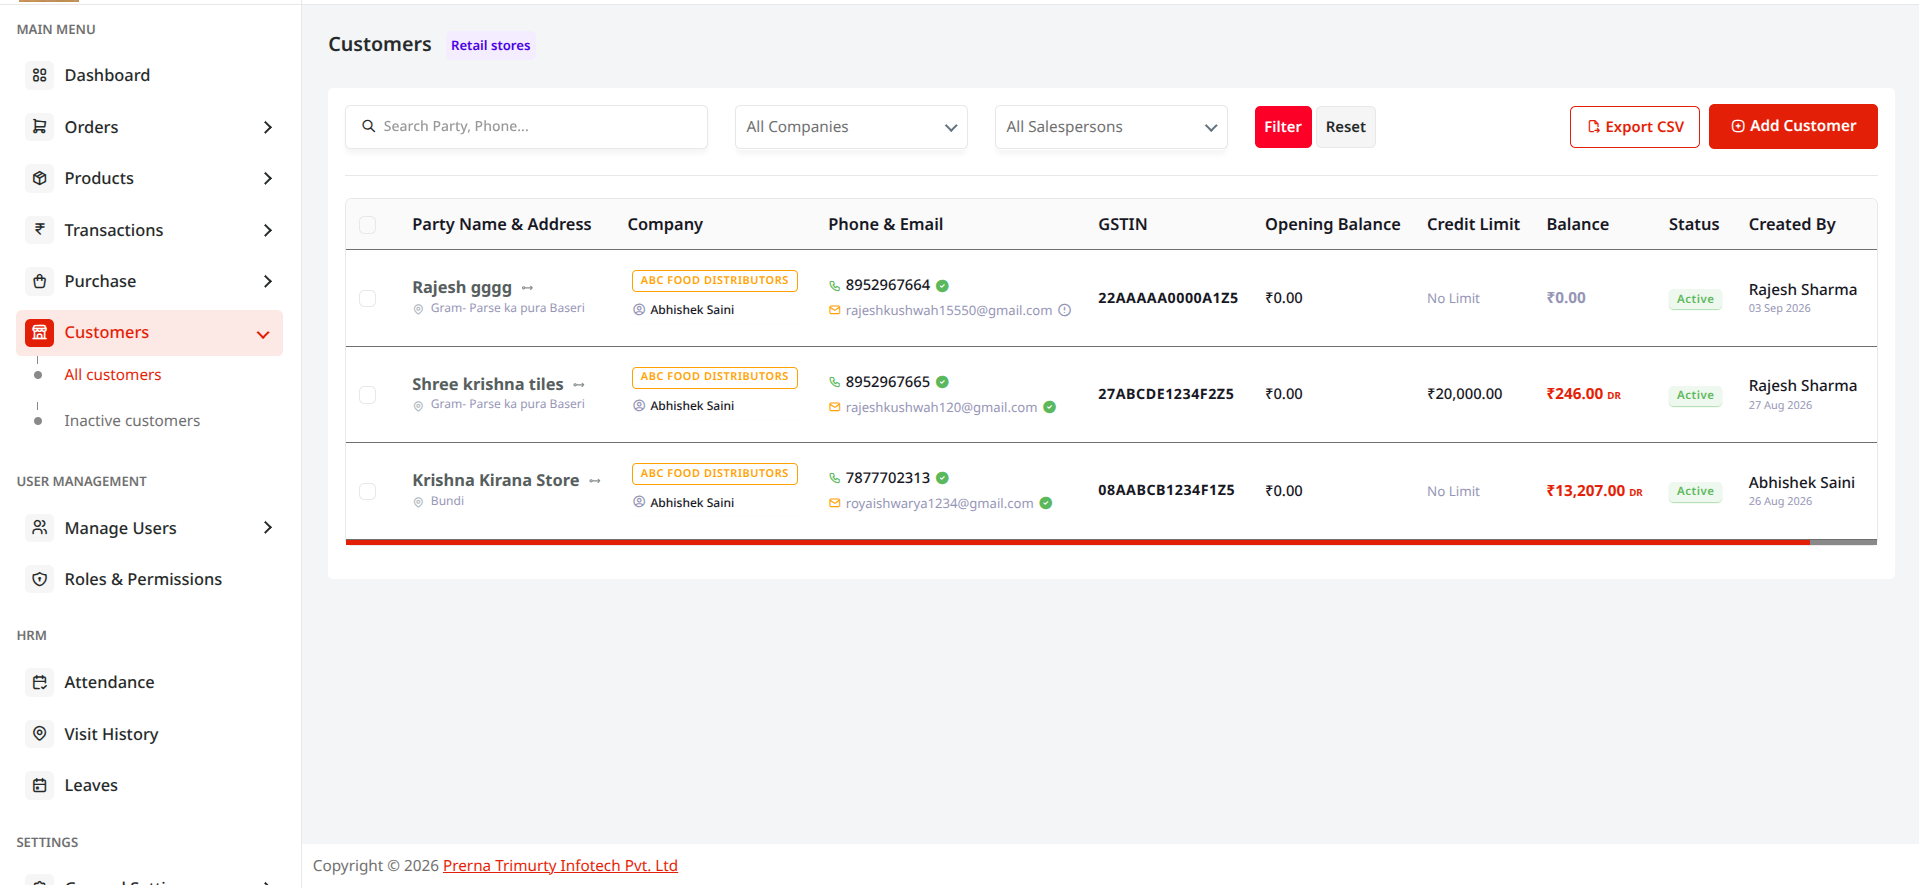
Maintain complete 360-degree profiles for retail outlets, wholesale distributors, institutions, and buyers with transaction history, credit period limits, tax GSTIN, and assigned sales representatives.
PTI CRM — Customers Directory & Outstanding Balances
https://pticrm.com/customers
PTI CRM Customers Directory
Figure 10.1: Customers master listing showcasing business names, contact details, assigned sales reps, current outstanding balances, and account actions. Live Interface

Customer Management Workflow

  1. Step 1: Onboard New Customer Account

    Click Add New Customer from `/customers`. Enter Business Trade Name, Contact Person, Phone, Email, GSTIN, Billing/Shipping Addresses, and Territory.

  2. Step 2: Assign Credit Limits & Price Lists

    Specify approved credit period (e.g. 15, 30, 45 days), maximum credit amount limit, and assign custom wholesale or retail price tier.

  3. Step 3: Territory & Sales Representative Mapping

    Map the customer to a specific field sales executive for recurring visit beats, route planning, and commission calculations.

Executive Command Center

11. Dashboard & Mobile App Analytics

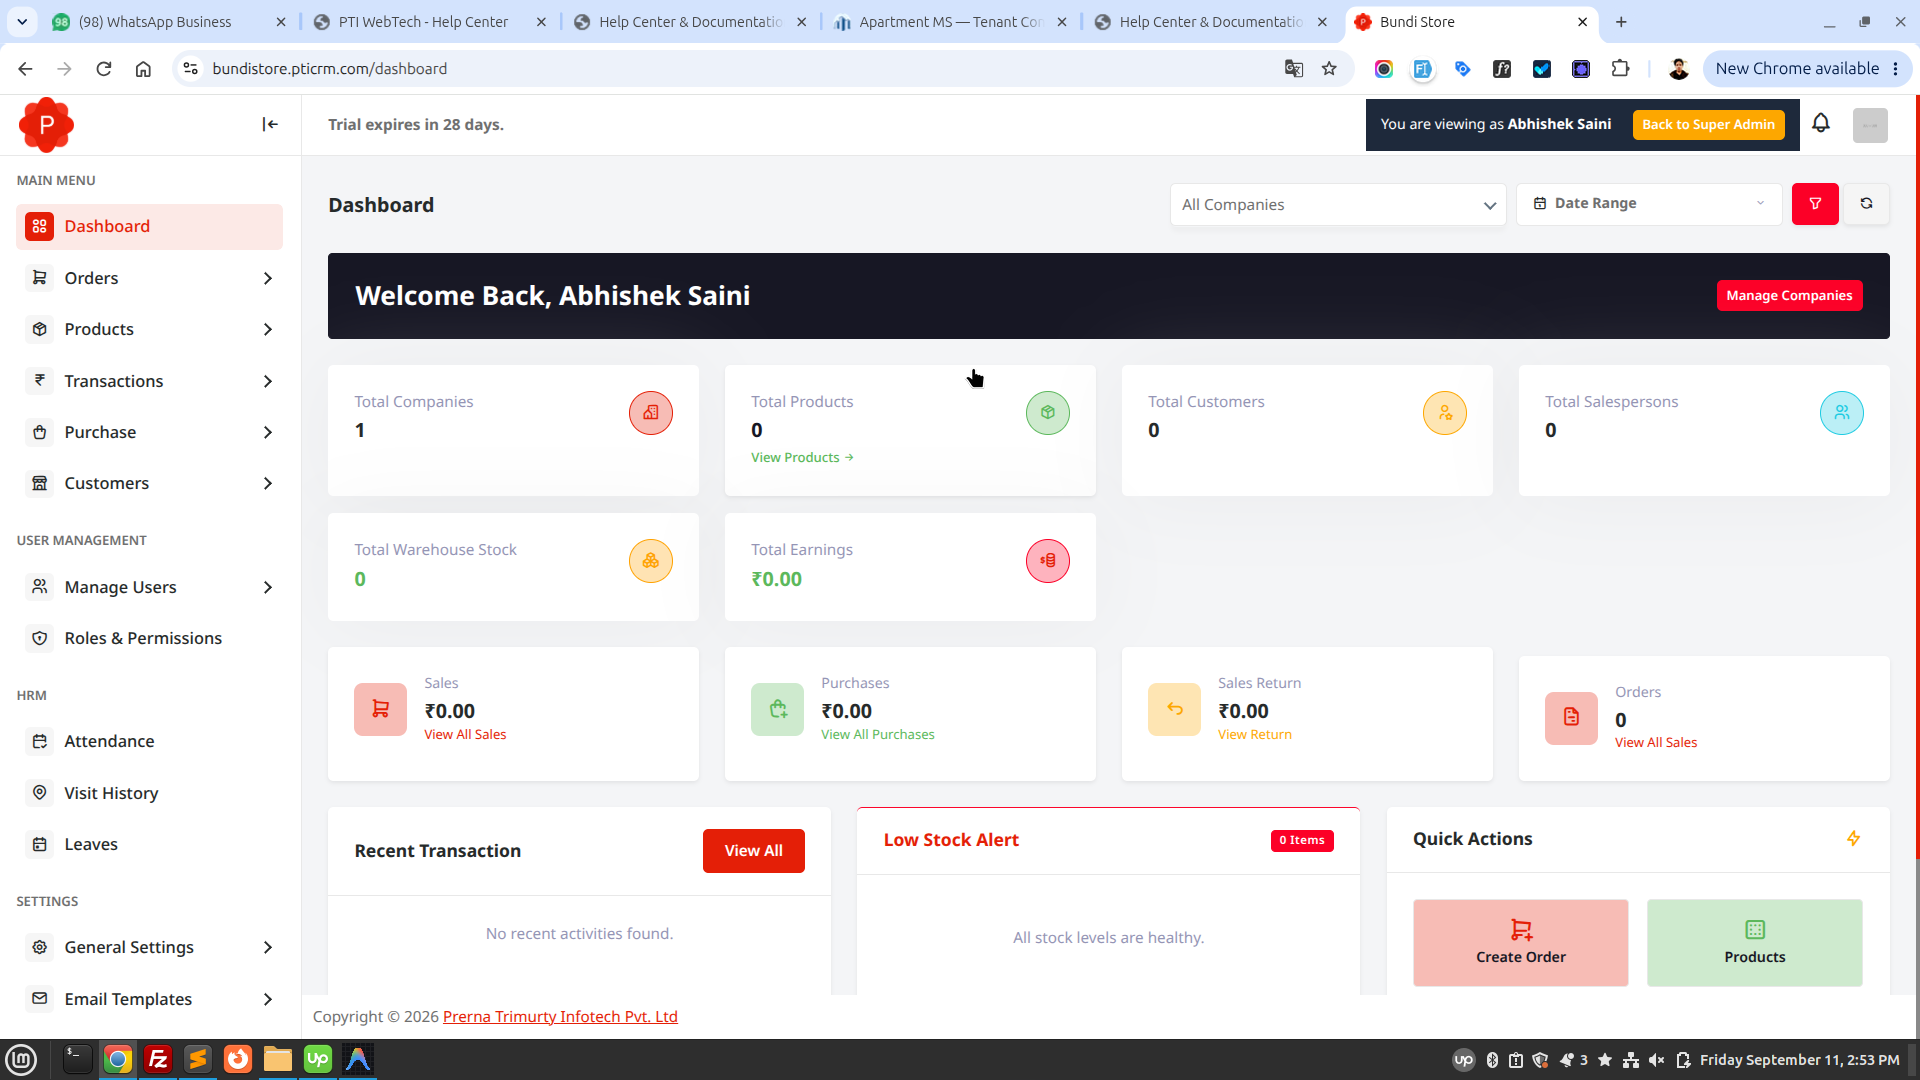
The PTI CRM central command dashboard delivers instant executive visibility into real-time sales conversions, active field agent visits, daily revenue metrics, order pipelines, and stock alerts.
PTI CRM — Operations Dashboard & Analytics
https://pticrm.com/dashboard
PTI CRM Main Business Dashboard
Figure 11.1: Central executive dashboard showcasing live sales metrics, order pipeline counters, top products, and field workforce statistics. Live Interface
PTI CRM — Field Sales Mobile App Dashboard
https://pticrm.com/app/dashboard
PTI CRM Field App Dashboard
Figure 11.2: Sales representative mobile app dashboard showing daily target progress, today's visit route, quick order punch, and pending tasks. Live Interface
Security & RBAC

12. Roles & Permissions

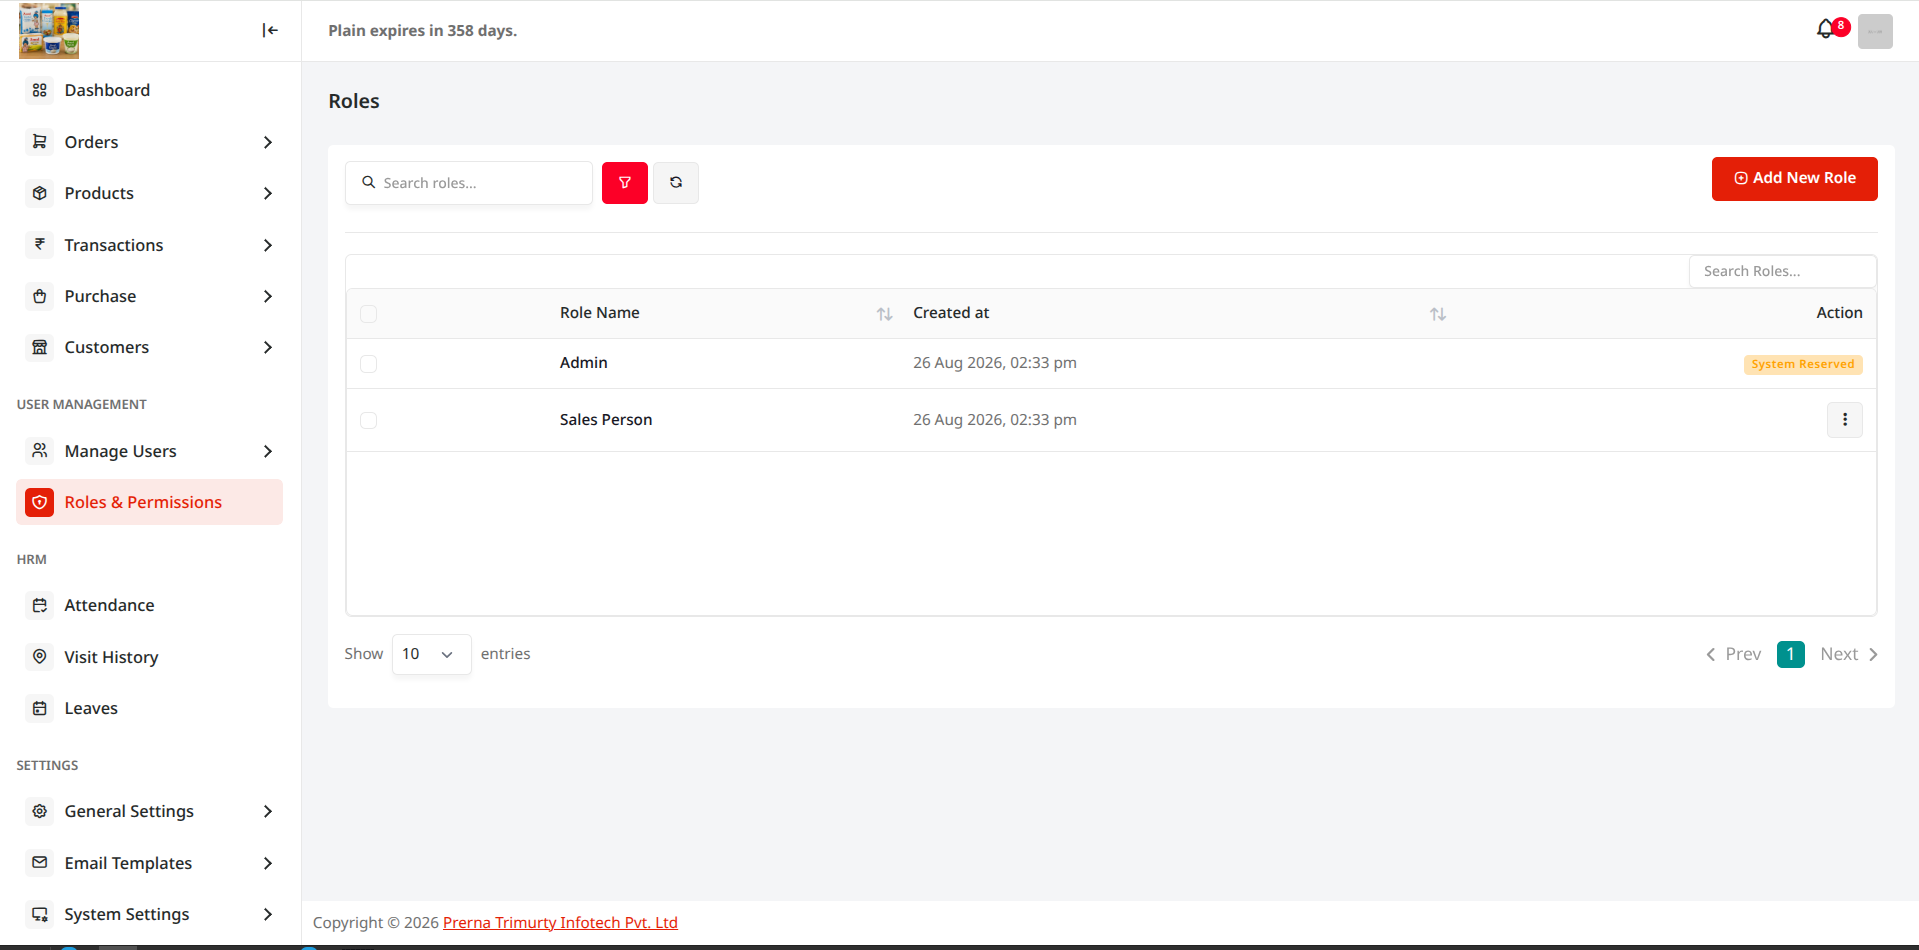
Configure granular Role-Based Access Control (RBAC). Create custom roles (e.g., Super Admin, Branch Manager, Sales Executive, Inventory Clerk, Accounts Auditor) with precise View, Create, Edit, Delete, and Export permissions for every module.
PTI CRM — Roles & Permissions Matrix
https://pticrm.com/roles
PTI CRM User Roles and Permissions
Figure 12.1: Role-Based Access Control configuration matrix with granular permissions per module. Live Interface
System Engine

13. System & General Settings

Configure system parameters, gateway credentials, tax schedules, stock holding timeouts, automated notification channels, app dashboards, role logins, and commission frameworks.

Setting Module Portal URL Primary Purpose
Account Information & Profile https://abc.pticrm.com/profile Organization name, address, GSTIN, and admin user credentials.
Email Settings https://abc.pticrm.com/email-settings Customizable email layout templates with merge fields.
Payment Gateways https://abc.pticrm.com/payment-gateways UPI, Razorpay, Stripe, and net banking gateway integrations.
SMS Setting https://abc.pticrm.com/sms-gateways SMS provider API keys and approved DLT template headers.
Stock Hold Settings https://abc.pticrm.com/stock-hold-settings Cart reservation timeout before automated inventory release.
GST Slab Setting https://abc.pticrm.com/gst-slab-settings Standard 0%, 5%, 12%, 18%, 28% tax rates and CGST/SGST splits.
Unit Settings https://abc.pticrm.com/product-units Product measurement units (Pcs, Kg, Box, Liter, Bag, Carton).
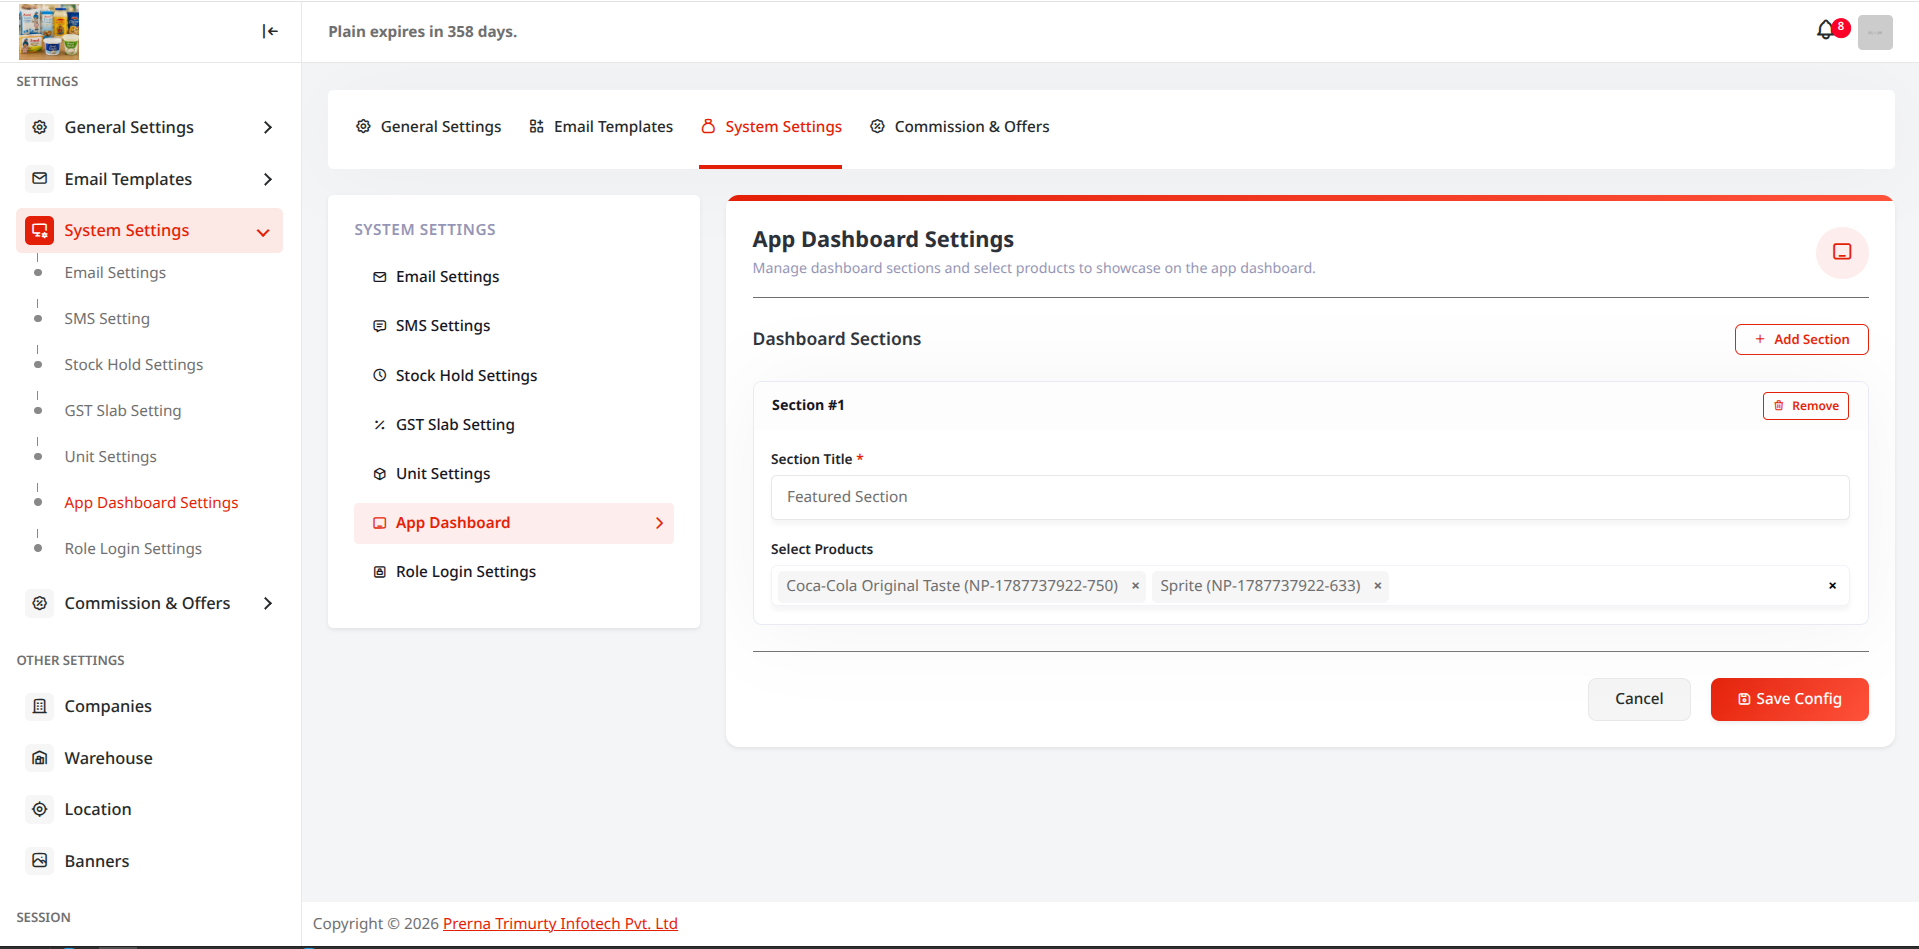
App Dashboard Settings https://abc.pticrm.com/app-dashboard-settings Configure card widgets, metric counters, and quick action tiles.
Role Login Settings https://abc.pticrm.com/role-login-settings Restrict mobile/web logins by role, IP whitelist, or device lock.
Commission & Offers https://abc.pticrm.com/commission-offers Sales executive tiered commission rates and sales targets.
Discounts https://abc.pticrm.com/discounts Coupon codes, volume discount slabs, and promotional pricing.
13.1 Account Information & Profile (https://abc.pticrm.com/profile) Profile & Setup

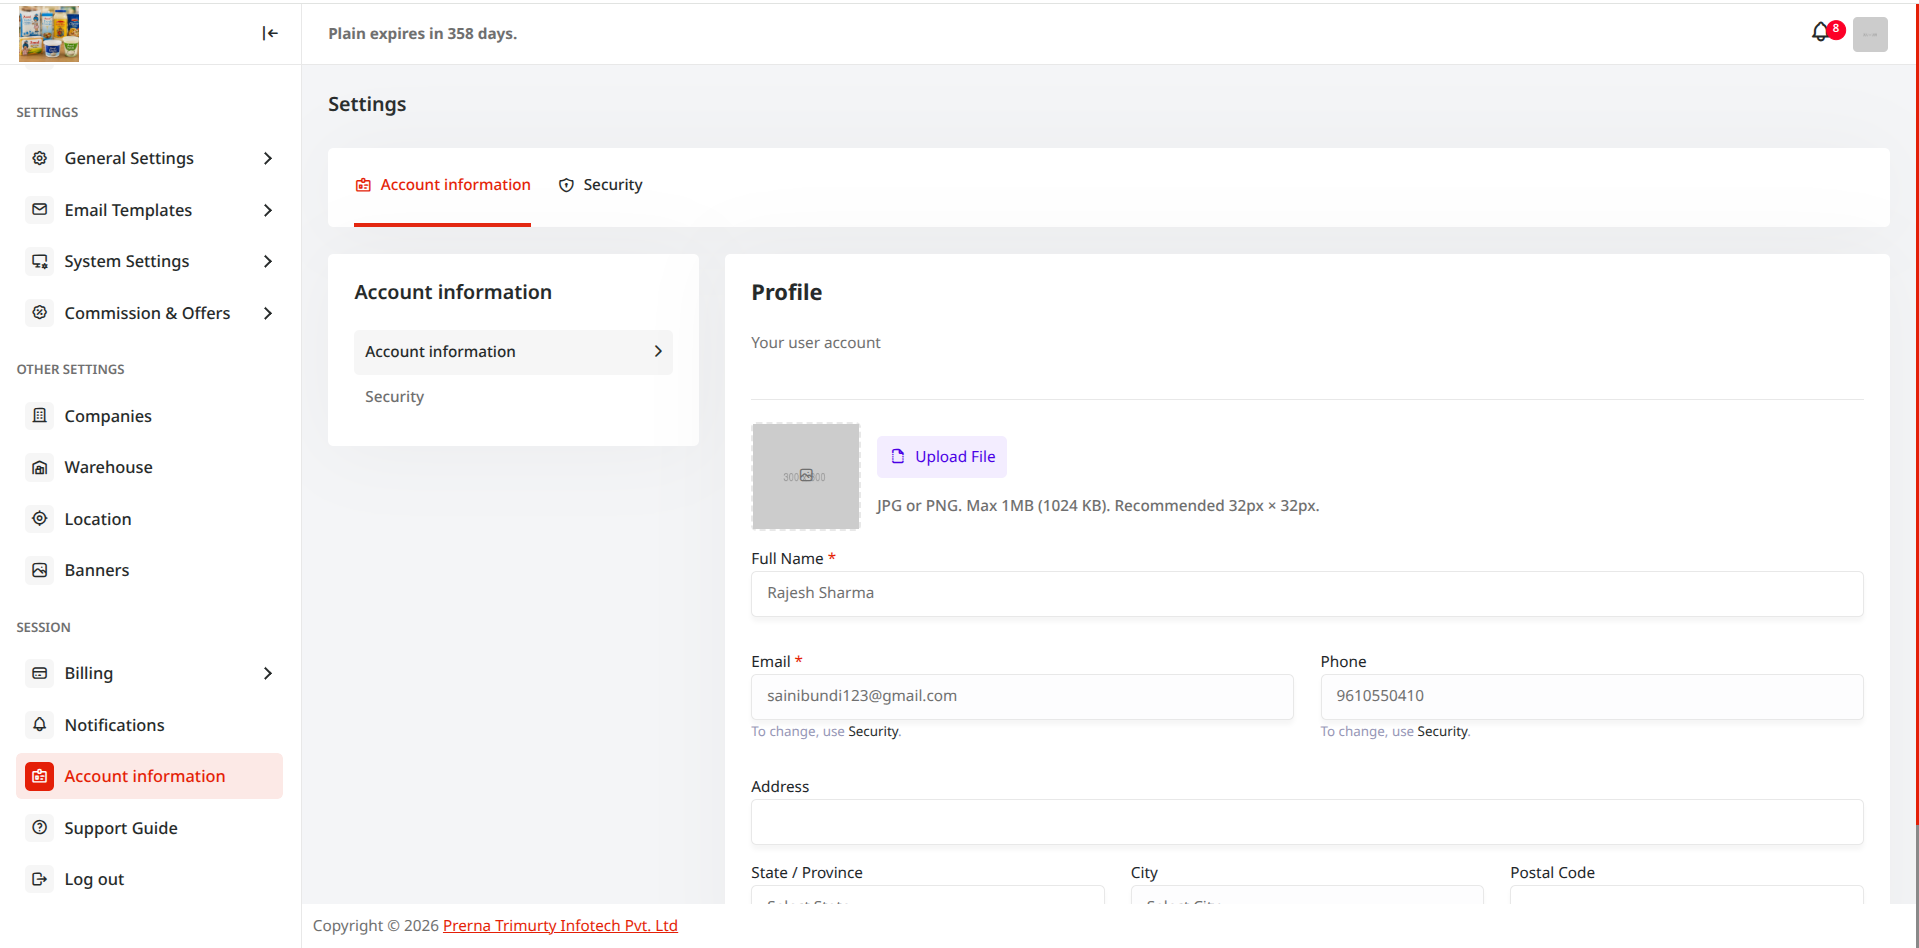
Manage company legal identity, registered business address, GSTIN, customer support phone, brand logo for invoice printing, and personal user password credentials.
PTI CRM Account Information and General Settings
Figure 13.1: General Settings and Account Information configuration panel.
13.2 Email Settings (https://abc.pticrm.com/email-settings) Automated Emails

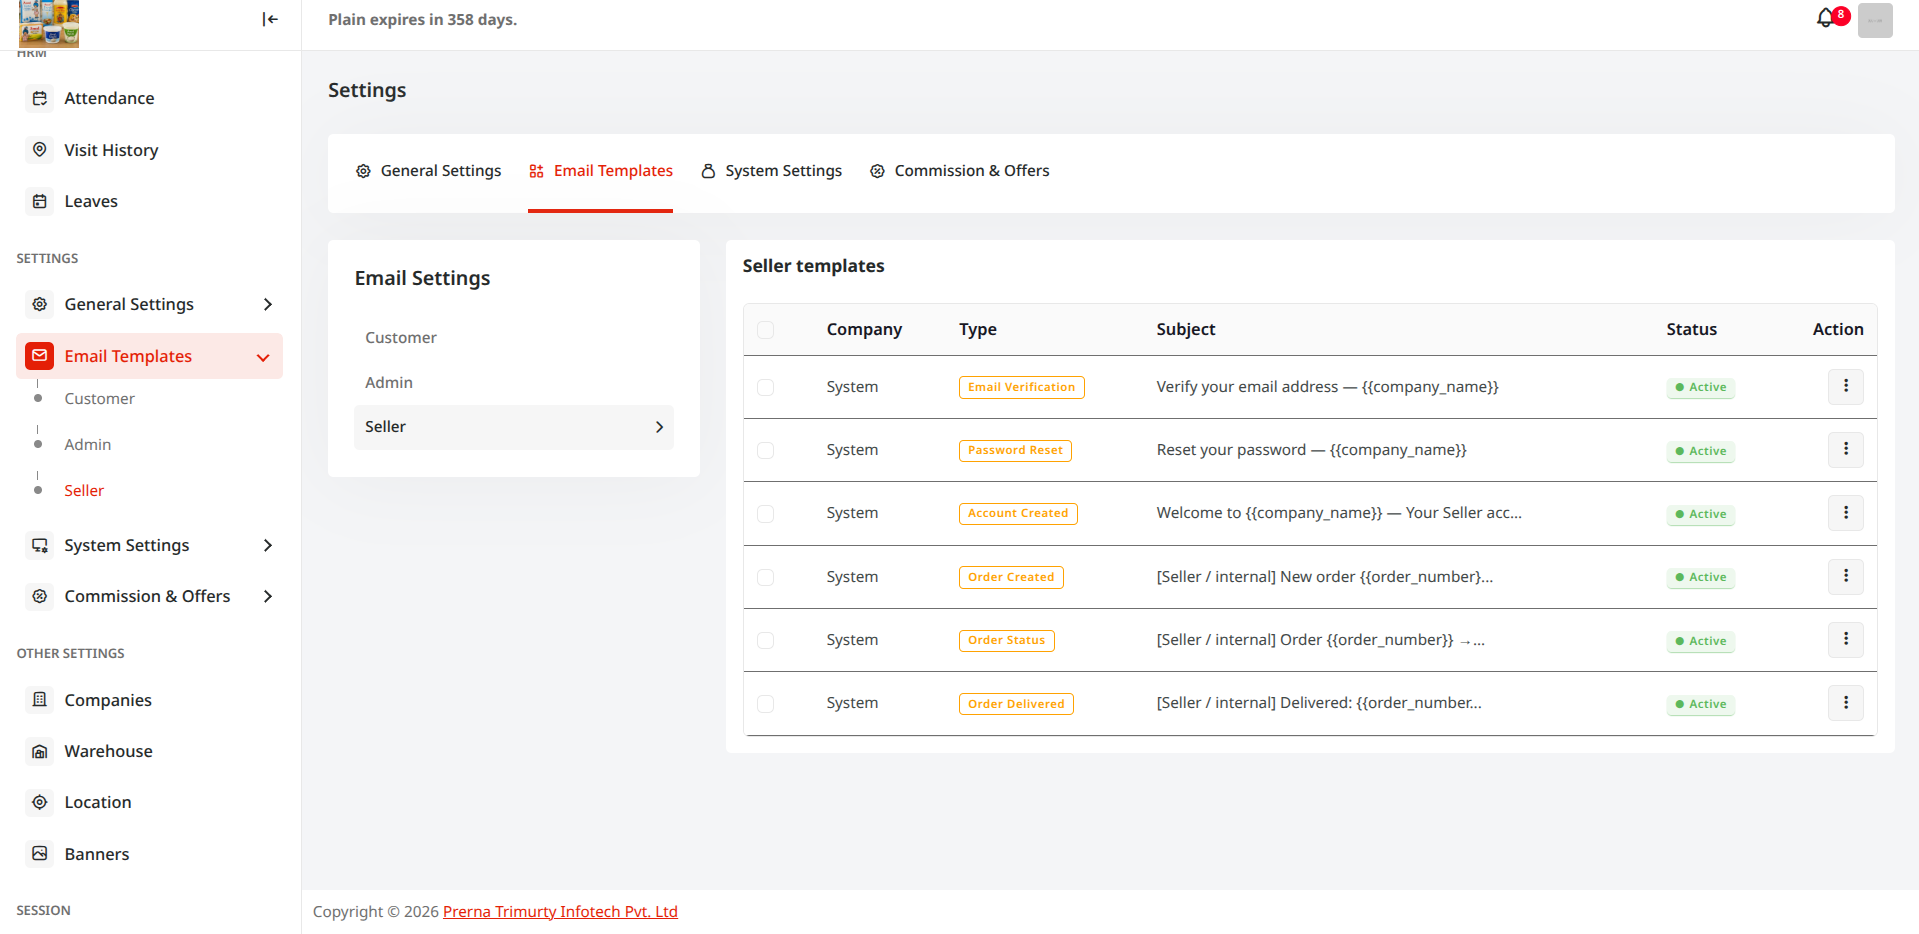
Customizable rich HTML email templates for Customer Order Confirmations, Invoice Dispatches, Low Stock Warnings, Password Resets, and Welcome Onboarding with dynamic merge tags (`{customer_name}`, `{order_id}`, `{total_amount}`).
PTI CRM Email Templates Settings
Figure 13.2: Email Templates management panel with dynamic merge tags and preview modes.
13.3 SMS Setting (https://abc.pticrm.com/sms-gateways) SMS Gateway

Connect your telecom SMS API gateway provider (Twilio, Gupshup, Textlocal, Fast2SMS) and configure approved DLT Entity IDs, Sender Headers (e.g. TRIMTY), and Template IDs for automated OTP and order status alerts.

13.4 Stock Hold Settings (https://abc.pticrm.com/stock-hold-settings) Inventory Rules

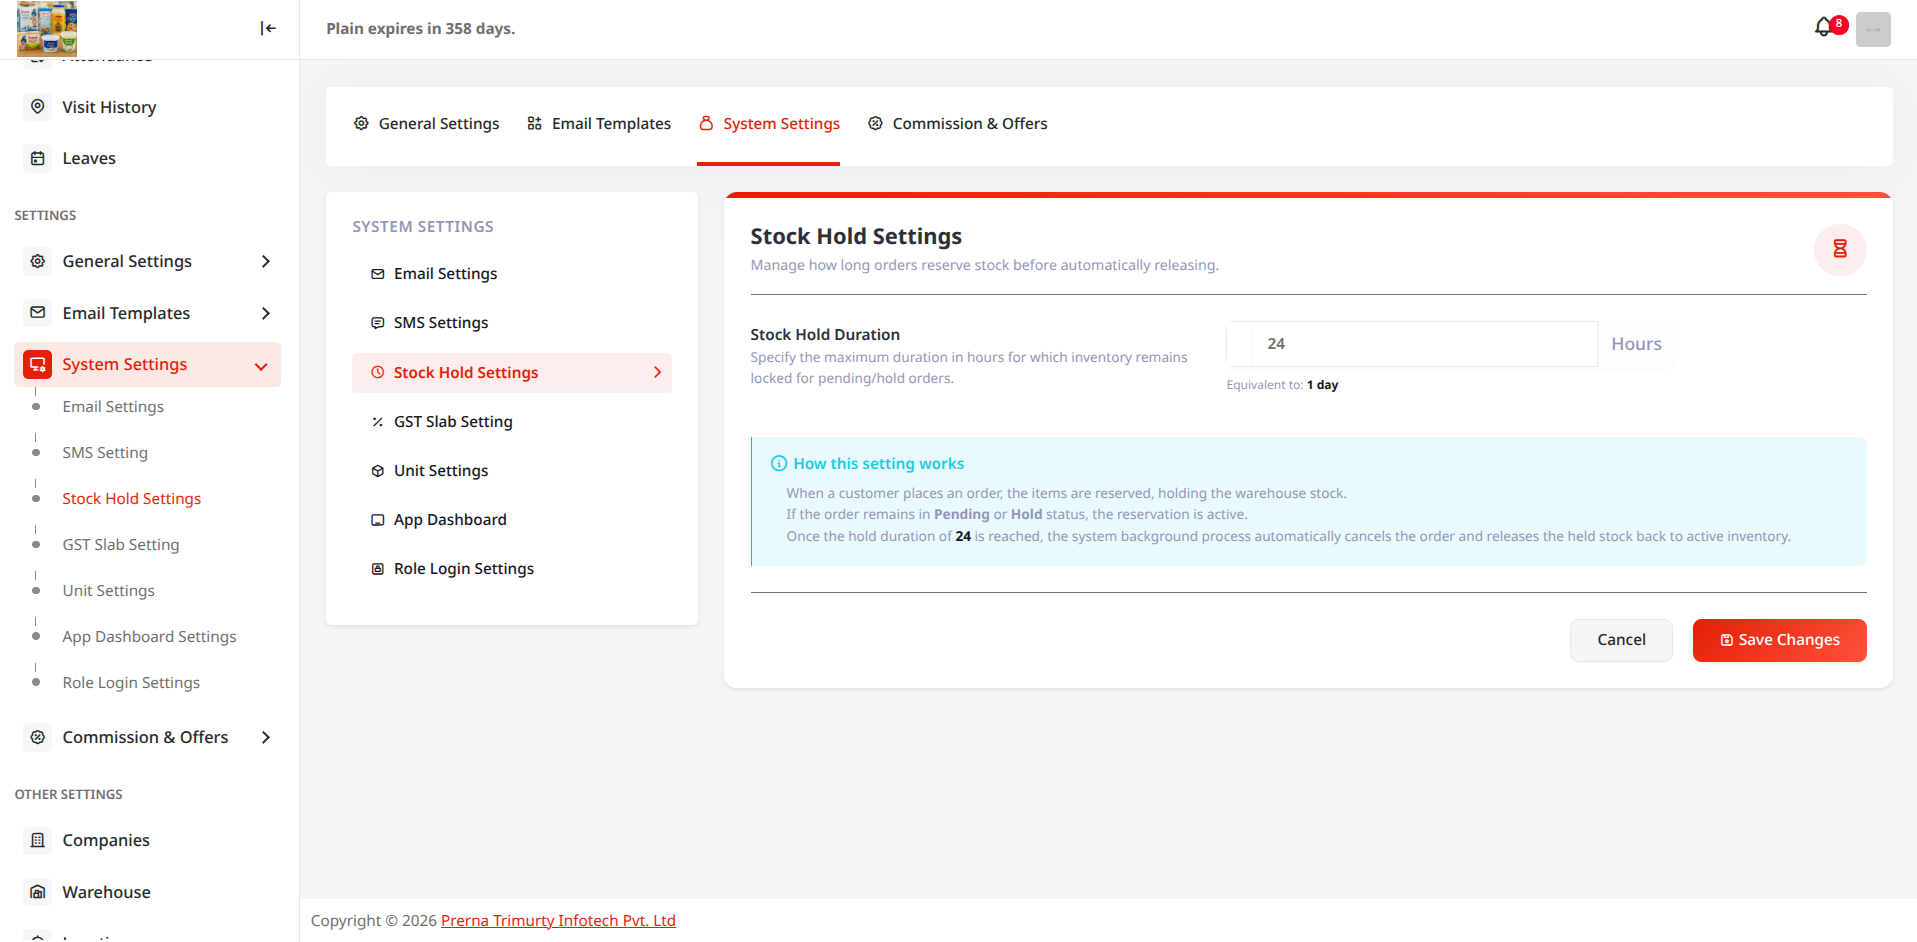
Define automated stock reservation durations. When a pending order or quotation is created, stock is held for the specified timeout period (e.g., 30 mins, 2 hours, 24 hours) before being automatically returned to available inventory.
PTI CRM Stock Hold Settings
Figure 13.4: Stock Hold configuration defining automated stock reservation timers and release rules.
13.5 GST Slab Setting (https://abc.pticrm.com/gst-slab-settings) Tax Master

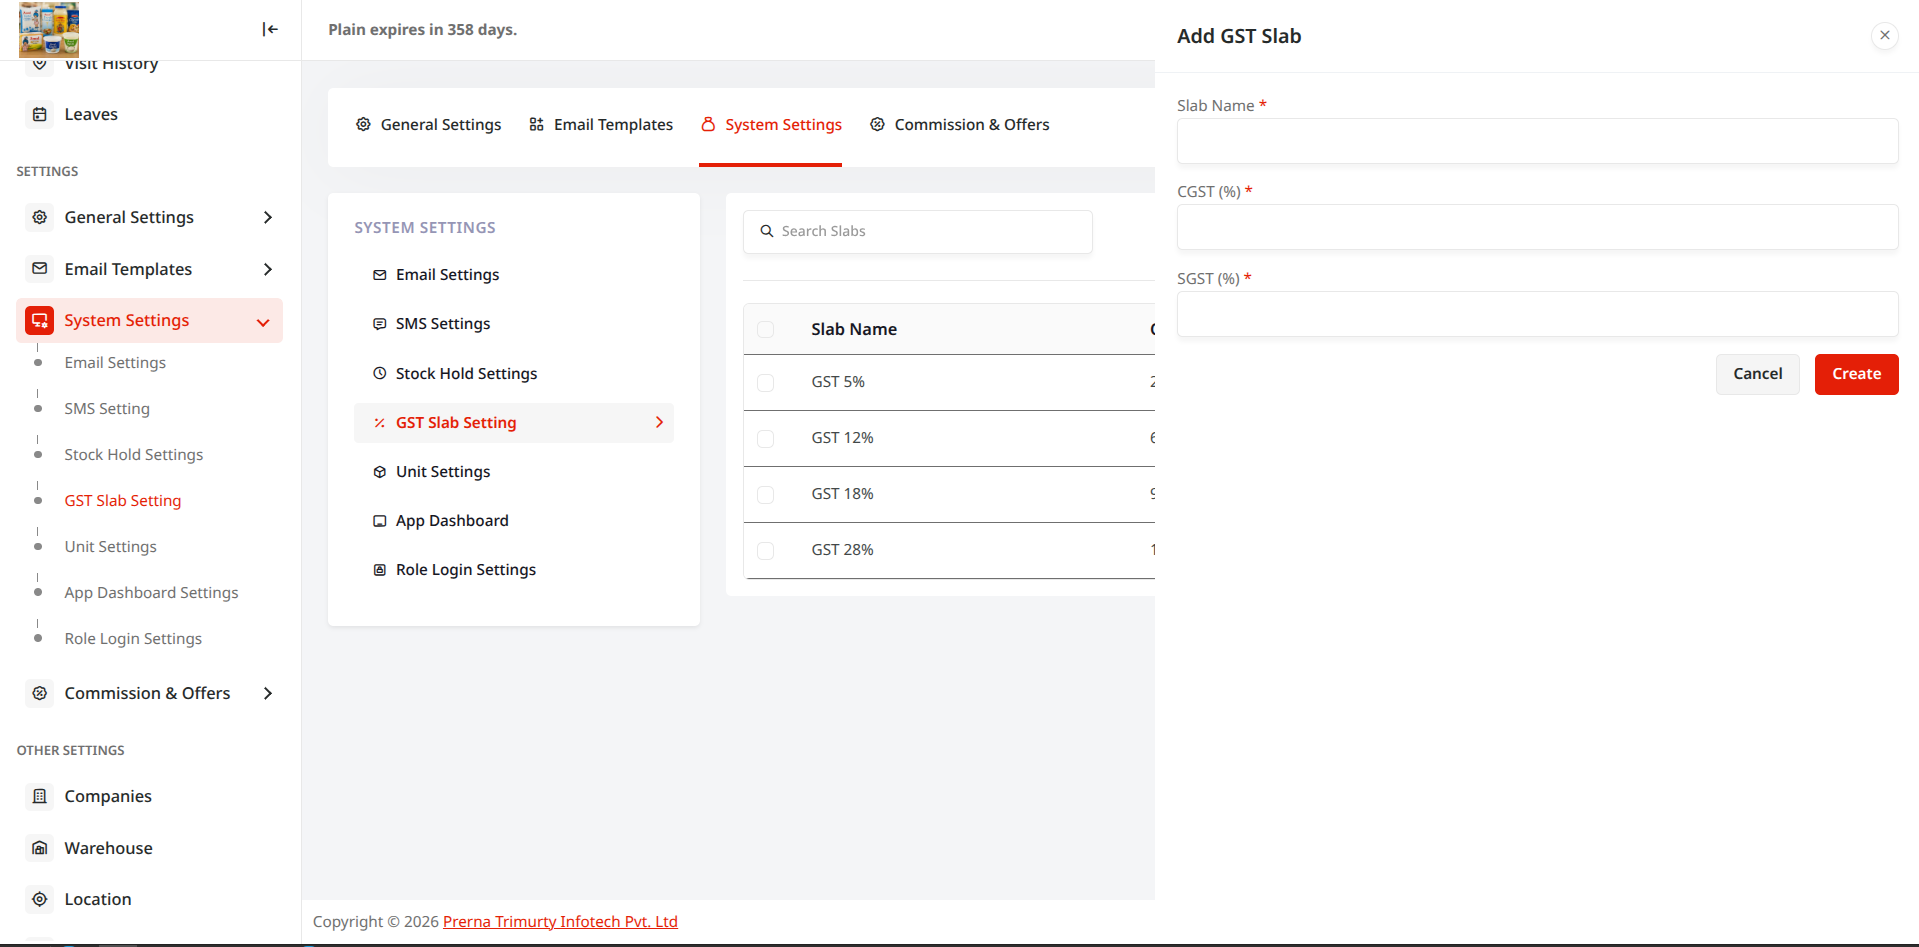
Configure standard GST tax brackets (0%, 5%, 12%, 18%, 28%) with automated CGST, SGST, and IGST calculation logic applied across customer purchase orders and invoices.
PTI CRM GST Slab Settings
Figure 13.5: GST Slab Settings interface with tax percentages and active status toggles.
13.6 Unit Settings (https://abc.pticrm.com/product-units) Measurement Master

Register standard units of measurement (Pieces, Kilograms, Grams, Boxes, Liters, Bags, Cartons) and define base conversion ratios for packaging and wholesale supply.

PTI CRM Unit Settings
Figure 13.6: Unit Settings master managing measurement unit codes and display titles.
13.7 App Dashboard Settings (https://abc.pticrm.com/app-dashboard-settings)

Configure which analytic KPI widgets, shortcuts, and route maps appear on sales representatives' mobile home screens.

PTI CRM App Dashboard Settings
13.8 Role Login Settings (https://abc.pticrm.com/role-login-settings)

Configure login permissions per role (e.g. Sales Persons restricted to mobile app, Admins allowed on web portal, single active session limits).

PTI CRM Role Login Settings
13.9 Commission & Offers (https://abc.pticrm.com/commission-offers)

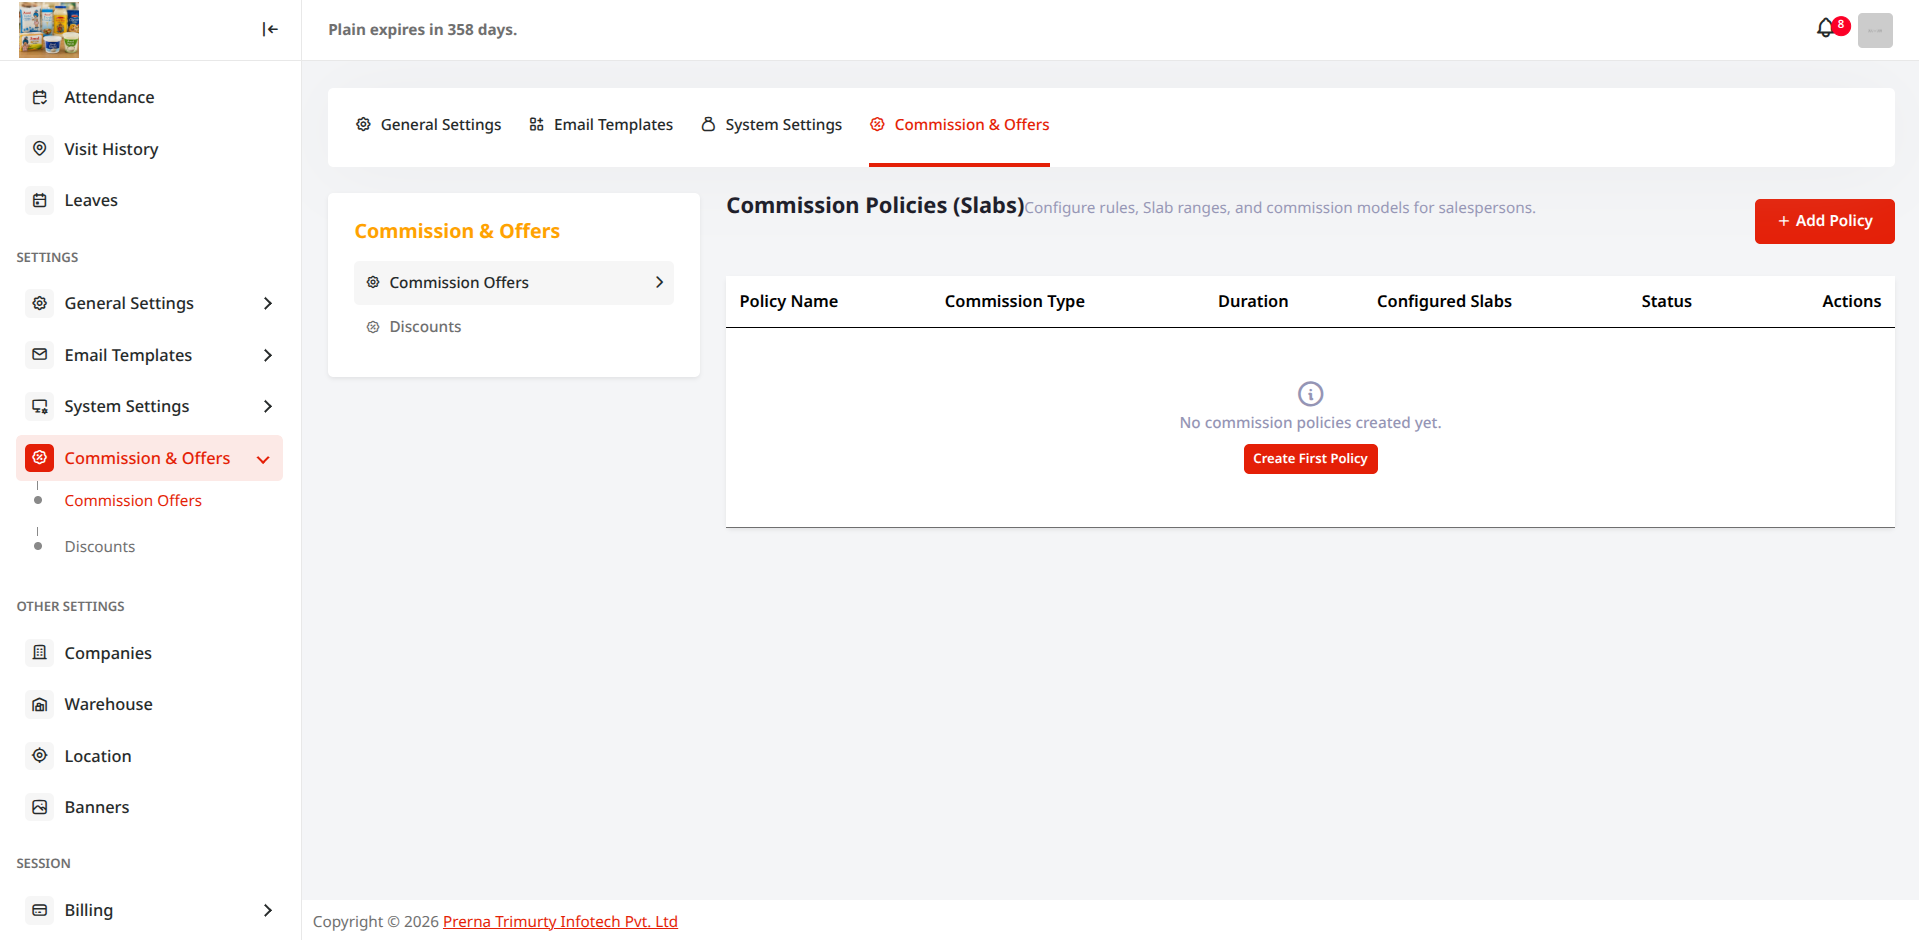
Establish field sales representative performance tiers, volume commission incentives, and seasonal bonuses.
PTI CRM Commission & Offers

Create promotional coupon codes, percentage discounts, flat cashbacks, and customer order value thresholds.
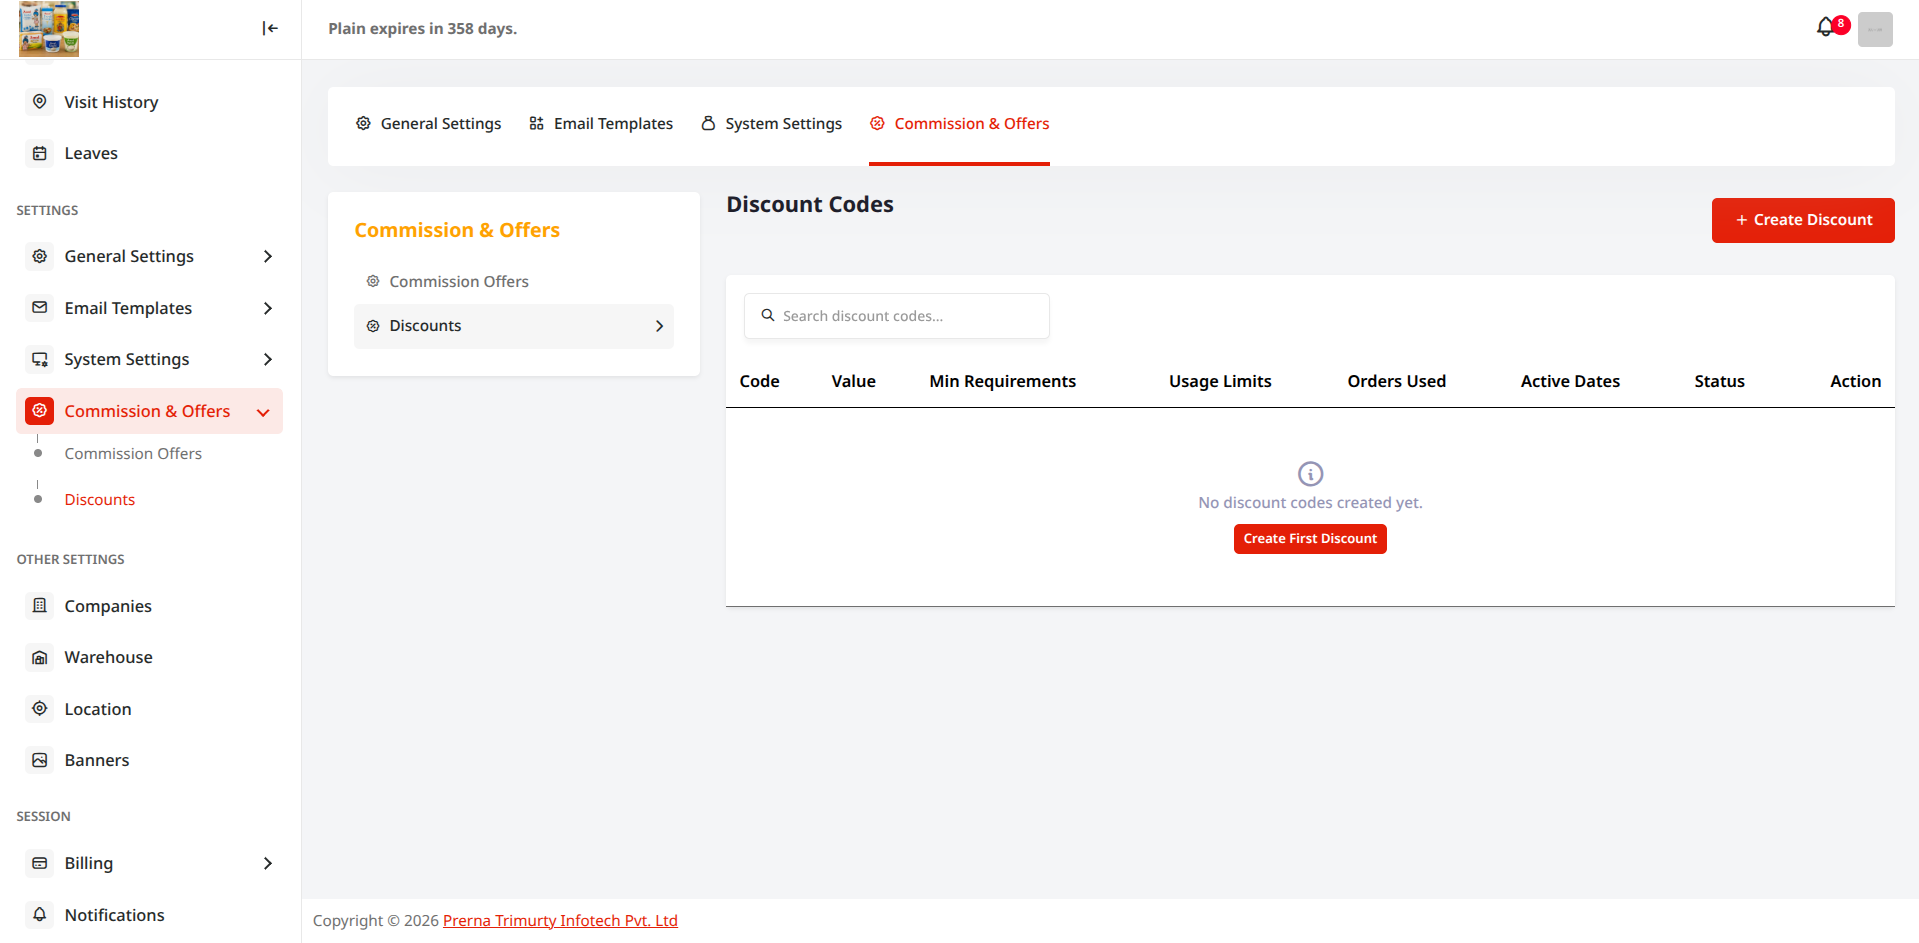
PTI CRM Discounts Settings
13.11 Notifications & System Alerts (https://abc.pticrm.com/notifications) Audit Log

Comprehensive notifications stream logging high-value payments, low stock warnings, order cancellations, and automated transactional dispatches (`/notifications`).
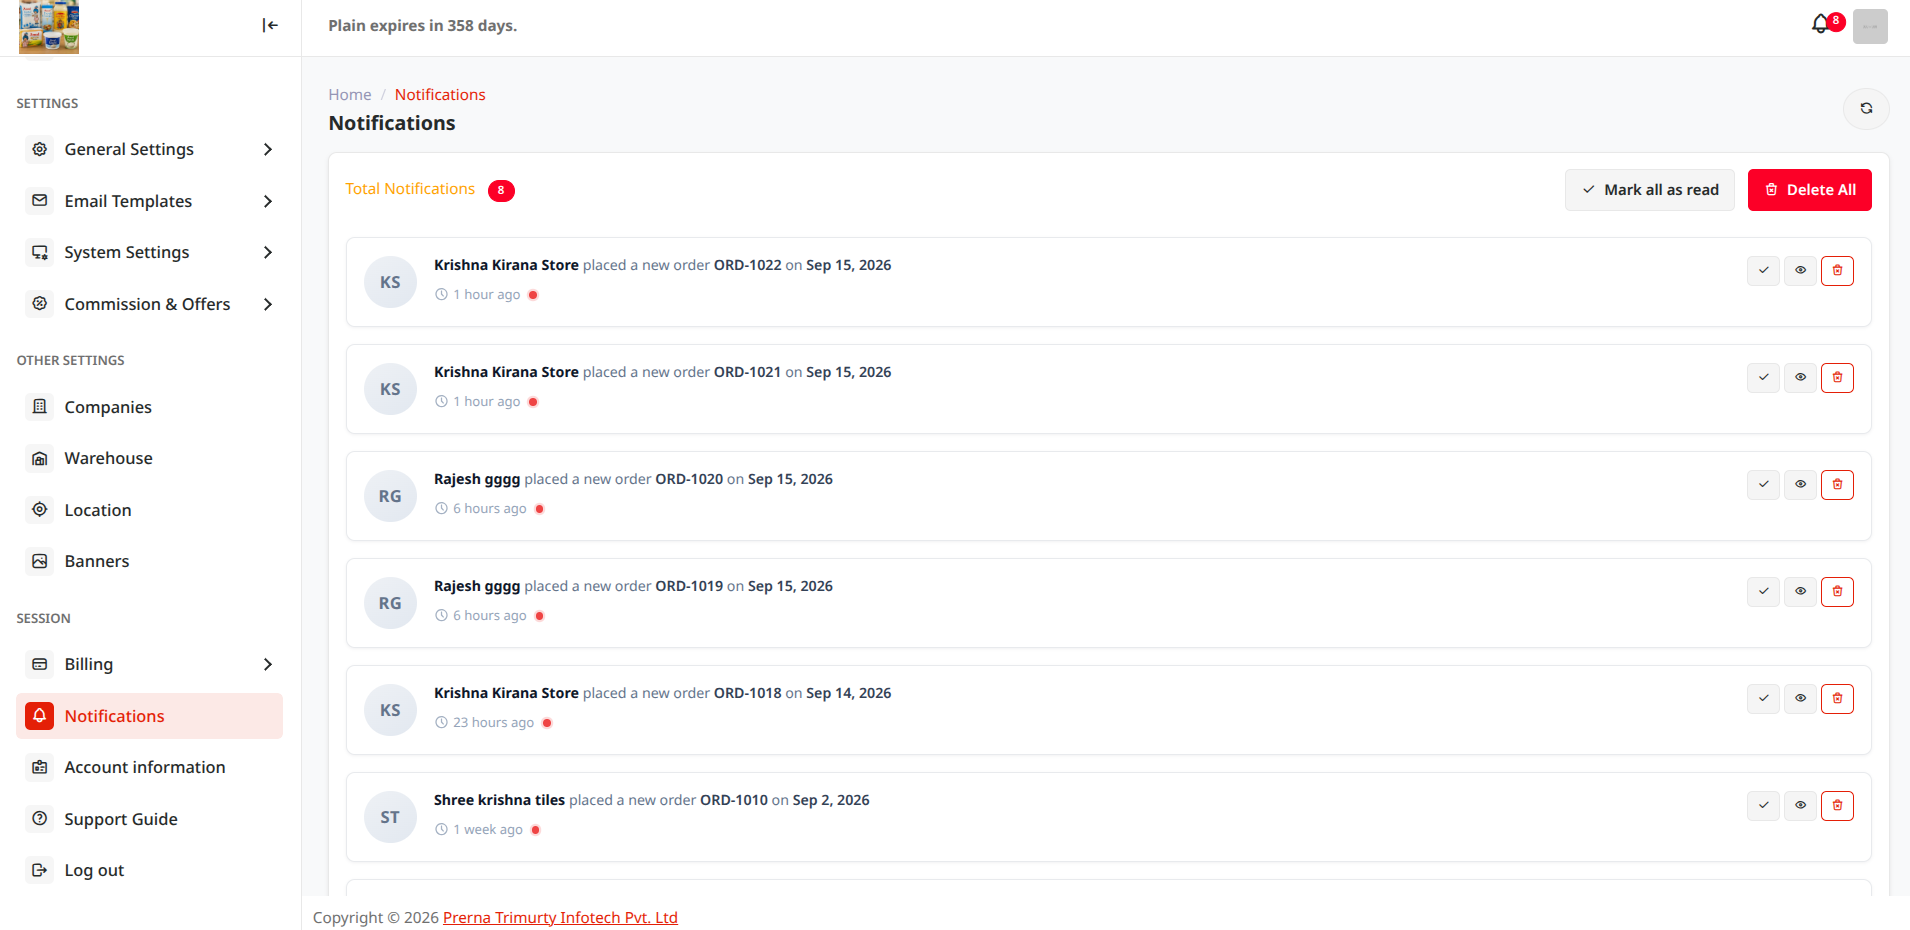
PTI CRM Notifications Feed
Figure 13.11: Real-time Notifications log with event timestamps and status alerts.
Workforce & Marketing

14. HRM & Field Operations

Empower your field workforce with GPS-verified mobile attendance, on-site client visit route histories, leave management, territory zones, and mobile marketing banners.

14.1 Visit History Field Sales Telemetry

Track on-site client visits conducted by field sales representatives. Review customer visit timestamps, verified GPS check-in/out coordinates, client meeting outcome notes, and booked on-site order drafts.
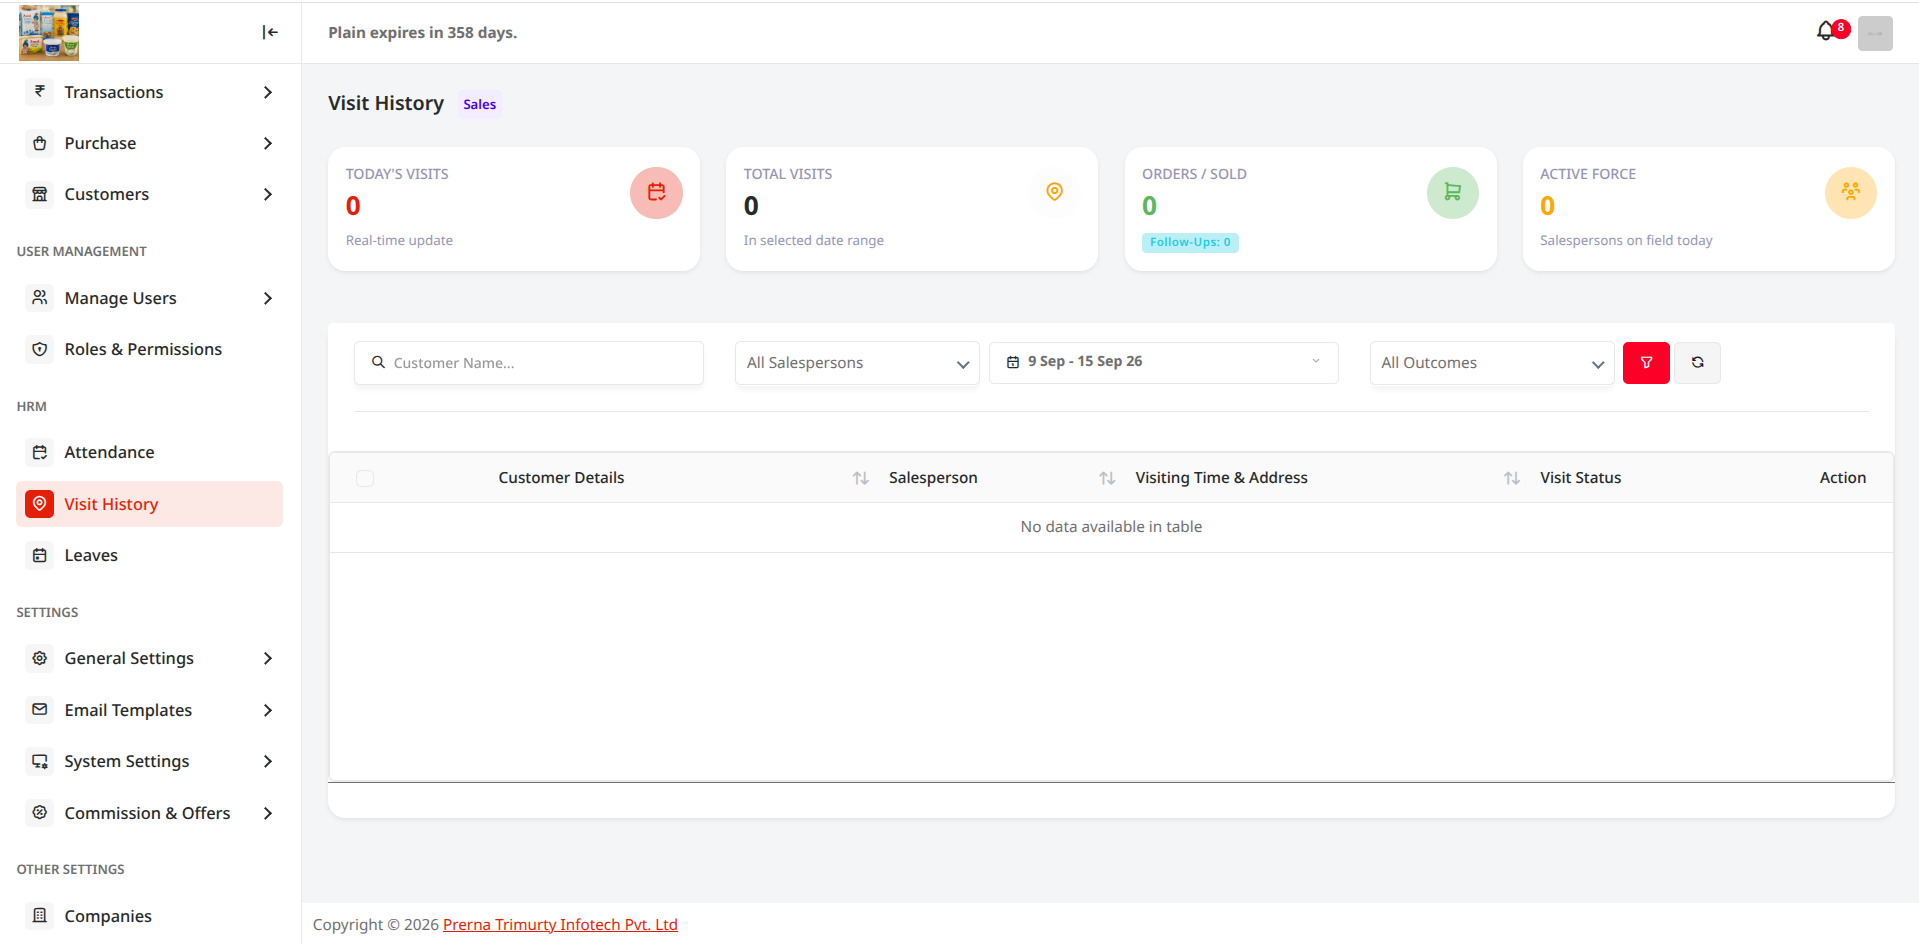
PTI CRM Visit History
Figure 14.1: Visit History log showcasing GPS-verified client check-ins, sales rep timelines, and visit remarks.
14.2 Leaves HRM Workflow

Streamlined employee leave application and manager approval system. Track leave quotas (Casual Leave, Sick Leave, Paid Leave), view calendar schedules, and maintain audit logs.
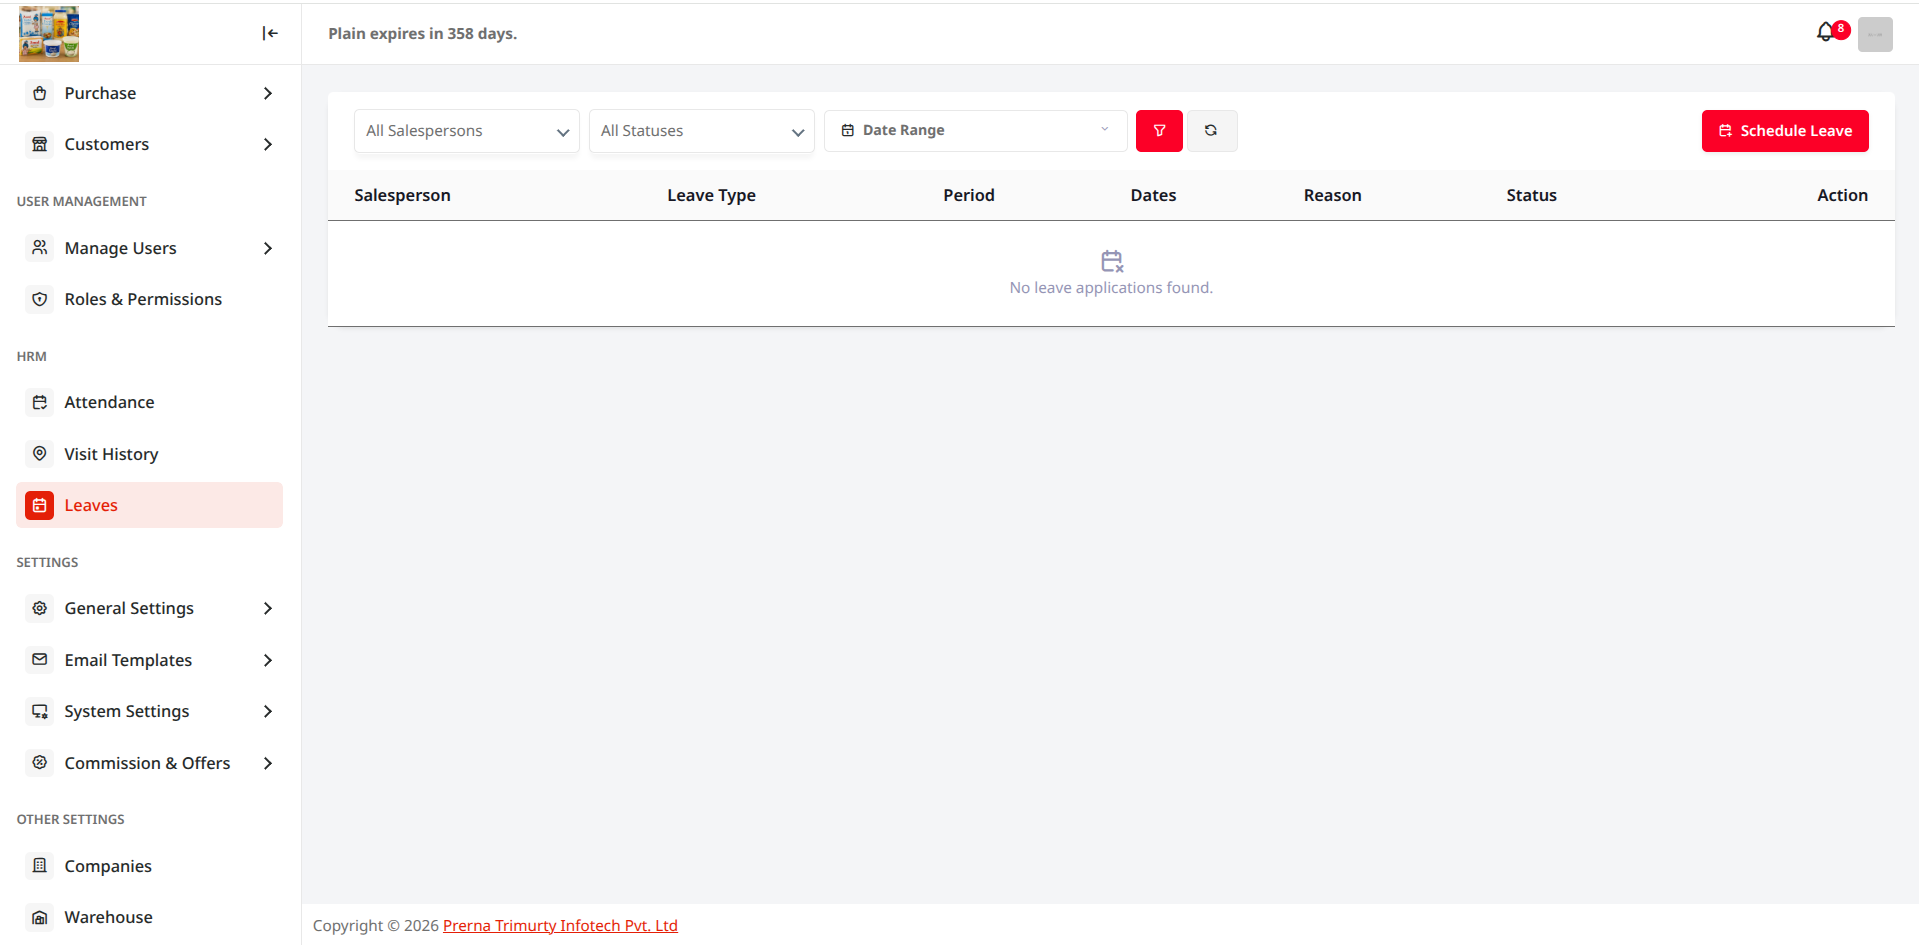
PTI CRM Leaves Management
Figure 14.2: Leave requests dashboard with approval status badges, leave balances, and date ranges.
14.3 Attendance Time & Attendance

Real-time workforce attendance tracking with GPS geofencing. Field agents punch daily clock-in and clock-out via mobile, recording location coordinates, total work hours, and late marks for payroll calculations.
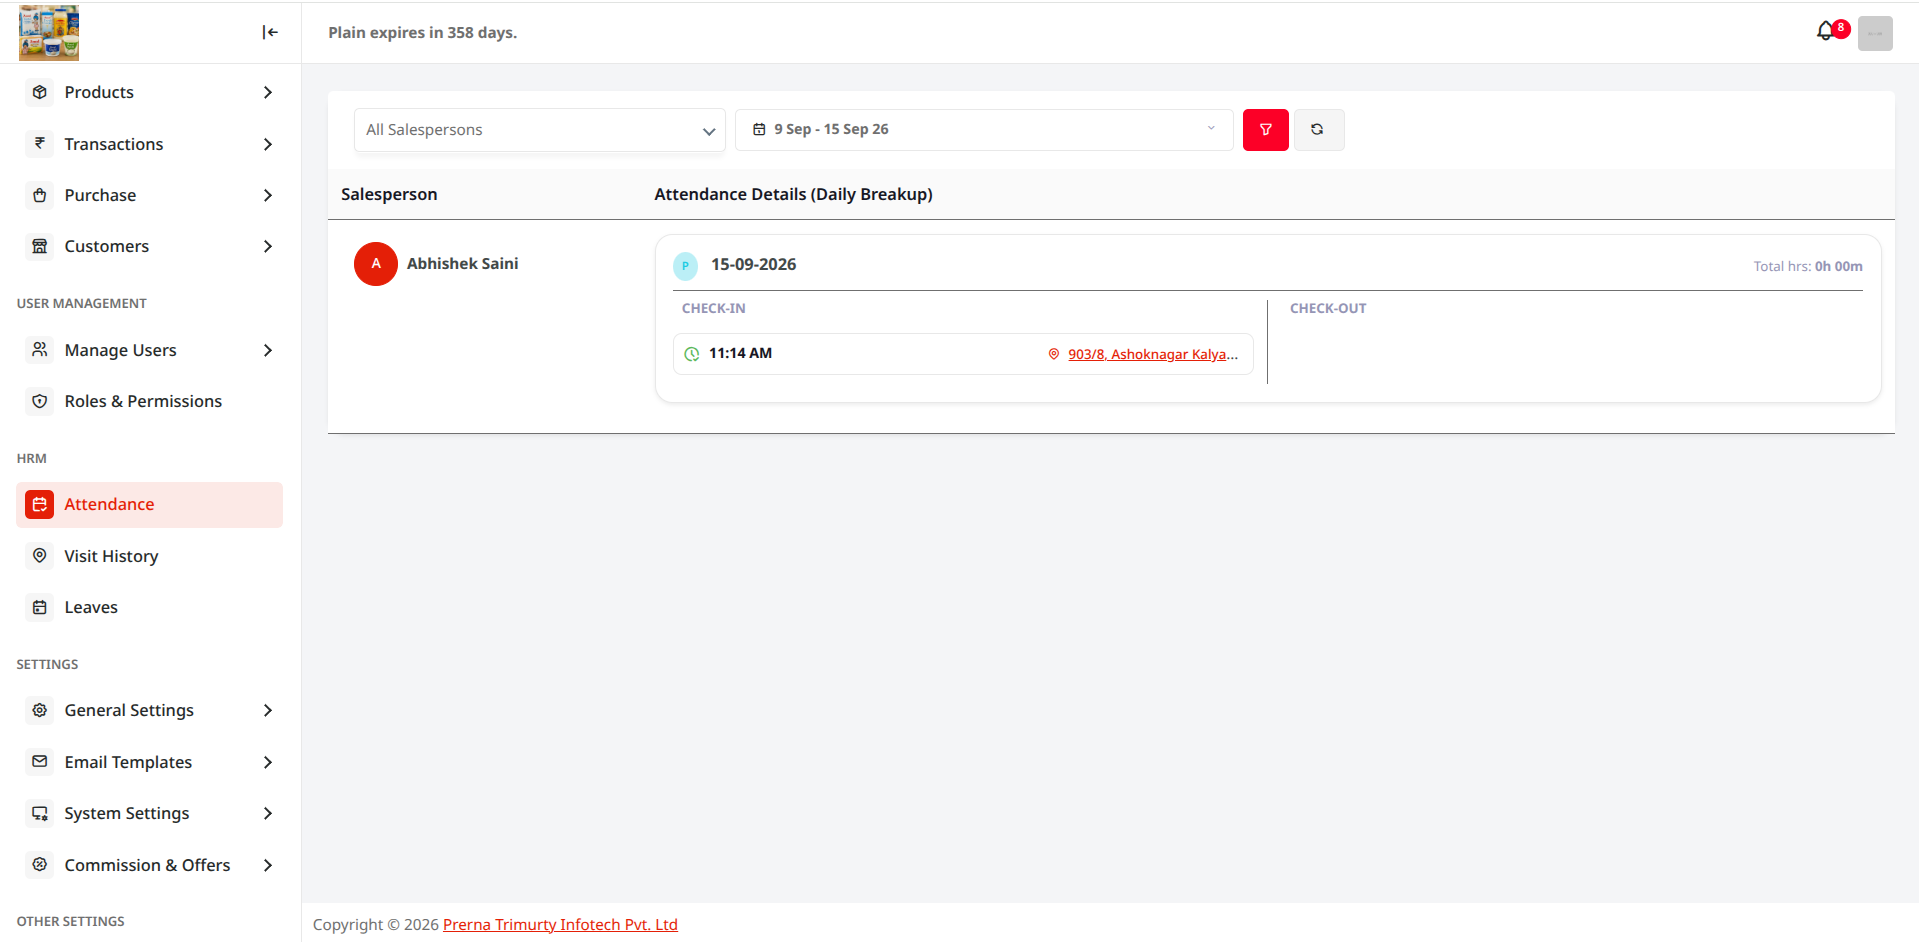
PTI CRM Attendance
Figure 14.3: Attendance register with daily clock-in/out timestamps, GPS coordinates, and status logs.
14.4 Location & Territories Geographic Hierarchy

Manage geographic master hierarchies (Country, State, City, Territory Zones, and Beat Routes). Map sales representatives to distinct sales territories for automated routing and localized commission models.
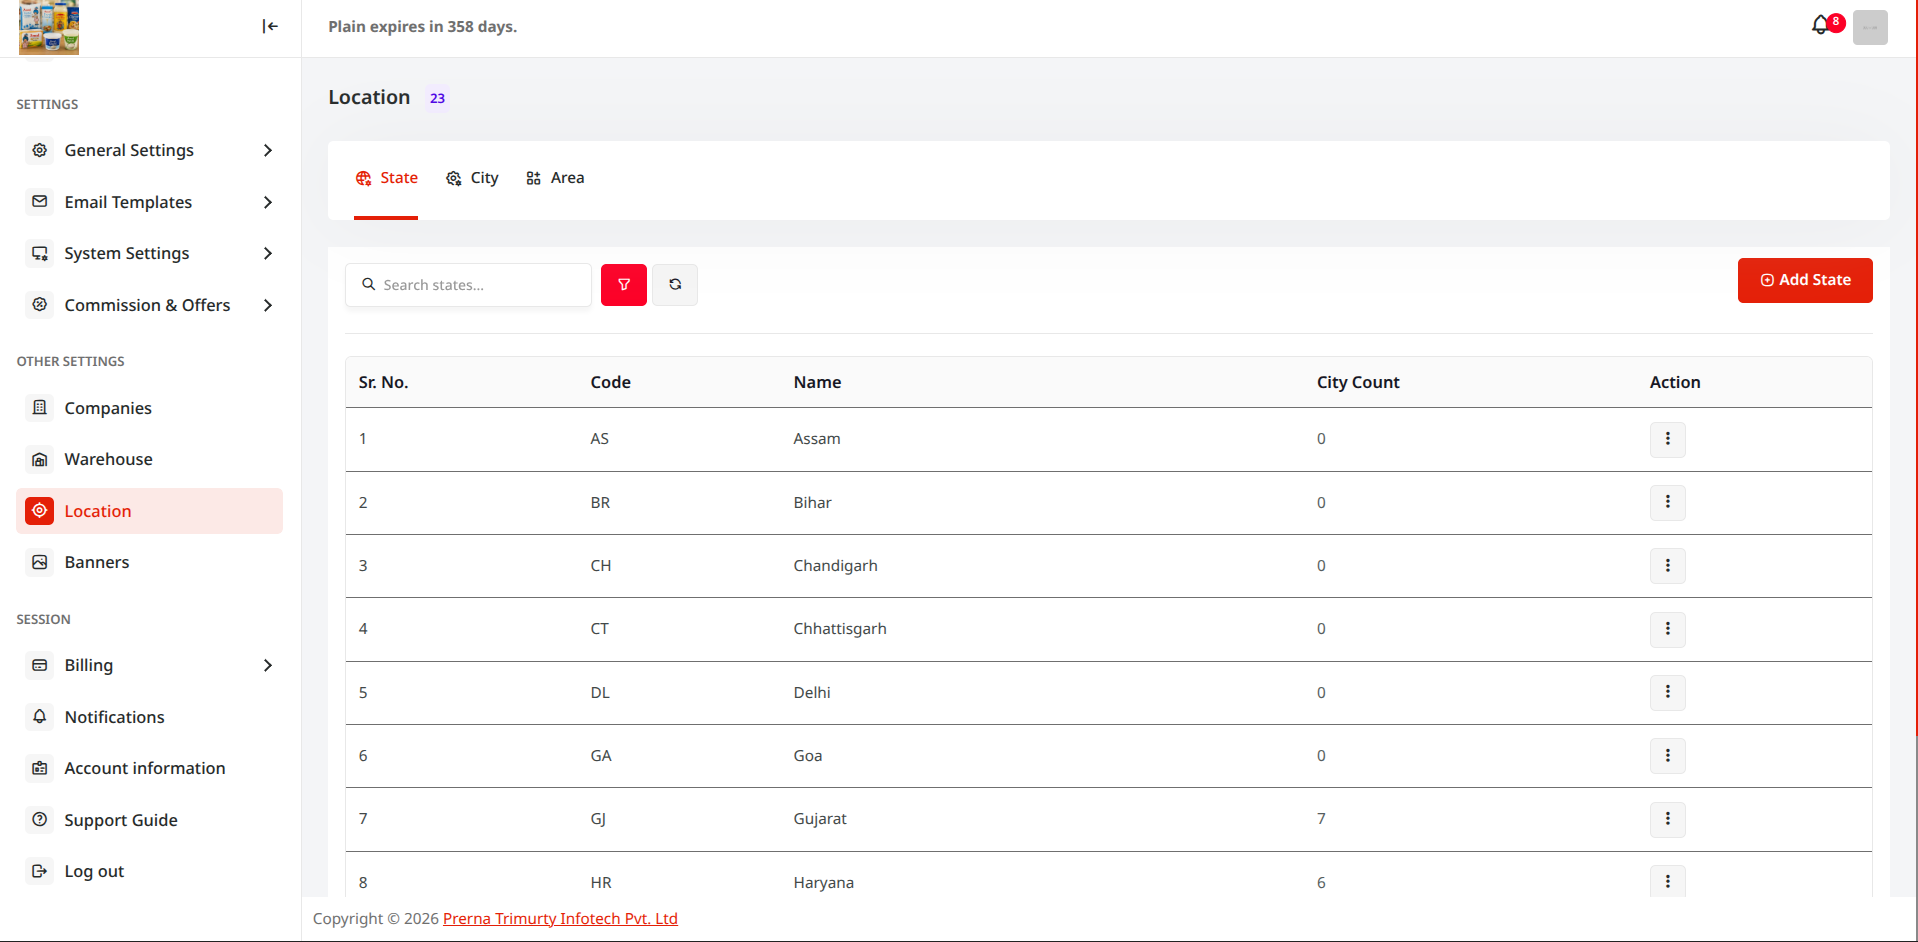
PTI CRM Locations Setup
Figure 14.4: Location master managing state, city, and geographic sales beat territories.
14.5 Banners & Marketing Sliders Mobile Catalog Banners

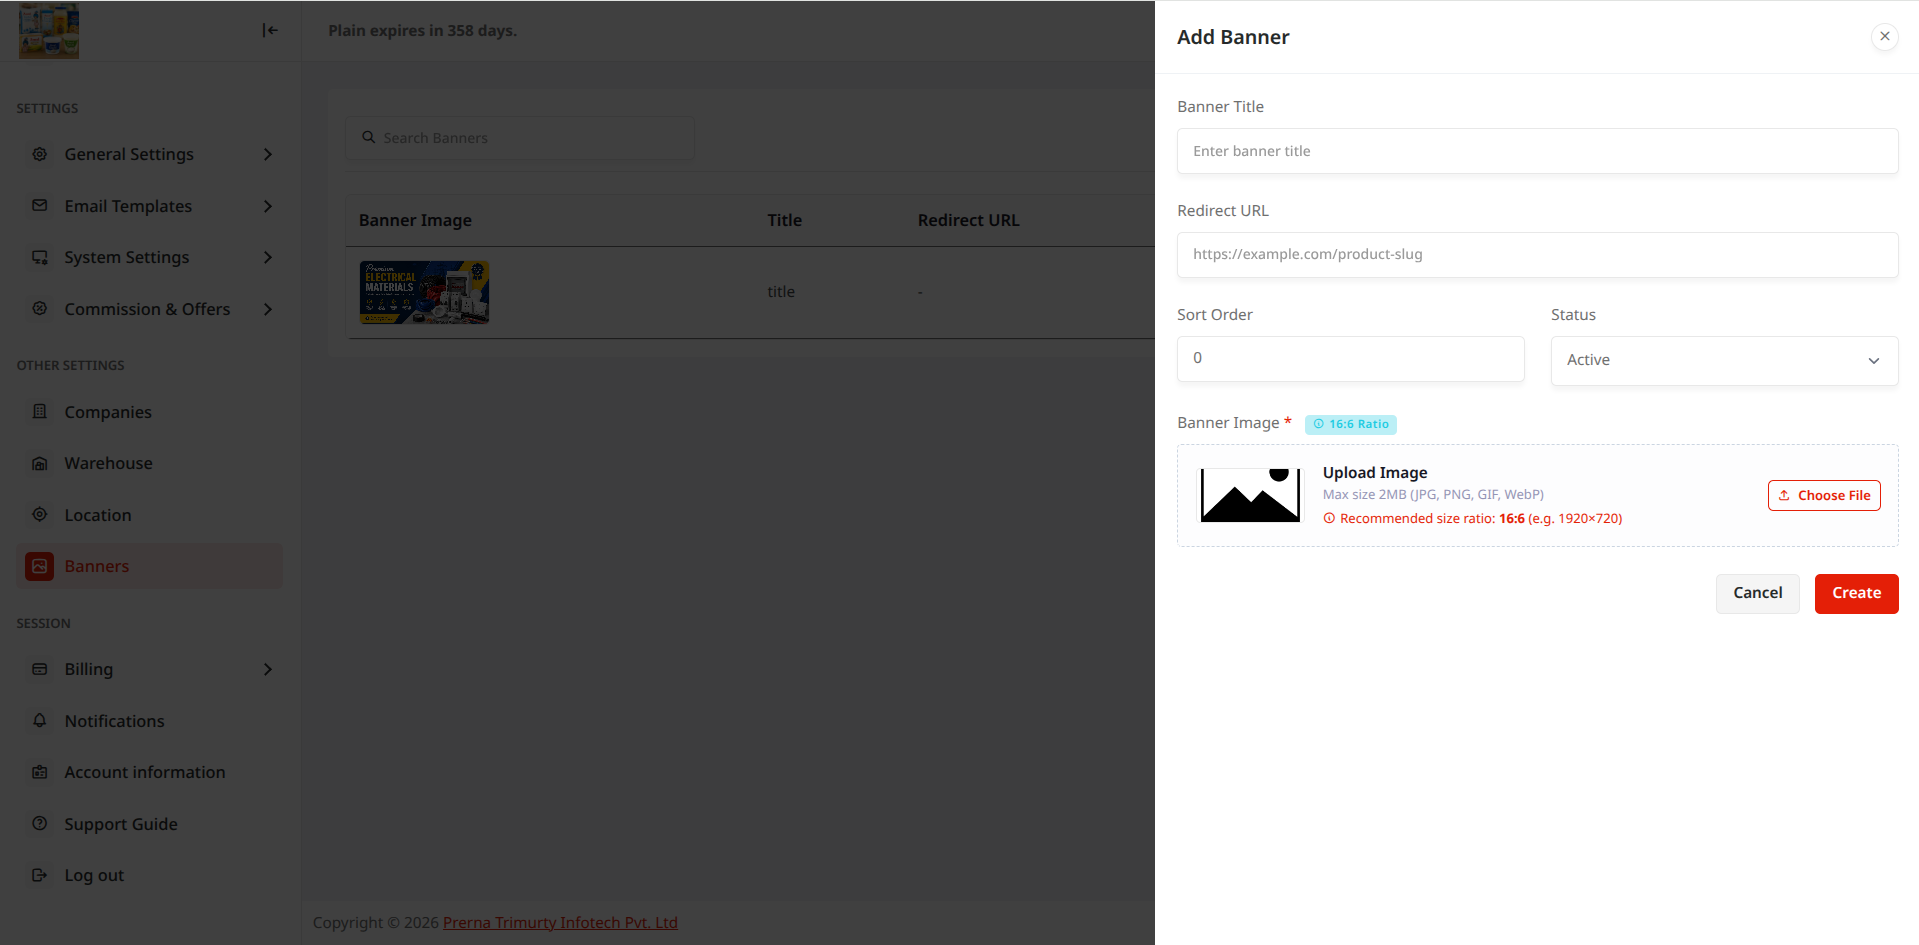
Upload marketing banners, seasonal promotions, and promotional flyers displayed on top of the customer-facing mobile ordering app and dealer portal.
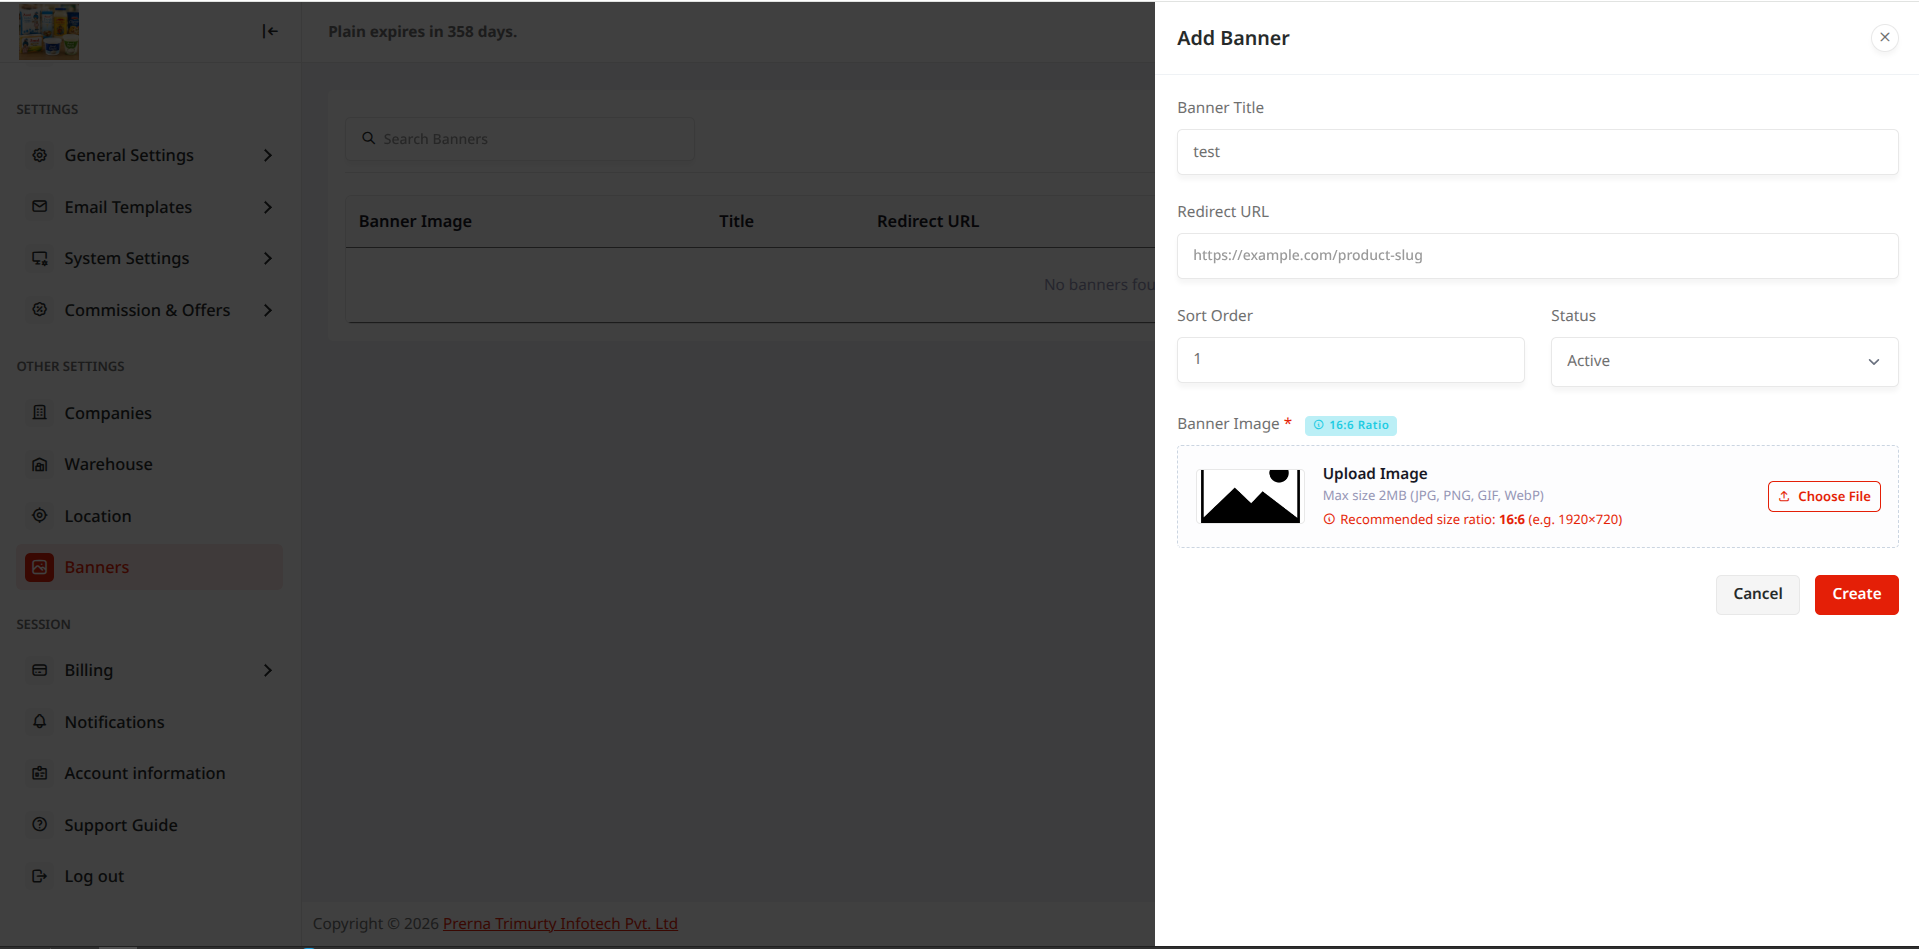
PTI CRM Marketing Banners List
Figure 14.5A: Banners Directory list showing active promo banners and view order.
PTI CRM Add New Banner Modal
Figure 14.5B: Add New Banner modal: Upload banner graphic, set target link, and active status.